|
|
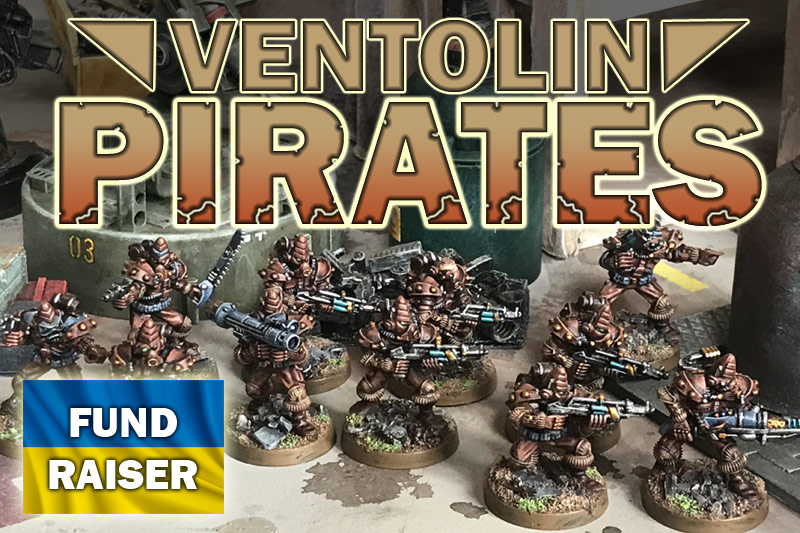
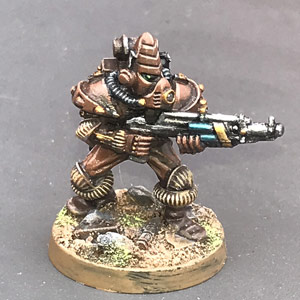
New Ventolin Pirate breacher squad. Armed with a selection of close combat weapons, these are the perfect addition to the basic squad released in 2023. What’s more, all money raised will be going to help Ukraine defend itself. Some of these sculpts were sponsored by Thaddeus Moore and Jochen Heidersdorf – many thanks to them for their additional support.
How to Buy
- Price £20 for 10 STLs or only £10 if you have already bought the first squad.
- These are the 3D files for you to 3D print for personal use, they are not physical models. To purchase, email warfactoryuk@gmail.com and I will send you payment instructions and a dropbox link.
- £20 to commission your own variant. This could be a specific pose, a new weapon, a new helmet/shoulder pad detail. Get in touch with your description or sketch and I will confirm whether it’s feasible.
- Sorry – no physical casts of these are currently available.
 All proceeds from the sale of these STLs will be donated to Dzyga’s Paw – who are fund raising to buy drones and other equipment for the Ukrainian military. Drones are critical for reconnaissance and targeting, and are easily lost due for reasons such as battery failure and jamming. Saving Ukrainian lives means keeping them well supplied. The first squad has raised over £800, so let’s keep going. All proceeds from the sale of these STLs will be donated to Dzyga’s Paw – who are fund raising to buy drones and other equipment for the Ukrainian military. Drones are critical for reconnaissance and targeting, and are easily lost due for reasons such as battery failure and jamming. Saving Ukrainian lives means keeping them well supplied. The first squad has raised over £800, so let’s keep going.
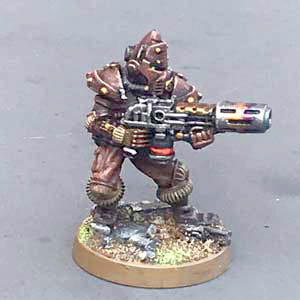 WF-P16A – Breacher with Melta 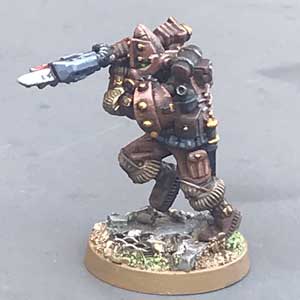 WF-P14A – Breacher charging with Axe 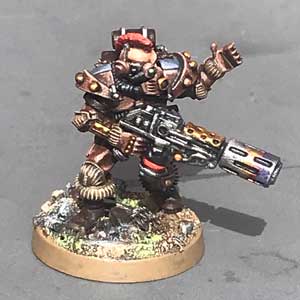 WF-P17A – Leader with Melta 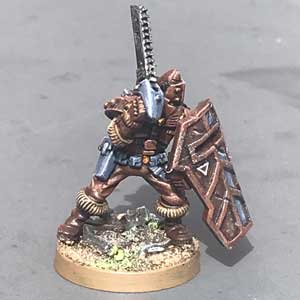 WF-P18A – Breacher with chainsaw and shield 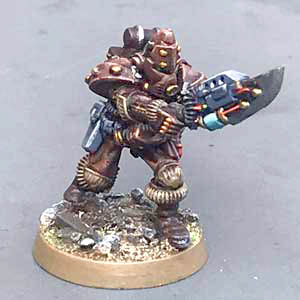 WF-P19A – Breacher chopping with axe 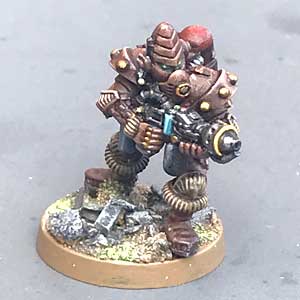 WF-P20A – Trooper with Flamer  WF-P21A – Trooper walking with Shotgun 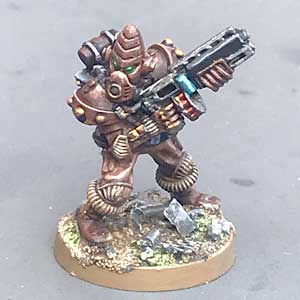 WF-P22A – Trooper with raised Shotgun 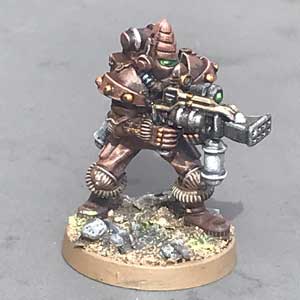 WF-P23A – Trooper with Webber 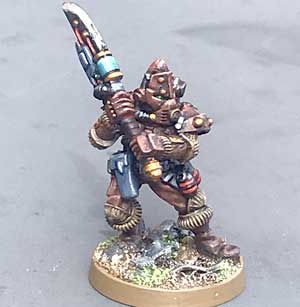 WF-P13A – Breacher swinging axe
 Exclusive Ventolin Pirate Captain Last year I launched a fundraiser for Ukraine with STL files based on the classic 80s Ventolin model. I’m delighted to say that it has already raised over £800, with a second wave being launched shortly.
To help publicise it, I created an exclusive sculpt which is available free to anyone who paints some of the squad and then blogs/posts them on social media (and is not available any other way). It’s been fascinating to see the different colour schemes that you all have chosen – thanks to everyone who has participated. I thought I’d collect them up here – please contact me if you have one to add.
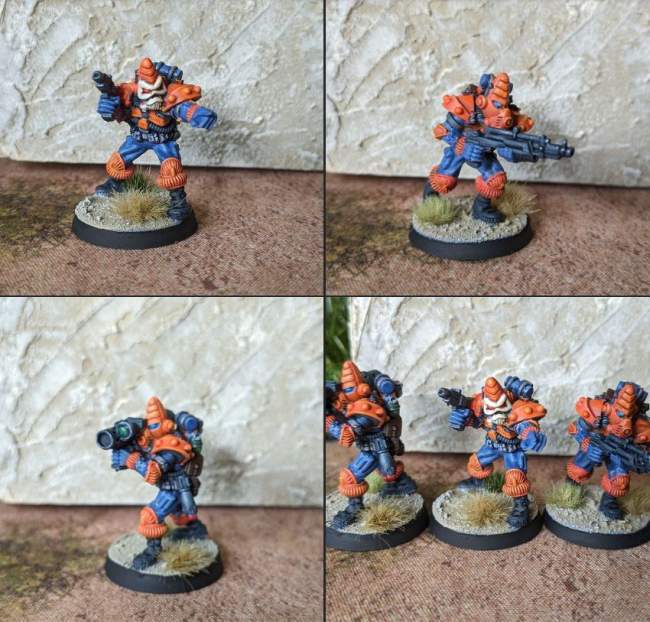 James Holloway (Monster Man podcast) 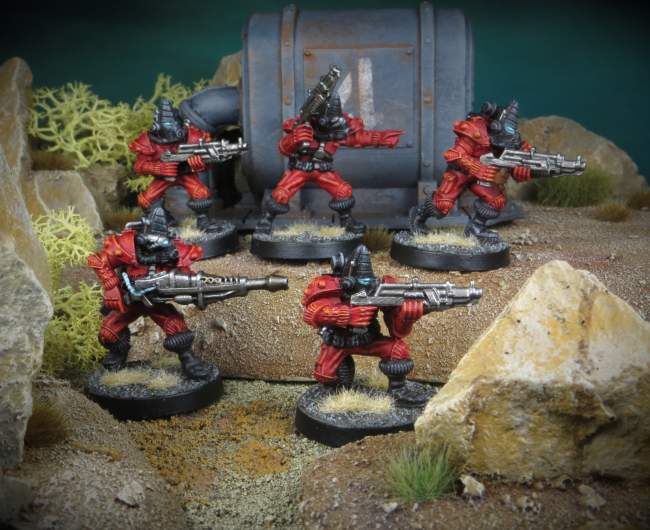 Magpie and Old Lead (blog) 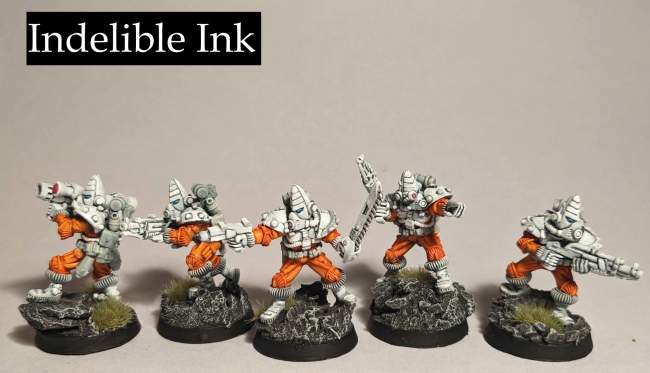 Indelible Ink 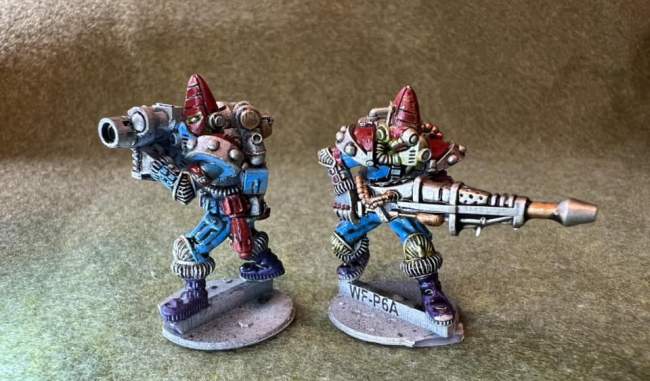 Roger Porter 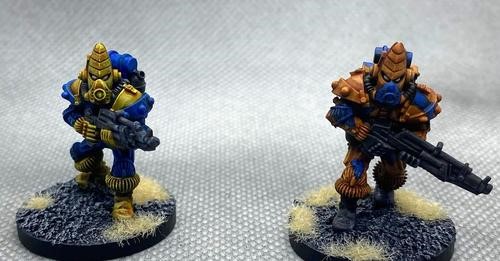 Cory Rosenberger 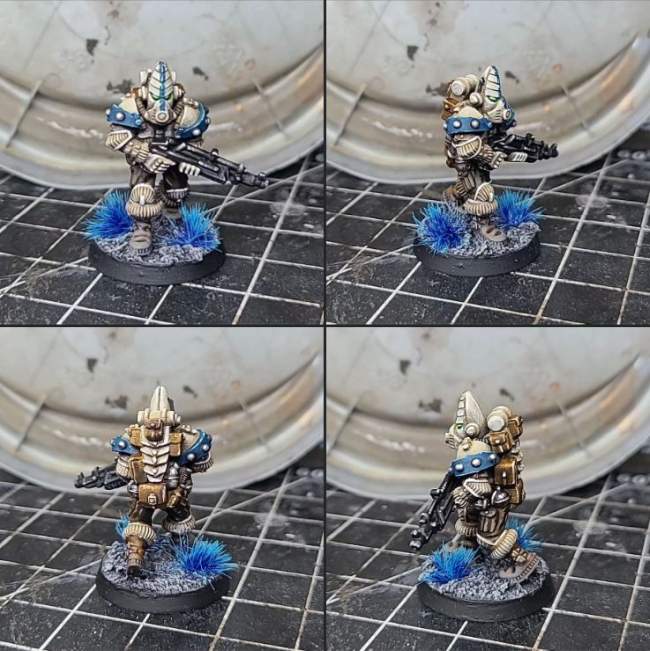 Black Heart of Texas
A full squad of 28mm pirates is now available. Lovingly sculpted to match the proportions and aesthetics of the 80s, these are the perfect way to bring to life the squad that never was. There are ten separate poses, with two variants the leader model.
Free Sample
Follow this link to download a free sample STL (22MB) – Pirate WF-P1A
 WF-P1A – Rifle, ready pose How to Buy
- Price £20 for 11 STLs – these are the 3D files for you to 3D print for personal use, they are not physical models. To purchase, email warfactoryuk@gmail.com and I will send you payment instructions and a dropbox link
- £20 to commission your own variant. This could be a specific pose, a new weapon, a new helmet/shoulder pad detail. Get in touch with your description or sketch and I will confirm whether it’s feasible.
- Sorry – no physical casts of these are currently available, however, if you would be interested then please email me so I can see whether there is enough demand to proceed with this.
All proceeds from the sale of these STLs will be donated to Dzyga’s Paw – who are fund raising to buy drones and other equipment for the Ukrainian military. Drones are critical for reconnaissance and targeting, and are easily lost due for reasons such as battery failure and jamming. Saving Ukrainian lives means keeping them well supplied.
Sculpts
WF-P1A – Rifle, ready pose 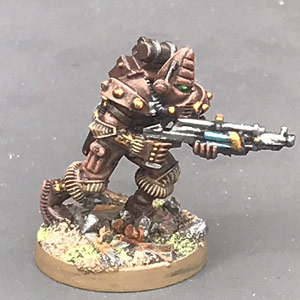 WF-P2A – Rifle, charging 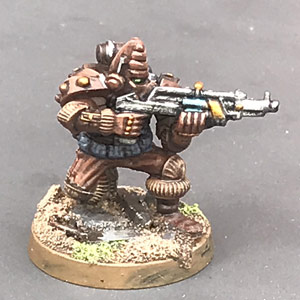 WF-P3A – Rifle, kneeling 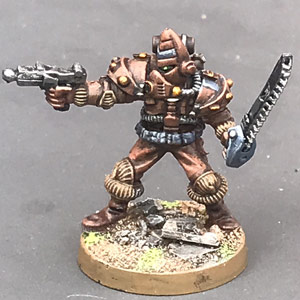 WF-P4A – Pistol and chainsword 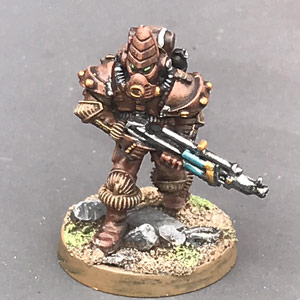 WF-P5A – Rifle, walking 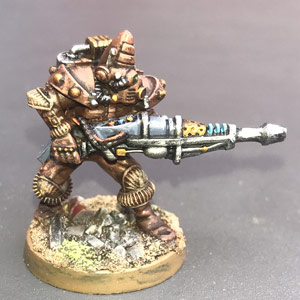 WF-P6A – Laser cannon 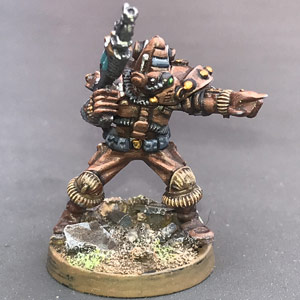 WF-P7A – Leader, Rifle 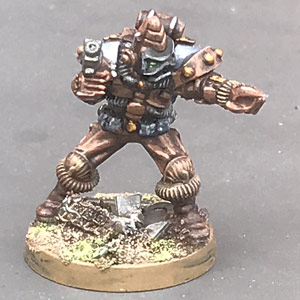 WF-P7B – Leader, pistol 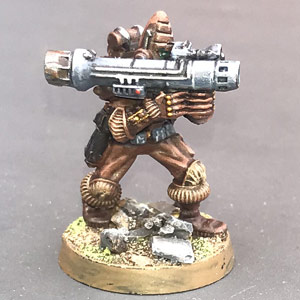 WF-P8A – Missile Launcher 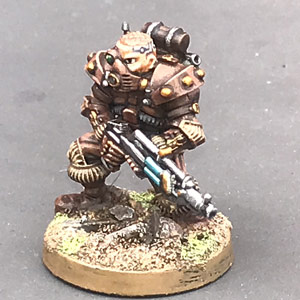 WF-P9A – Rifle, crouching, bare head 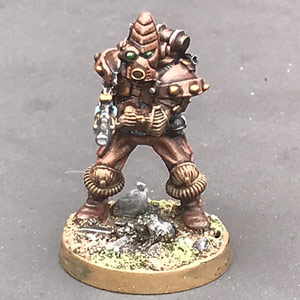 WF-P10A – Rifle, firing forward
Day 2 of our Normandy campaign has been completed, and the scenarios for Day 3 are about to be sent out. Day 2 was generally a bit quieter than Day 1, with most of the activity occurring in the west where the British had made their strongest gains on Day 1. The Germans attempted to encircle the British salient from both sides.
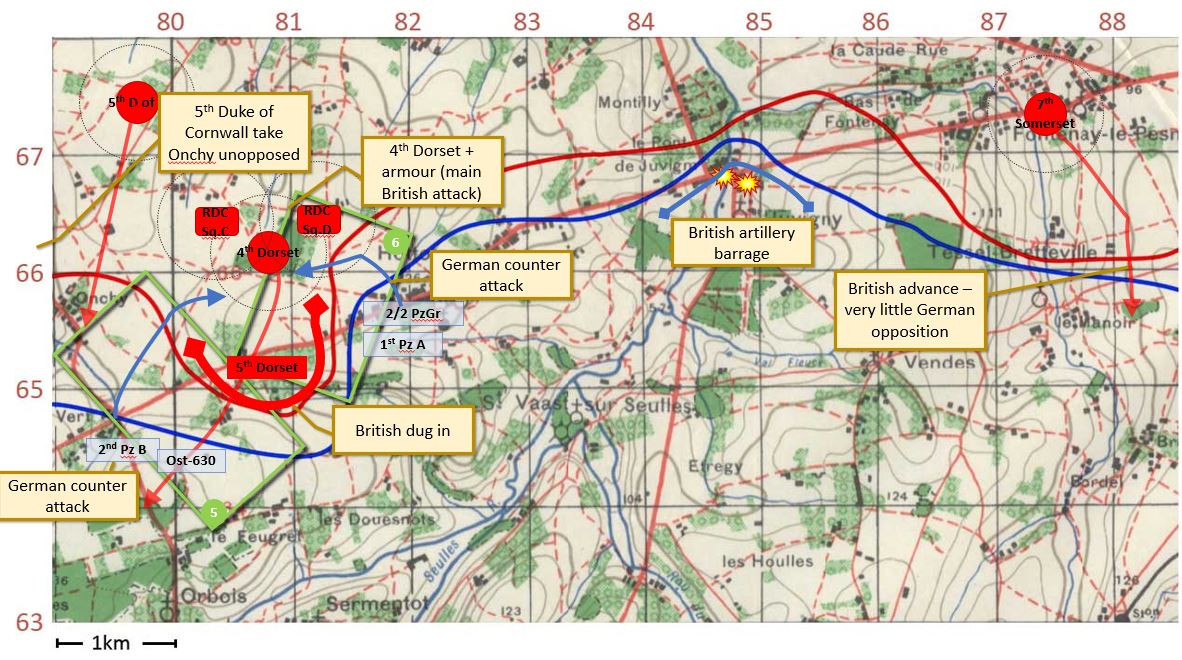
The British 5th Dorset infantry battalion had dug in at the extent of their advance, at the end of Day 1. Their main position occupied some orchards just south of the main road between Lion Vert and Hottot. This meant that the Germans in Hottot were now starting to become cut off, with their only line of supply coming from farm tracks and with the nearest proper bridge over the Seulles river being at Orbois to their south west. The German C-in-C decided to launch a strong counter attack to cut off the British salient, to force them to retreat or surrender and thereby relieve the Hottot defenders.
The west of the salient was to be pressed upon by the Ost-630 battalion – unfortunately Green troops without all their normal supports, but reasonably close to full strength. They would be given some backbone a company of Panzer IVs from 2nd Panzer division. The Panzer Kompanies have been ‘sandboxed’ down to 5 tanks – between a third and a quarter of their actual numbers, to keep them in proportion with the infantry battalions. This area was played out as Crossfire game on a 4’x8′ table as marked out by the green rectangle labelled 5. The British had some hidden forces of 5th Dorset, plus advancing on to the table were companies from 4th Dorset who had come through the dug in 5th Dorset with orders to push south west towards the Orbois road.
This battle initially went well for the Germans and they advanced against the British attack. However, more and more British came on to the table, and significantly a company of the 5th Duke of Cornwall (who had advanced through Onchy without opposition) came on behind the left flank of the Germans. It was a big table, and the Germans didn’t really have enough troops to hold such a long line. They retreated steadily south and ended the game in a tight perimeter around the Chateau de Bu in the south corner of the table, having taken moderate losses of both infantry and armour. British losses were comparatively light.
The east side of the salient was fought as another Crossfire game. The Germans were using two companies of II Battalion, Regt. 2, 2nd Panzer Division – veteran troops, supported by a company of Panthers and a Stug. Dug in on the British right flank were a company of 5th Dorsets. The Germans (with a significantly stronger force) started to encircle them. With the 4th Dorset’s attack well under way (in Battle 5), reserves were limited – a carrier platoon and D Squadron of 4th/7th Royal Dragoon Guards (Shermans) were sent to fend off the Germans. The Shermans, as with the German tanks, were ‘sandboxed’ so the squadron was represented by 3 x Shermans and 1 Sherman Firefly. Even with these reinforcements, the British were outgunned and were forced off the table to the north west, leaving the Germans in control of the wood at 808662.
In the east of the campaign area, the Germans were heavily bombarded by artillery, but the British didn’t attack, so this wasn’t played out on the table. At the Eastern edge, a British infantry battalion advanced south and was met only with snipers and forward observation posts, so again was not played as a Crossfire game.
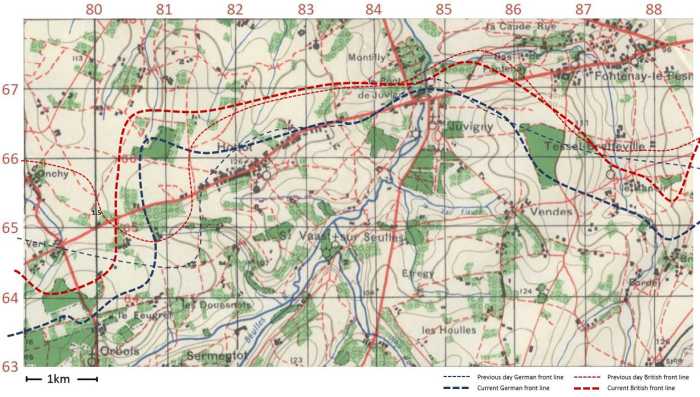
The frontlines are now as below for Day 3. The British salient has been pushed west, the centre is broadly static and there are significant British gains in the east.
 The final battle of Day 1 was a continuation of Battle 2 (which had only been played up to 10 30am in game time). The final battle of Day 1 was a continuation of Battle 2 (which had only been played up to 10 30am in game time).
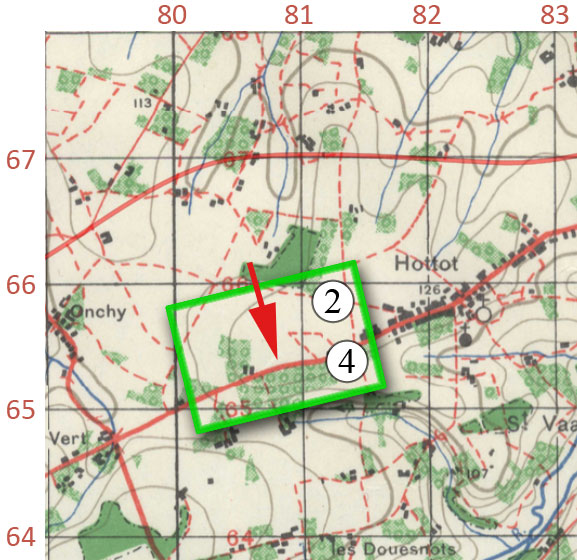
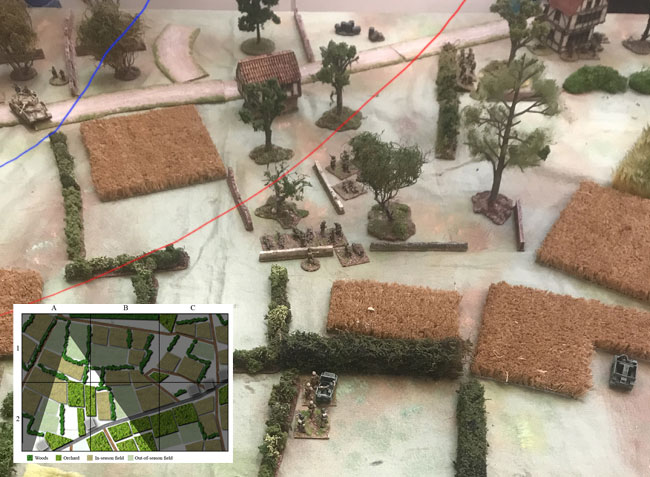
This map shows the location of the table on the overall campaign map. The British had moved up to the large wood just north of the battlefield overnight, and launched a massive attack from there in the morning. Battle 2 had covered the first part of the attack, but they ran out of time before it reached a conclusion.
Using a map and photos from Battle 2, we set up the table as best we could to match how their game had ended and any differences were rationalised as there having been a brief lull in the fighting which both sides had used to regroup and reorganise.
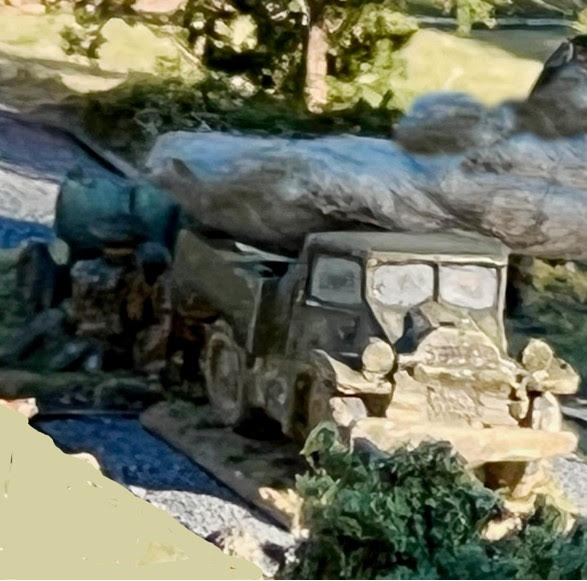
At this point, the British attack wasn’t looking terribly secure. On the west side, they were quite successful in pushing back the Green troops of the 3-857, but on the east side they were facing stiffer opposition. The 2/2 Panzer Grenadiers had brought up a few more infantry from Hottot village, and in addition to the Pz IVs they already had, a SdKfz 251 with a short barrel 75mm mounted on it. When firing, this got 4d6 for the MG and another 4d6 for the main gun, giving it the anti-infantry firepower of a tank. With just the occasional PIAT, the British were in a weak situation to counter the German armour.
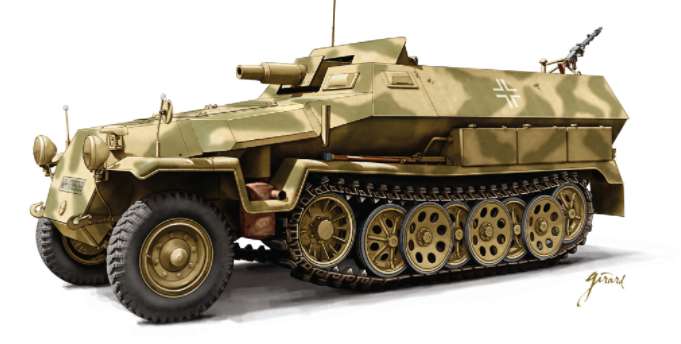 SdKfz 251 with 75mm gun
This map shows the battlefield and the approximate British front line (red) at that end of Battle 2. Germans were still mainly in their deployment zones – about a company of coastal battalion (Green) in Zone 1 and another company or so of 2/2 Panzer Grenadiers in Zone 2 (Veterans), backed by four PzIVs.

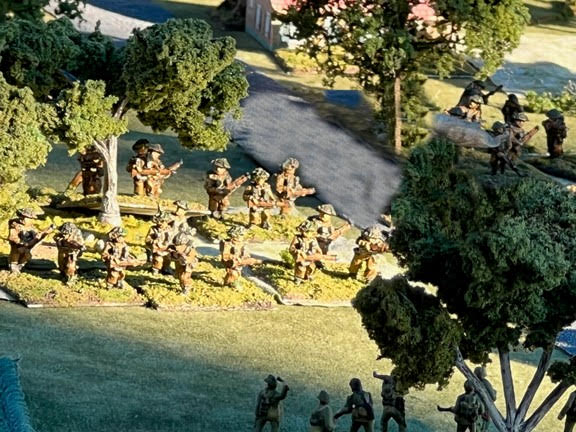
This is a shot of the Zone 2 corner, looking East. Two Pz IVs and a couple of platoons have come forward to menace the British flank. They have countered with a 6 pounder in the wood.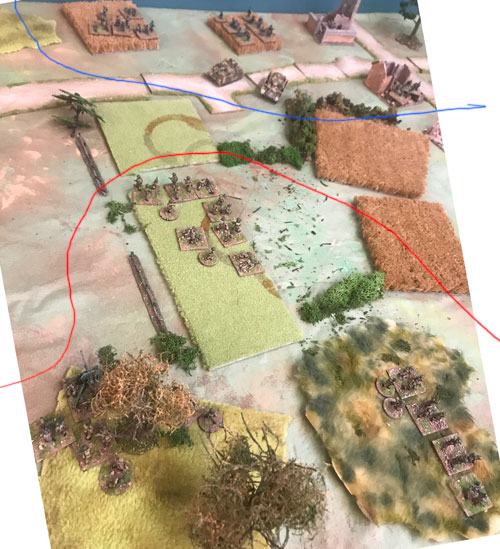
Worried by the armour, and feeling they needed a bit of a boots, the British made an immediate request for Shermans from their reserve, and started moving forward.
Attempting to leverage their local superiority, a Pz IV pushed forward. A British PIAT reactive fired and made a lucky hit – they needed a 5+ (d6) to hit, followed by another 5+ to destroy it, so this was by no means likely. Without that, the Germans could have mounted a strong push on the British flank and potentially done significant damage. As it was, with only one more Pz IV on that flank, they decided they couldn’t risk a further assault and the danger to the British had passed.
In the centre, the British pushed forwards, encountering just a few hidden Green squads. Soon they were in sight of the road.
Although some advances were being made, the game clock kept ticking on, and no sign of the Shermans.
 The battalion commander had driven to the front to investigate the stalled attack.
The British numerical superiority had two main benefits – first they could fill every corner of the defence, leaving no weak points for a German assault to exploit. The other was that they had plenty of fresh rifle platoons. Every time a platoon became suppressed or lost a squad, another platoon could push through them and carry on the assault – no need to wait for rallying or to use a below-strength platoon.
 British secure2 the house at the western end of the road, but the Germans still held the large area of orchards with veterans and armour. 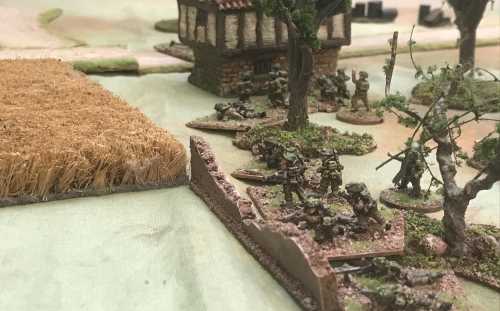
On the east the British attack had stalled with a platoon losing its PIAT squad to the 75mm SdKfz.
 On the east the British attack had stalled, with a platoon losing its PIAT squad to the 75mm SdKfz. They couldn’t hurt the SdKfz, but they managed to kill one German squad and suppress another in the adjacent field. Company A, 2nd Platoon Commander rushed forward with a rifle squad, assaulted and destroyed the suppressed German squad, then retreated back to safety.
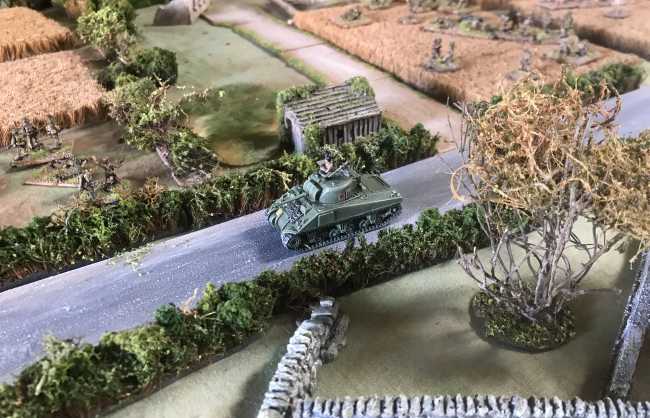
Finally at around 1.30pm game time, the British Shermans showed up – three standard Shermans and a Firefly.
The British start to wrap round the west flank of the Germans and force them back into the orchards south of the road.
Back on the east side, a Sherman shows up to rescue the British platoon pinned in the orchard. The 75mm SdKfz doesn’t fancy an exchange of fire with a tank, and backs off under the cover of smoke to safety.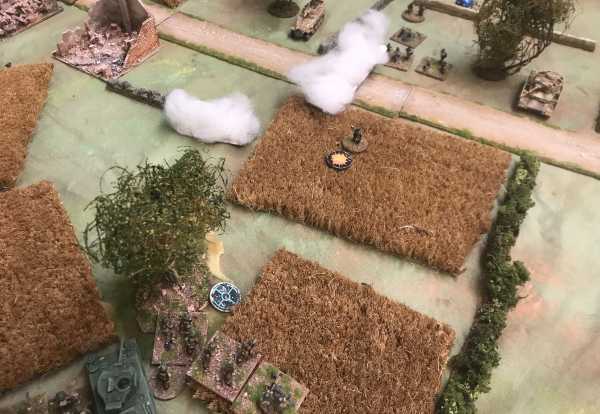
The Firefly takes up a commanding position round the corner of a house to stop any German armour crossing the road. One platoon pushes into the orchards, backed by a Sherman. The battalion carrier platoon is moved up, so the carrier MGs can support an assault.
British casualties so far have been very light, but they have been mainly clearing up Green troops. It’s about to get tougher as the German armour and veterans are backed into a corner.

A British platoon tried to push forward in the orchard but was stopped by reactive fire. The Germans dropped smoke and then counter attacked – the Sherman’s LOS was blocked by its own side and was unable to give covering fire before the British platoon was assaulted and destroyed. by the German 3rd Platoon.
In an attempt to cut off the German path of retreat, another Sherman advanced but came into the LOS of an unspotted PzIV and was destroyed.
Attempting to relieve the pinned platoon, the Carrier platoon advanced but with two pins and a suppress, was swiftly stopped.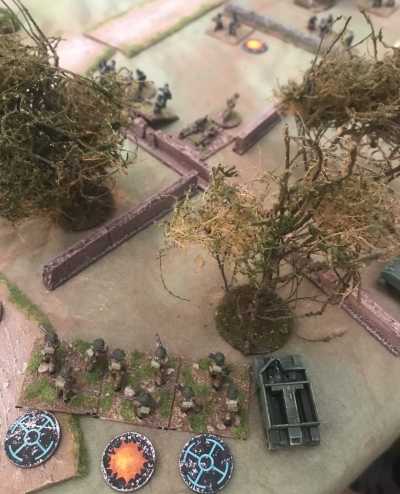
With limited success, the British tried to attack on another flank. Covered by a rifle platoon and a 2″ mortar, a Sherman advanced but was hit by a lucky Panzerfaust.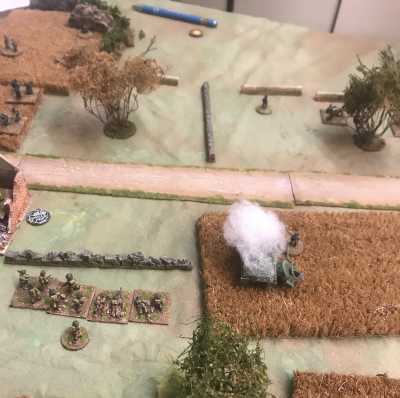
The British problems mounted – the Sherman in the orchard should probably have pulled back when the infantry platoon ahead of it was destroyed. Spotting its exposed position, Leutnant Wernicke of 2/2 PzGr Co.B, capitalised on his previous assault and pushed forward to destroy the 3rd Sherman before pulling back.
Gritting their teeth, the British rallied and pushed up again. The orchards needed to be swept to consolidate the British position south of the road. Two platoons finally managed to force their way in. The Germans had retreated into the corner of the battlefield (map square C2) – the edge of the village of Hottot, but with all but one of the British tanks destroyed, the British commander decided to call off any further attack, and the game ended.
Crossfire is a great game, but it does need an awful lot of scenery. The current Normandy campaign specifically needs hedges – typically not quite as much as the Bocage scenario in “Hit the Dirt”, which by my count is somewhere in the region of fifty feet (!), but still a lot more than we had. I’ve been experimenting with different ways to make it, and I think I’ve finally hit on a winner. I managed to make around five feet of it in around half-an-hour, and I think it looks as good as many much slower techniques. Here’s some of it lining the road:
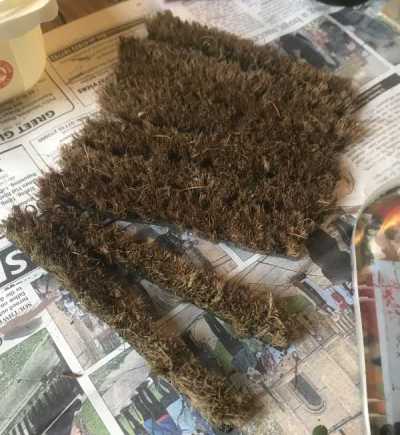
Step 1 – cut strips from a door mat
This is an old natural bristle doormat. I cut it into deliberately slightly irregular strips using a scalpel on the back of the mat. Each strip is around 5″ long.
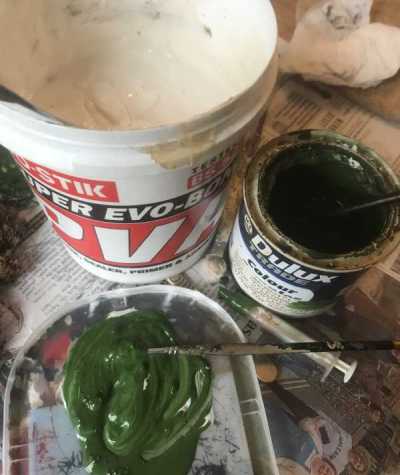
Step 2 – Paint the top and sides with glue mixture
I used a tub of quality PVA (white glue). I always buy good stuff – don’t get the runny muck for ‘craft’. It’s mixed about two parts glue with one part green emulsion paint. An old plastic syringe is ideal for sucking up a good quantity of paint in one go and squirting on to the palette. Put plenty on with an old brush, to give the flock something to grip to.
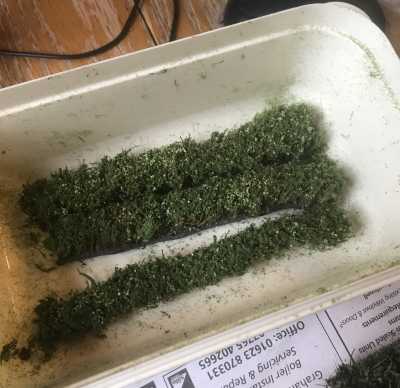
Step 3 – Put in a tub and flock
I did three bits at a time, and put them into an old ice cream tub. I have a good selection of different flocks. First I sprinkled on some little patches of more distinctive flock – some light green, some orange/red – real hedgerows tend to have lots of different plants growing in them and look quite motley. Some of these had quite large crumbs compared to the more basic flock which came next. Then I covered the rest with a basic green flock similar to the paint colour. Finally I put the lid on and shook it up to get the flock into all the crevices.
Step 4 – Add features
Once this has had plenty of time to dry, I added lumps of clump flock and different colours of lichen to give it a more irregular appearance and to add interest.
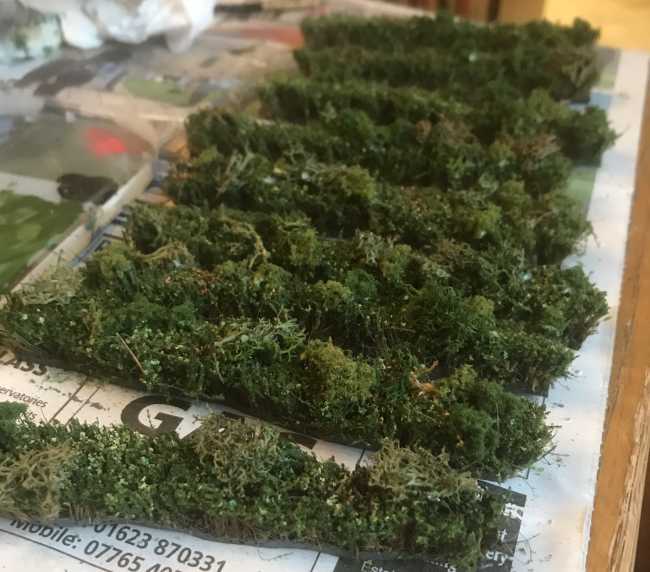
That’s it – done. Note that the dark grey base of the mat is still visible, but it isn’t really noticeable on the table. I did consider flocking along the edge of it with something brown, but decided not to bother. The mat bristles are still visible in places, but they look like the stems of the hedge and actually improve the appearance – this is one of the benefits of using this as a base – if it was foam, for example, it would need to be fully covered to prevent it looking unnatural.
Look out for the next exciting instalment, in which I’ll go over some of my less successful hedge methods and explain what was good and bad about them.
A brief interlude from the battle reports to show some scenery:
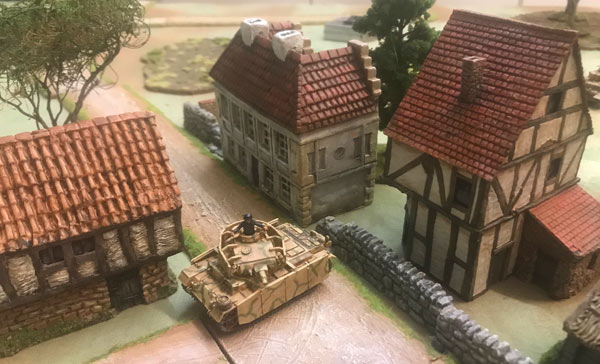
Last year I was given these 15mm buildings, which is perfect because we were preparing for the Crossfire campaign, and we only had a couple of non-ruined buildings (previous campaign had been Stalingrad – so the ‘buildings’ were more bits of wall sticking out of rubble than actual houses). These were mostly painted with emulsion tester pots, with smaller details being finished off in acrylic. They are solid resin, and drawings of two of them are actually visible in the original Crossfire rulebook – so it feels as though we are playing the game exactly the way we are meant to!
The chateau-like one in the middle is definitely quite small scale for 1:100 – but I think that’s a good thing. Scaling to actual size results in buildings that are larger than they really need to be, and giving the right visual impression is enough for me.
This game was played at a different scale to standard Crossfire, in that normally the smallest element is a rifle squad. This game was played so that elements represented sections instead of squads, as per the rules on Lloyd’s site. The location was at the far east of the campaign map:
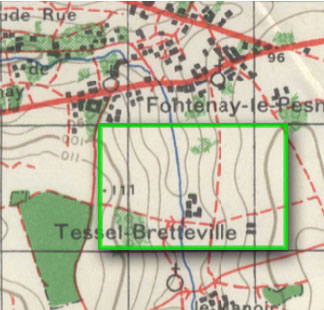
British briefing was as follows:
The 7th Dorsets have occupied Fontenay. They are not directly taking part in the attacks on the 18th June but are sending out patrols to recce the area to the South of them. This game represents a platoon sized “fighting patrol”. Your objective is to recce the countryside prior to any larger scale advance. Try to find out the scale of the German forces, the location of any forward positions (machine guns, ATGs etc). Engage targets if opportune to do so, but this is primarily to locate rather than destroy the enemy.
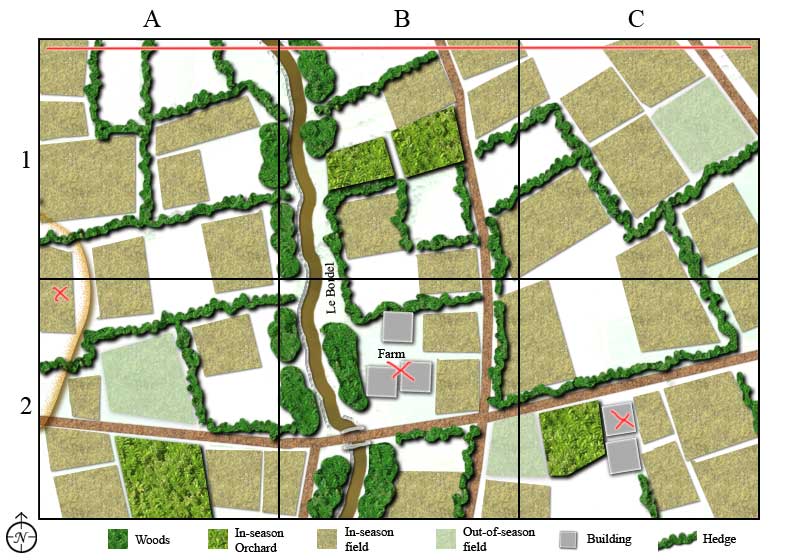
Objectives
- Get LOS to the three locations marked with red X on the map (not necessarily at the same time)
- Avoid casualties. If you take more than one third casualties (including commanders and squads), you must withdraw immediately.
- Uncover as many German units as possible.
- Destroy high value German targets if encountered.
I don’t have any pictures or even much detail of the battle, the results from the British CO were as follows:
“Got LOS to all three points shown on the map. All the Germans that were revealed were killed/captured except one mg which retreated.
I did not take one thirds casualties and inflicted enough casualties on the Germans to force them to retreat leaving the British in control of the battlefield.”
Casualties
British: 1 lmg team, 1 rifle section, 1 squad commander, and the two inch mortar
German: 3 msg, 3 rifle teams and 1 commander. An FO was also captured.”
Because it was being played at a smaller scale than usual, the casualties were fairly negligible for the overall division, however, the British victory has moved the front lines on the campaign map and has also given the British C-in-C a small bonus in Command Points for the next day. Command Points in these campaign rules are required for the C-in-C to deploy forces on the overall map.
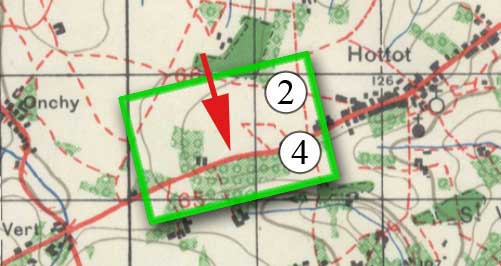
This game covered the second prong of the British attack. Overnight the 5th Dorsetshire had advanced to the wood, the edge of which is just visible below at the top of the map. At 0800 18 June, a massive rolling bombardment began, and the infantry advanced behind it. The British had four rifle companies available immediately, with more infantry and armour available to exploit a breakthrough.
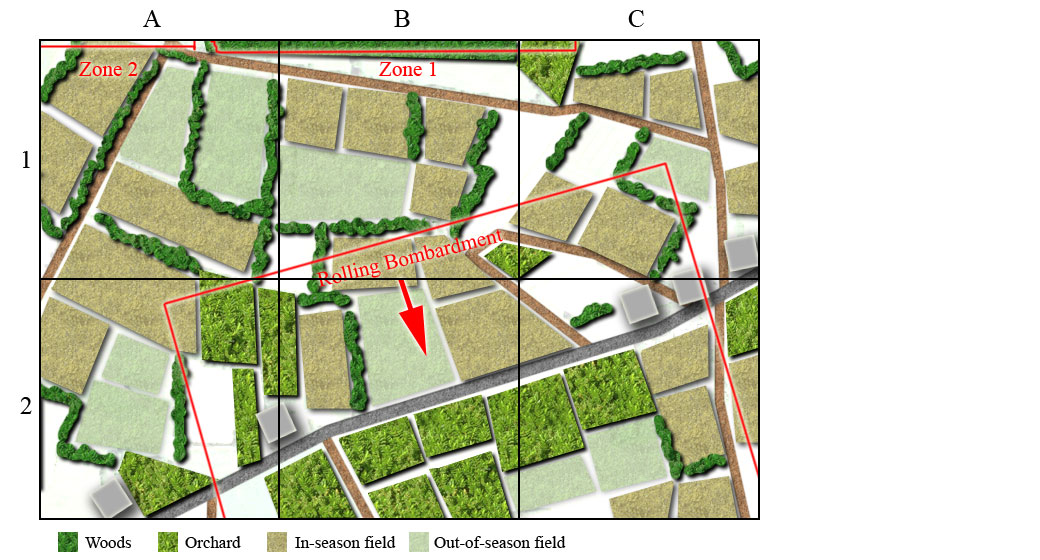
Rolling artillery barrage rules
British forces sometimes used their artillery in a ‘creeping’ line directly in front of an infantry advance. The rolling barrage is allocated by the C-in-C, and is not available as a firing option for in-game FOs. Often the following infantry struggled to keep up with the barrage and the suppressed Germans had time to recover before being attacked.
Stretch a piece of string across the table. It advances 3” inches (or as specified in the scenario) at the beginning of each German initiative and any elements it crosses is hit. Each element, is only hit in the first turn it is touched by the line. Hidden elements are hit when the barrage first touches the cover they are hidden in. Roll 3d6 for each element (reduced by 1d6 if they have cover for Indirect fire). If the unit is hidden then the owning player can do this in secret, and might want to roll some ‘dummy’ dice when the barrage moves across empty features to avoid their opponent guessing too easily where hidden troops are.
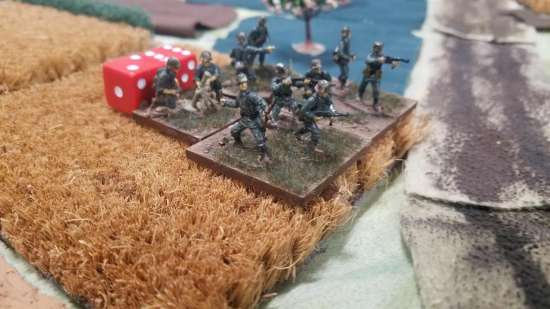
The German line was mostly held by Green troops from the 3-857 “coastal” battalion – a low quality unit that had already suffered casualties in its retreat from the coast. These started to take significant casualties as the bombardment passed over them. They started with an ineffectual ambush on the advancing British and were then rapidly battered by the artillery.
A contemporary account of one of these barrages (at the start of Operation Epsom) by SS-Standartenfuhrer Kurt Meyer gives an idea of how heavy it was:
“The earth seemed to open and gobble us all up. All hell had been let loose. I lay in a roadside ditch listening to the noise of battle. There was no let up to the artillery barrage. All telephone lines had been destroyed and communications with Divisional Headquarters and units at the front no longer existed…My ears tried unsuccessfully to analyze the sounds of battle and all I heard was the permanent spitting, cracking and booming of the bursting shells, mixed with the noise of tank tracks.”
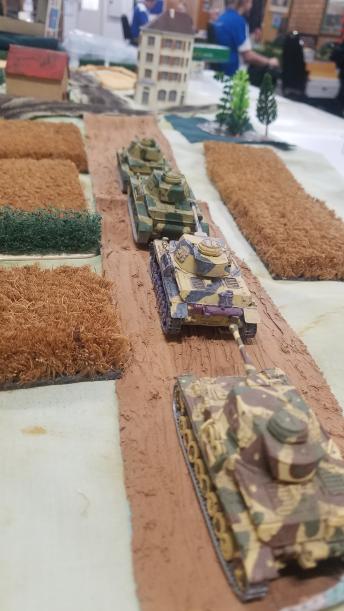
Fearing a collapse, the German player immediately called for Pz IVs which were waiting in reserve to the south. Luckily they responded quickly and raced up the dirt road.
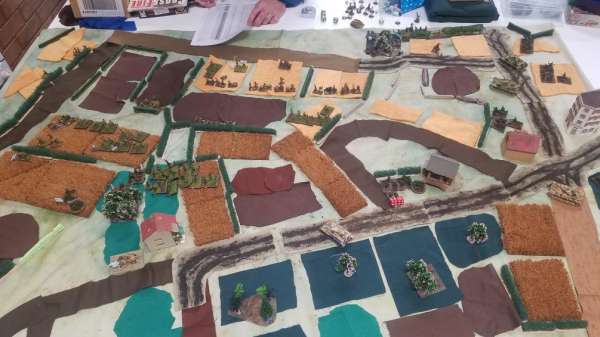
The Germans also had some Veterans of the 2/2 Panzer Grenadiers who were mostly stationed in Hottot, to the east of the battlefield. These had only just moved to reinforce, so were not hidden at the start of the game. Below is a shot of the table – the British, with four companies in their lead battalion, are attacking across a broad front.
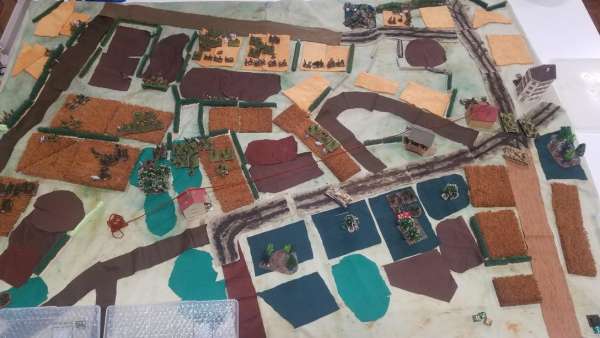
The Pz IVs can be seen at the crossroads on the right hand side, having just driven up the brown road. With the tanks and the veteran troops on the east side, the Germans pushed forward slightly, trying to relieve the pressure on their weaker comrades. The British were reluctant to engage 2/2 PzGr, especially once the tanks arrived to support them. 2/2 did lose a single rifle squad and a platoon commander to fire from a British 25 pdr, but suffered no casualties apart from that.
3-857 Company B was furthest west and got the worst of it, suffering heavy casualties mostly to artillery (rolling or otherwise), and a couple of close combats from the British. 3-857 company C fared better, but still took some tough losses.
The moving clock was being used. After about three hours of real life play, and about two hours of actual game time, the game had to finish, leaving the troops as in the photo below.
The extent of the British advance can be seen as marked by the red line on the map below. The British had taken extremely light casualties – only one rifle squad, the Germans had lost about ten – mostly Green.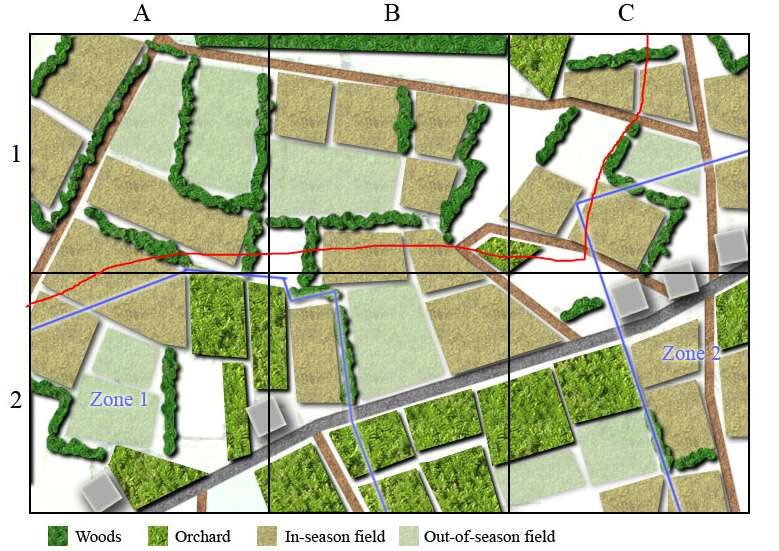
As the battle had only reached about 10 30 in game time, and both sides had plenty of troops left, it was decided to fight the rest of the day as Battle 4 (report to follow).
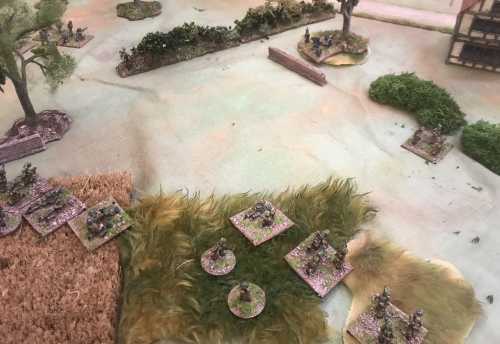
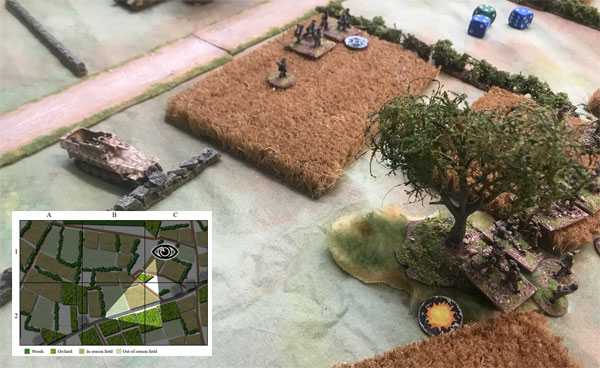
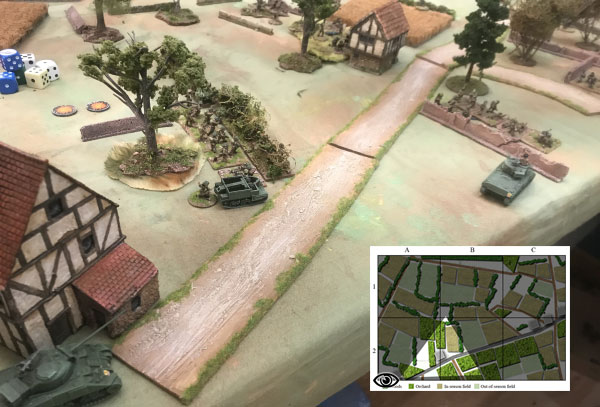
As players from both sides know what has happened in each tabletop game, I’m not considering it secret. This is what happened at this location, with the red arrow indicating the British attack. I have orientated the map to match the initial photo showing the whole table. In game time, the British attack began early morning after an initial pre-planned bombardment hitting the centre of the village and other surrounding areas. The British pushed forward through the dense terrain directly north of the village. No armour was used on either side.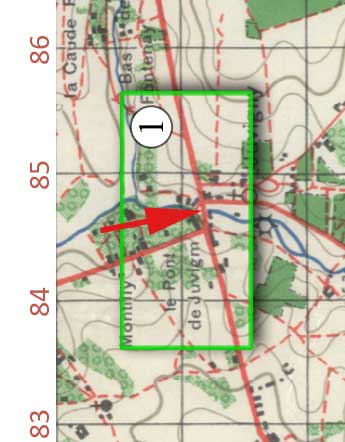
The German forces prevented the British from capturing the main road bridges, which were the most important strategic point in the area, with the British calling off the attack at 1400 hours – the area was clearly held in strength by some of the best German troops. Overall German casualties on table could be described as light, with British casualties being moderate.
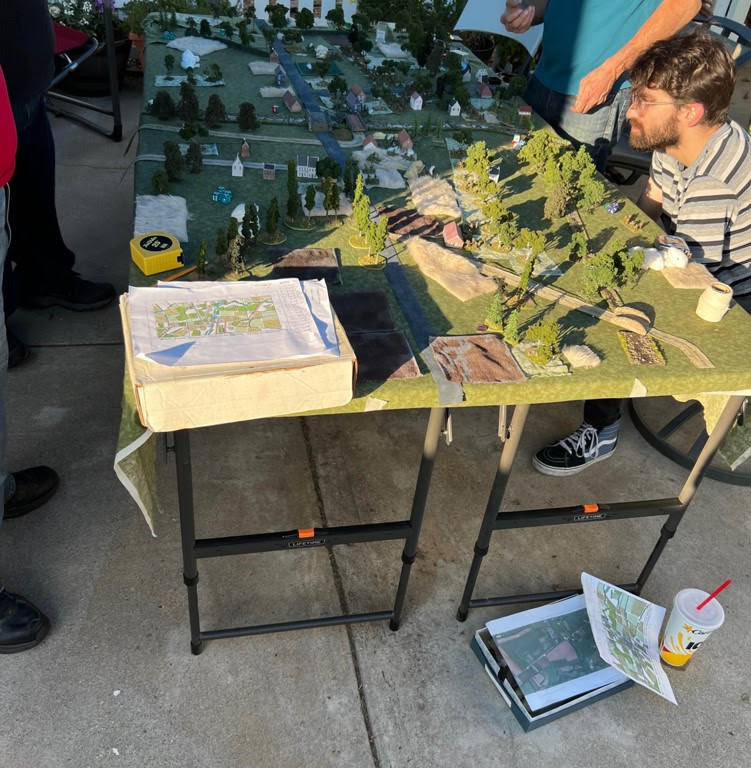
The following text and pictures were sent to me by Stephen Phenow
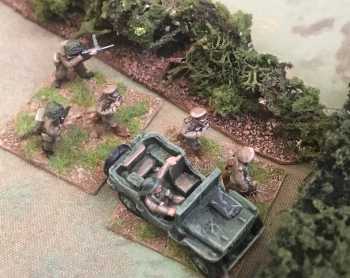
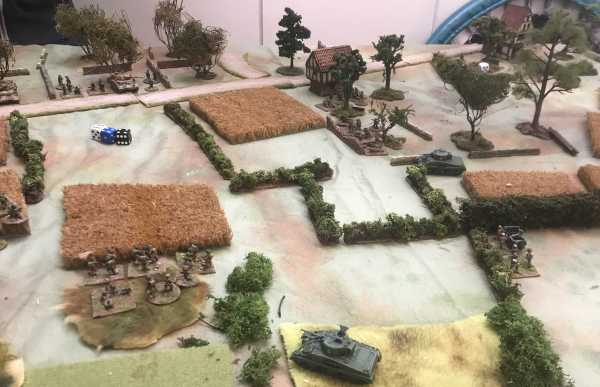
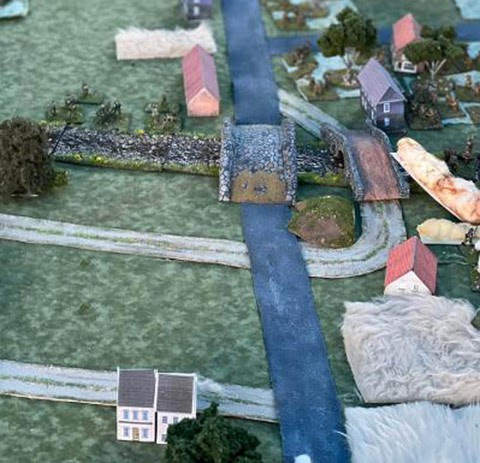
First the board. Light is coming through the open garage door which lightens the board’s end. British will advance down the center road from left to right. Germans are hidden behind the road in the fields and houses and behind the bridge.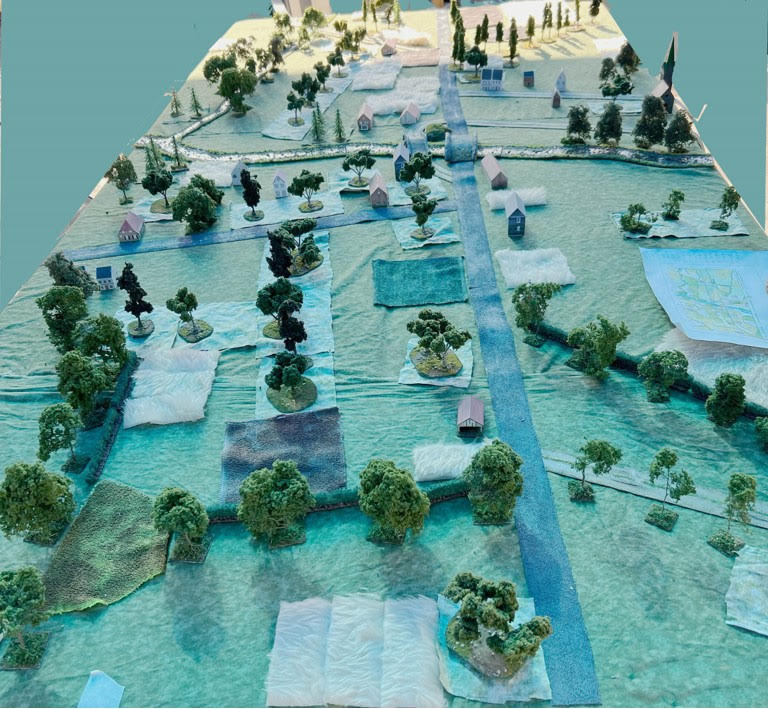
The British assumed that after the pre battle it would safe roll up their A/T guns. German Mortars destroyed the first one and second drove into an orchard where it stayed for the rest of the battle.
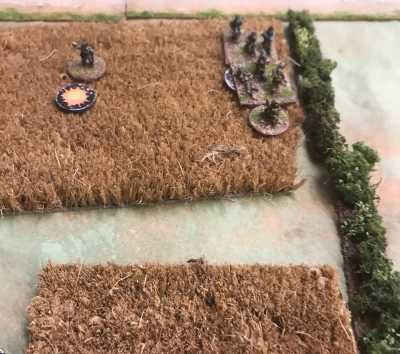
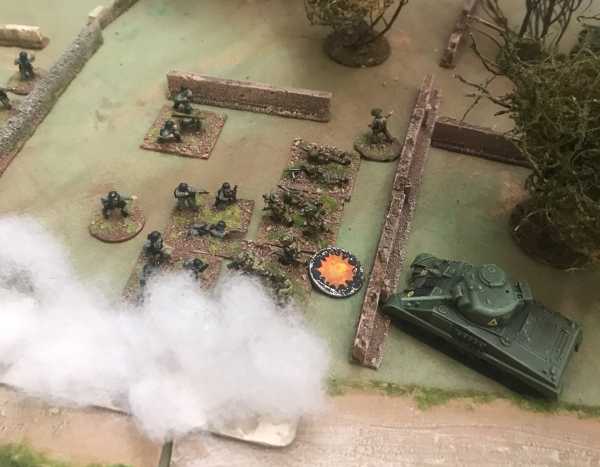
“A” Company 1st Platoon is Ambushed. As first platoon approached the road the prone Germans in the field and orchards opened fire. Wrecking 1st Platoon. 2nd Platoon did not fare much better as 1st platoon was suppressed and went to ground.
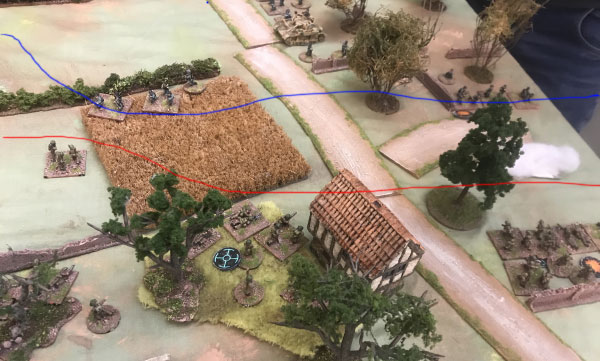
British Commander looks on in dismay as B Company’s 2nd is wiped out by an ambush and mortar attack at the bridges in centre.
The ambush at the bridges. Nothing is left of 2nd platoon, B, 3rd platoon advances through smoke to fill the gap.
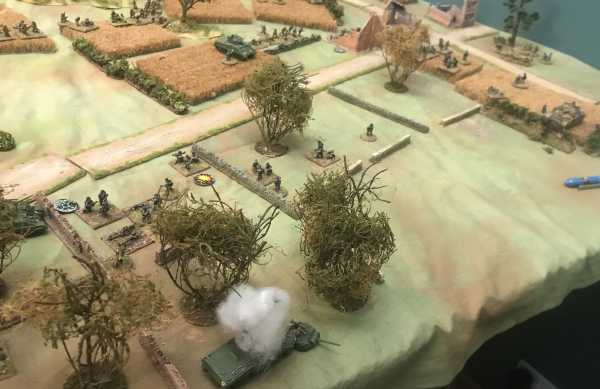
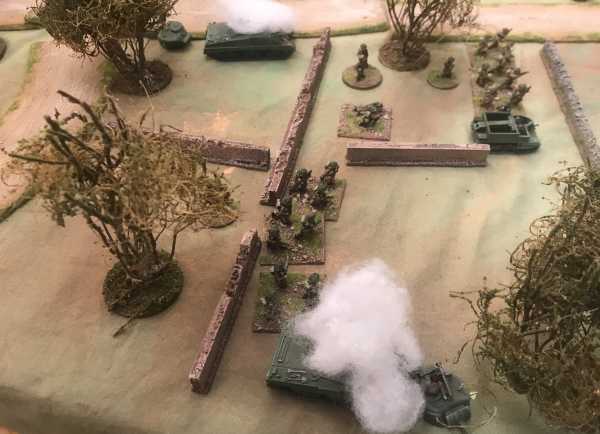
Panzer Grenadiers can be seen behind the pink house waiting to counter attack. They were not needed. 3rd platoon pulled back.
1st Platoon “C” company was ordered to advance to take pressure of ‘A’ Company. Its squads were hit by a Nebelwuffer strike and suppressed.

|
|
