Day 2 of our Normandy campaign has been completed, and the scenarios for Day 3 are about to be sent out. Day 2 was generally a bit quieter than Day 1, with most of the activity occurring in the west where the British had made their strongest gains on Day 1. The Germans attempted to encircle the British salient from both sides.
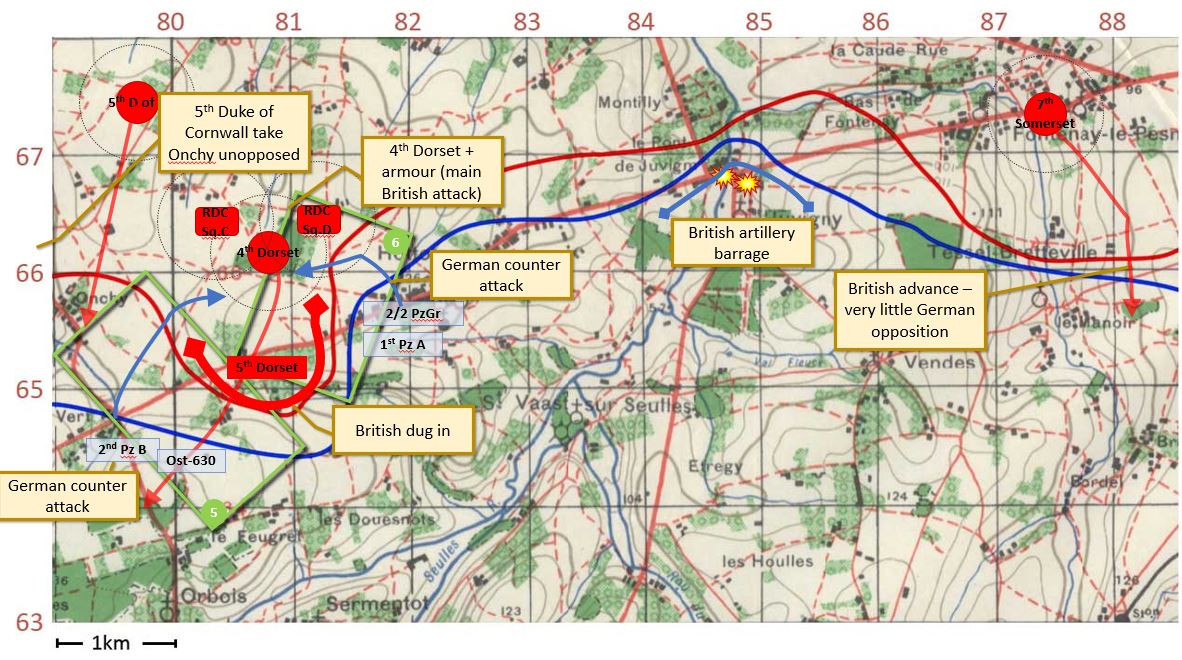
The British 5th Dorset infantry battalion had dug in at the extent of their advance, at the end of Day 1. Their main position occupied some orchards just south of the main road between Lion Vert and Hottot. This meant that the Germans in Hottot were now starting to become cut off, with their only line of supply coming from farm tracks and with the nearest proper bridge over the Seulles river being at Orbois to their south west. The German C-in-C decided to launch a strong counter attack to cut off the British salient, to force them to retreat or surrender and thereby relieve the Hottot defenders.
The west of the salient was to be pressed upon by the Ost-630 battalion – unfortunately Green troops without all their normal supports, but reasonably close to full strength. They would be given some backbone a company of Panzer IVs from 2nd Panzer division. The Panzer Kompanies have been ‘sandboxed’ down to 5 tanks – between a third and a quarter of their actual numbers, to keep them in proportion with the infantry battalions. This area was played out as Crossfire game on a 4’x8′ table as marked out by the green rectangle labelled 5. The British had some hidden forces of 5th Dorset, plus advancing on to the table were companies from 4th Dorset who had come through the dug in 5th Dorset with orders to push south west towards the Orbois road.
This battle initially went well for the Germans and they advanced against the British attack. However, more and more British came on to the table, and significantly a company of the 5th Duke of Cornwall (who had advanced through Onchy without opposition) came on behind the left flank of the Germans. It was a big table, and the Germans didn’t really have enough troops to hold such a long line. They retreated steadily south and ended the game in a tight perimeter around the Chateau de Bu in the south corner of the table, having taken moderate losses of both infantry and armour. British losses were comparatively light.
The east side of the salient was fought as another Crossfire game. The Germans were using two companies of II Battalion, Regt. 2, 2nd Panzer Division – veteran troops, supported by a company of Panthers and a Stug. Dug in on the British right flank were a company of 5th Dorsets. The Germans (with a significantly stronger force) started to encircle them. With the 4th Dorset’s attack well under way (in Battle 5), reserves were limited – a carrier platoon and D Squadron of 4th/7th Royal Dragoon Guards (Shermans) were sent to fend off the Germans. The Shermans, as with the German tanks, were ‘sandboxed’ so the squadron was represented by 3 x Shermans and 1 Sherman Firefly. Even with these reinforcements, the British were outgunned and were forced off the table to the north west, leaving the Germans in control of the wood at 808662.
In the east of the campaign area, the Germans were heavily bombarded by artillery, but the British didn’t attack, so this wasn’t played out on the table. At the Eastern edge, a British infantry battalion advanced south and was met only with snipers and forward observation posts, so again was not played as a Crossfire game.
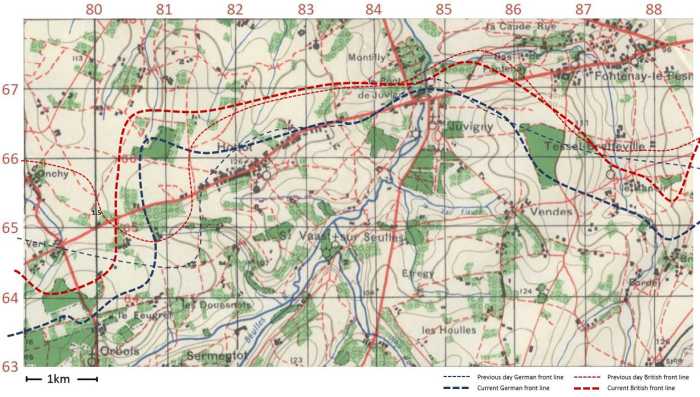
The frontlines are now as below for Day 3. The British salient has been pushed west, the centre is broadly static and there are significant British gains in the east.

Leave a Reply