|
|
2016 is turning into a bumper year for blog posts. Here are the first couple of models painted up for Frostgrave. On the left we have a marksman – Rowan’s costliest henchman, and on the right is my biggest spend – a barbarian. I’ve based all the Frostgrave models on 20mm square, because I was raised on WFB III and that’s what a human should be based on. The barbarian does get a 25mm square because he was just too big to put on a 20mm one. I suppose he would make a decent Chaos thug (25mm), although with those axes sticking out, he’s not going to “rank up” very well unless the models on either side of him are crouching down (or Chaos halflings).
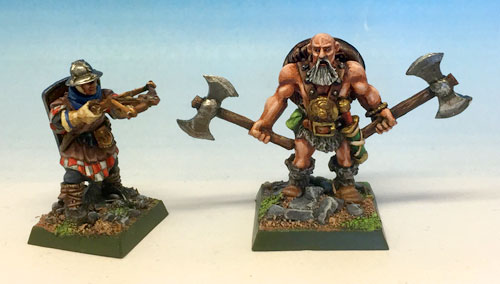 Marksman and Barbarian The marksman is from the Frostgrave soldiers box, with the addition of a shield from the Perry European mercenaries box. I was going to do something heraldic, but that seemed a bit boring so I went for something a bit more fantasy themed.
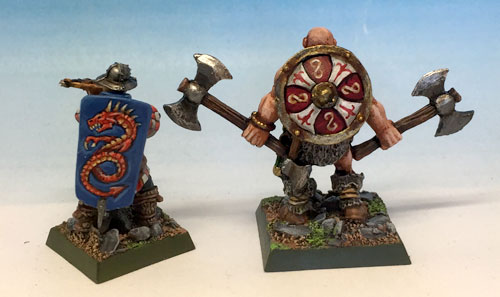 Marksman and Barbarian The barbarian is from Blacktree Design. Some of the faces in this range are a bit ropey, but this one is fine. I bought a few last year with the intention of converting them to Necromunda ratskins, but on seeing them in real life, I realised they were too big and muscle-bound to be suitable. The bald head made me go for a grizzled, grey bearded veteran look. With the shield I was trying to evoke an Eastern European look – he’s wandered in from the steppes.
The massive double axes made me think of these Lindybeige videos. In this one he explains why carrying two weapons in real life doesn’t double your attacks – it’s just a bit pointless, and in this one he explains why there’s no point in a fighting axe being double-bitted because it just makes the head heavier and harder to wield. I don’t think you’d want to explain that to this barbarian though, he might take offence.
A model from the tail end of 2015 here – Hazmat for Hazardous Materials, by the way. This is from Casting Room Miniatures – an offshoot of Wargames Foundry. A useful model for scenarios, who would very much fit in with the zombies and SWAT teams previously shown, and is also anonymously sci-fi enough to slip into a Rogue Trader setting. I find white very difficult to get smooth – this is perhaps a bit grainy and grubby, but will certainly do in an emergency (which presumably it is if you are wearing that sort of clobber).
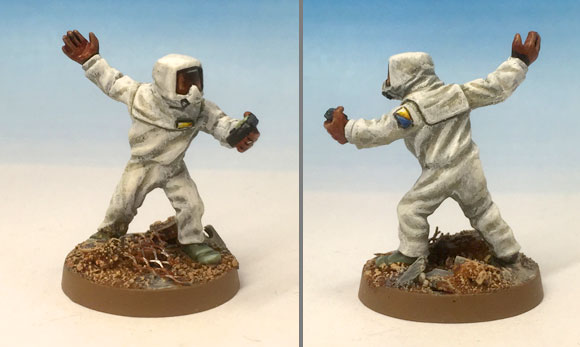 Hazmat suit
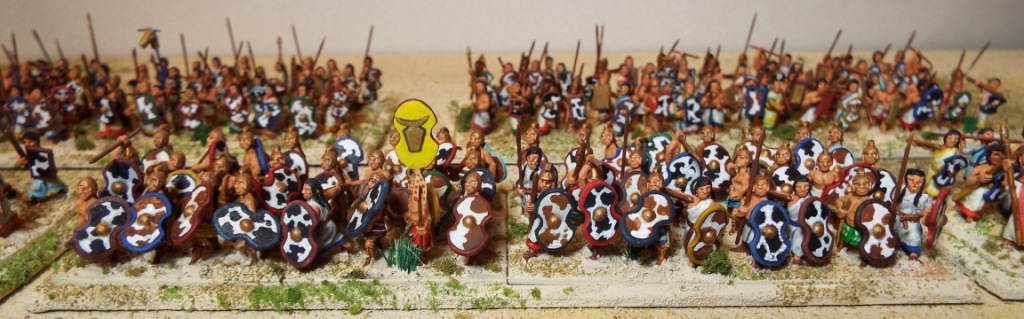
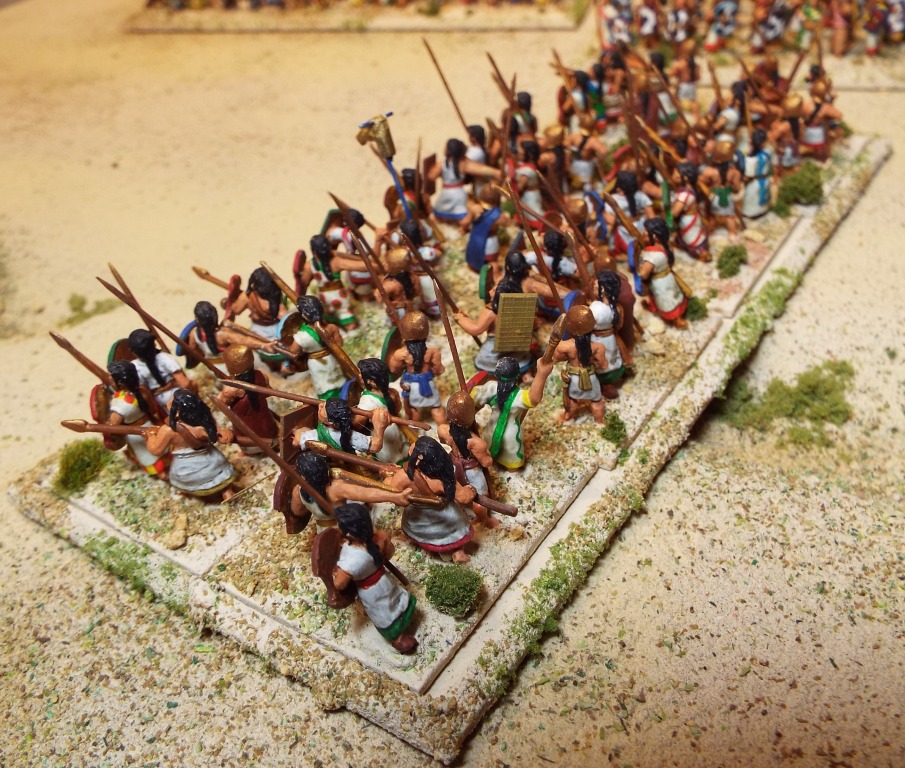
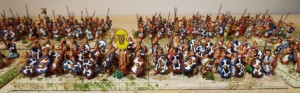
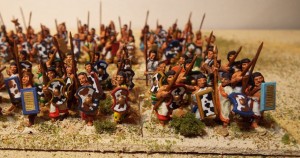
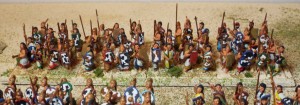
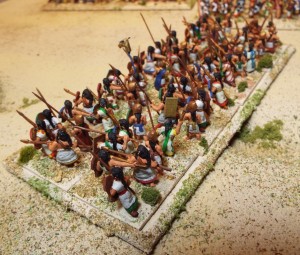
At long last got around to revamping the Hittite footsoldiers. I had around 120 from 20 years ago, since when more pictorial interpretations have been published and superior figures produced, unfortunately in 28mm starting with Foundry rather than 15mm. I had a fair stock of unpainted figures, and decided to pad them out with some suitable figures that I could convert to Hittites. Not too hard to find kilted figures with helmets that came close, but didn’t manage to find any without beards, and of course pigtails were a bit thin on the ground. The cloak-style jobbie that leaves the left arm free, while protecting the side of the body, is a particularly Hittite feature as well. I was also looking for some figures wielding spears 2-handed. Sumerian spearmen from Magister Militum were the best options I found.
I had to trim off the beards, which was a bit of a faff. Pigtails were easy with green stuff. Mainly the long one down the back, but I also did some with the side pigtails over the front of the shoulders. I got one pack of the Sumerians with the thick protective cloaks, figuring that the concept was similar to the Hittite garment and that some may have opted for this type of protection. I carefully pared away the metal disks on the outside of the cloak, on the basis that they were too distinctively Sumerian.
All of my original figures had Dipylon? style shields. I wanted to put in a good number of rectangular shields for variety to reflect those interpretations mentioned earlier. In some cases the dipylon shields were reused to give variety to other figures, after being carefully cut off figures using either a craft knife or razor saw, depending on which figure it was and how hard the metal was. The rectangular shields were produced from plasticard, scored into 6mm by 8mm rectangles and snapped apart. A few were scored to represent bare wicker, but most were left blank.
The original figure all had the shields painted in bright geometric colours. I wasn’t really happy with these, and decided that repainting them as mottled cowhide, with a variety of coloured rims, would not only look more effective, but would also draw the different shield shapes together.
Where I thought it was necessary, I replaced spears with pins, having hammered the point flat to create the spearhead. I wanted some figures to have long spears as some have proposed that these were used by some Hittite infantry.
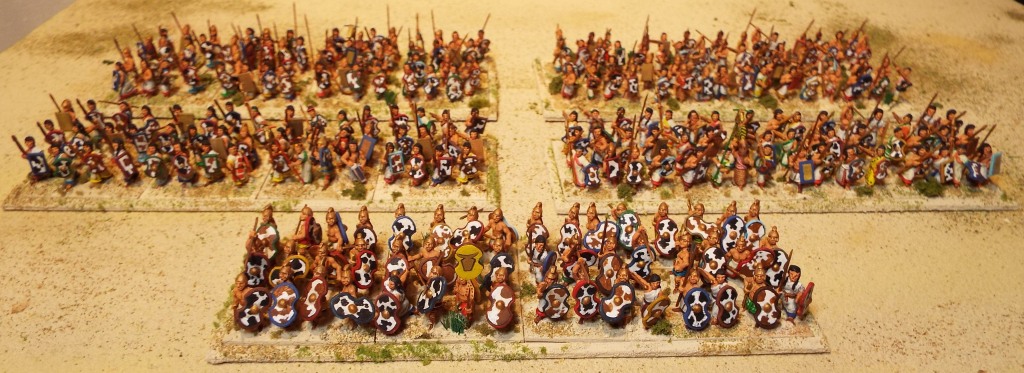
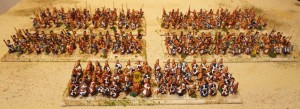
Another thing is that Essex, for whatever reason, chose to make their shields much bigger. I decided to arm one unit with these, partly just because I wanted to, and partly because my impression of the Hittite army is that it would have included contingents from different regions. I decided on the following mix of units;
1 unit of close order infantry with Javelins and large shields.
2 units of close order infantry with javelins and smaller shields.
2 units with a mixture of javelins and longer spears and a greater variety of gear. These would represent either city levy raised either in an emergency or for local use, or following the collapse of the Hittite empire, remnants of different units banded together to form larger units.
All 5 together;
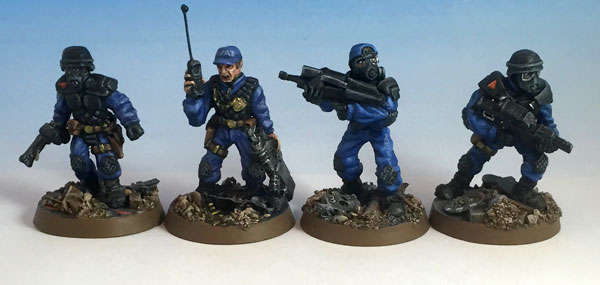 SWAT team sculpts These are some of my earliest scratch-built models, which I have finally got round to painting and basing. From what I can remember they were the 4th, 5th, 6th & 7th that I ever sculpted – going from left to right. I’ve now sculpted about thirty models in total. This set were started around 1996 when I did the first two. The third and fourth were mostly done around 2002, but only completed last year. I started them when I was collecting near future and difficult though it may be to believe now, the only futuristic police available back in the mid-90s were Mark Copplestone’s police in conventional police uniforms and caps (now available from em4). I thought I’d do some more heavyweight police to complement these.
These were all done in green putty on a thin wire armature (the plastic coated phone wire). They look OK on the tabletop, but looking at them with a critical eye there are quite a few bits out of proportion. Going through them in turn:
Model A
His legs are too short compared to the upper body – this overall proportion is something I still struggle with. Even when working on an armature, there’s enough leeway as you bulk this out to get it wrong, and it’s difficult to notice until you’ve done all the detail and it’s too late. His shoulders are also a bit narrow and hunched. Handcuffs came out quite well, but generally detail could be crisper.
Model B
Right arm holding the radio is a bit long. His gun was made by printing on to thin card and then cutting it out with a scalpel (the barrel is wire). This was very laborious, but I didn’t have anything else suitable.
Model C
This one is getting a bit big compared to the others – I tend to creep bigger if I’m not careful. His bottom looks curiously narrow. Obviously given his pose, you couldn’t mould this because the arms form a circle, but I was never intending to cast them.
Model D
Here I tried for a more dynamic pose, which has been partially successful, but… he has ended up with particularly large long arms, and there is something a bit wrong about how he is leaning forward which I can’t put my finger on. Also, if he stood up straight he would be even bigger than model C. This one is carrying a Wargames Foundry weapon because I had plenty and I didn’t fancy laboriously scratch building another one.
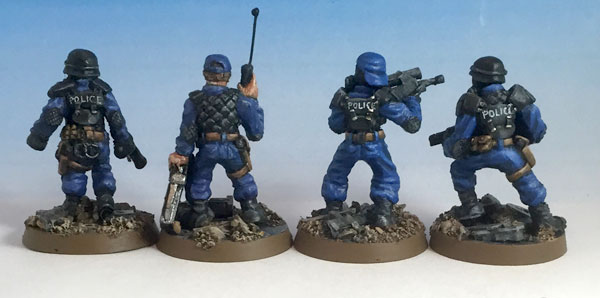 SWAT team sculpts I’d be interesting to see what you think – you can be brutal, these are an early effort and I know there’s plenty wrong with them. What are other people’s early sculpting experiences? What did you do wrong at first, and how did you improve?
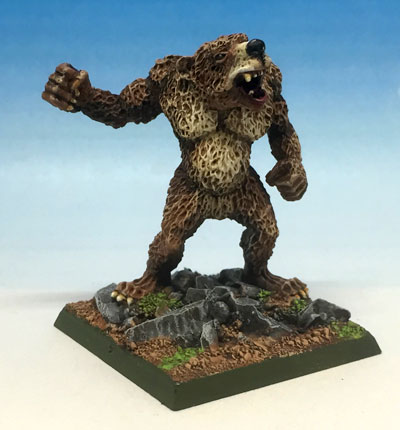 Werebear This rather nice model from Black Tree Design ticked two boxes – he has been sitting around for about a year half painted, so that’s a tick for finishing things off, and I’m also trying to collect models for Frostgrave (that’s one of the key projects for 2016), and there’s something very suitable about a giant humanoid bear. I considered putting snow on the base, but then it will look very odd in any other setting, so I went for just making it more rocky than usual as a half way compromise. I looked up a few pictures of bears, and the lighter muzzle seemed typical. The paler stomach isn’t so accurate but I wanted to avoid just making him plain brown all over.
One of my resolutions for 2016 is to clear up some of the half finished models that have been hanging around in the painting tray, many for months. Another resolution is to try to avoiding starting anything that isn’t in the top three projects list (to be disclosed later).
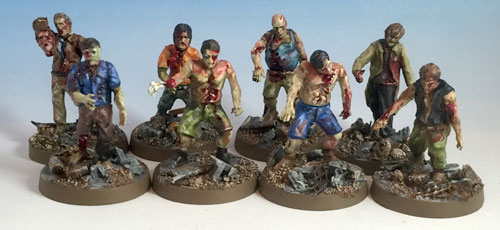
These are the last eight of a box of 40 zombies that Rowan had last year as a Christmas present. He’s keen on building them and playing games, but not so keen on the painting, so I’ve done most of them.
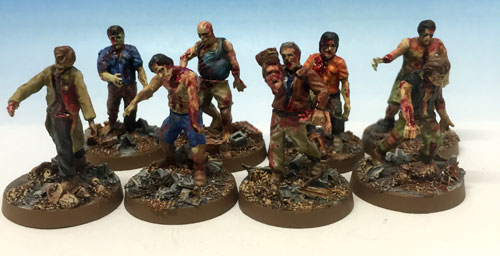 Wargames Factory Zombies These are from Wargames Factory. Note that “Wargames Factory” is completely unconnected to this “WarFactory” blog, or the WarFactory models being sold by Lancer. It’s a little inconvenient that they have such a similar name, but as I registered warfactory.co.uk in 1999 and did a logo etc, I’m not going to change it now.
They are a good value kit, but the detail isn’t that sharp. Altogether they make a great horde, and the poses are suitably shambling. I have painted them pretty roughly in a smudgy style that looks effective from a distance. The best bit is the use of some clear, red glass paint which makes great wet-look blood. My favourite bit is splodging some of this on at the end. It’s water based, so it’s very convenient to use. The make is Creativity Glass Paint from Philip & Tacey – not sure if it’s still available, I’ve had it for years.
We’ve already used these zombies in a number of games including the Chainsaw Warrior game, and as NPC extras in a couple of Rogue Trader games just before Christmas.
 Wargames Factory Zombies New comments login
I have just switched the comments login over from using the WordPress Jetpack plugin to the Social Login plugin connected to the oneall site. This should allow you to use a number of common logins (facebook, google etc). In theory the Jetpack one should have done this, but I noticed that it jammed up on my iPhone, for example, and this one seems more fully featured. Please do comment – it encourages me to post more, and if you have any problems then please get in touch. You should be able to fill in your name and email if the social networking login doesn’t work.
Everyone’s at it with the year-end retrospectives – as 2015 slides into the past, what better time to cast an eye back over the modelling milestones. This blog has been around just over a year, and I’ve been pleasantly surprised when I looked back at what had been achieved on the wargaming front:
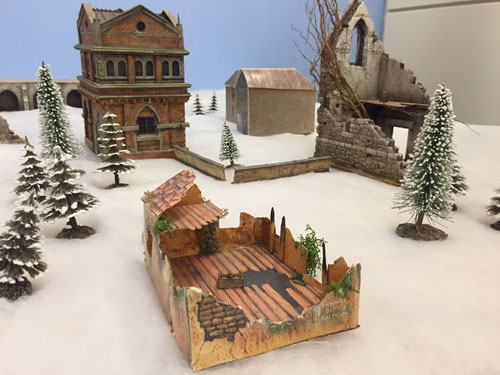 Frostgrave table
The WordPress blog is now the main site…
It came to my notice that some people, (well, at least one) were following “www.warfactory.co.uk”. This meant that they wouldn’t get any updates, because the WordPress site was at “www.warfactory.co.uk/wp”, and this URL pointed at the old site. I’ve just made this (the WordPress site) the default so they will both work – and this will be the first update they get on their blog reading list. If you want to get to the old site (pre-2009), then follow the “Old Site” link in the header.
Real life commitments interrupted me recently at the point when I had just mixed up a blob of green stuff, and I had to leave it unused. Rather than waste it, I tried putting it in the freezer. To my slight surprise, once I had warmed it back up the following day, it was perfectly usable – I wouldn’t have known that it wasn’t fresh.
 Wargaming table supports Everyone has their take on the wargaming table and so here’s mine. A long time ago it was firmly established in my head by WFB3 that the standard table was 4’x8′, so I couldn’t really consider anything less. It needed to store in a small space and be easy to put together, and not too expensive.
I already had two book cases that are about 3′ wide and 3′ high (that’s a few inches higher than ideal, but that’s what they are). On top of those I put two timber beams. These are the sides from an old door which had gone mouldy in storage and wasn’t fit for re-use. They are about 7′ (210cm) long. I used a power sander to clean them up and remove the rough bits where they had been sawn off the rest of the door. These just sit on top of the two book cases as on the left.
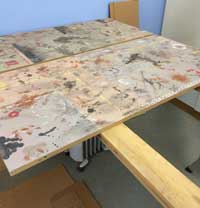 Half built table
The table surface itself is made from 4 pieces of 4’x2′ 18mm thick MDF, just laid on top. I bought a sheet from B&Q (just under £20) and they offer a free service to slice it up for you before you take it home. Recently I painted the top with a variety of emulsion tester pots to create a grimy futuristic surface. If I’m using it for WFB or similar I have a green cloth which goes over it. You can see the cloth in this in this post of an Epic battle.
To help stop the pieces moving about and flipping up if someone leans on the edge, I have drilled two holes into each edge and glued in some dowel to help keep them together. This didn’t work as well as I had hoped because the dowels are quite short and the mdf sockets they fit into easily loosen as the MDF can be rubbed away, however it certainly helps.
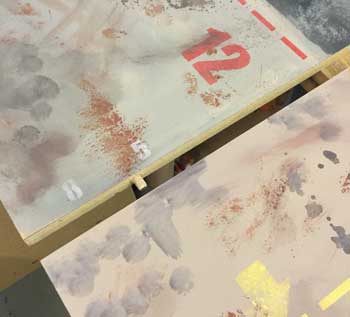 Dowels in edges of table top
|
|