|
|
Since just before Christmas, I’ve been churning out Frostgrave scenery, all of it made very cheaply. Total spend so far is around £20 and there’s enough to fill a 3ft square table already.
 Insulation foam ruins Specially bought:
Free:
- Stones from the garden
- Bits of dried plant. In the UK this is a good time of year to collect things, anything that’s lasted this long through the winter will be well and truly dried out.
- Foam pizza bases (I didn’t buy the pizzas specially and then discard them).
 Dried plant sprigs and stones from the garden From the store cupboard:
These are virtually all left over from building work or other projects. Either free, or I’ve used very small quantities of a large stock.
- Plasterboard Adhesive (left over from building work – at 25kg for £9, that’s enough to last you for years if you buy it specially). You could also use any hard plaster such as Herculite. http://www.wickes.co.uk/Wickes-Gypsum-Based-Plasterboard-Adhesive-25kg/p/220600
- Woodland Scenics Realistic Water. That’s quite pricey too at £10-15 per bottle, but I’ve only used about 5ml for a Frostgrave pond which is less than 20p worth. It’s great stuff – buy one and it will last you for dozens of little projects. I tried quite a few different water techniques and products, and this was the best.
- Scraps of extruded polystyrene. These are bits of insulation that I peeled off plasterboard.
- Scraps of hardboard left over from building work or scavenged from old picture frame backs etc.
- Some resin gothic windows – I was given these. They would be fairly expensive to buy, but you can make your own by cutting them from mounting board. See this tutorial I wrote years ago: Gothic Ruin
- 5mm Foamboard. This was left over from work presentations, so it cost me nothing, but you can get it for less than a couple of pounds for an A1 sheet if you shop around.
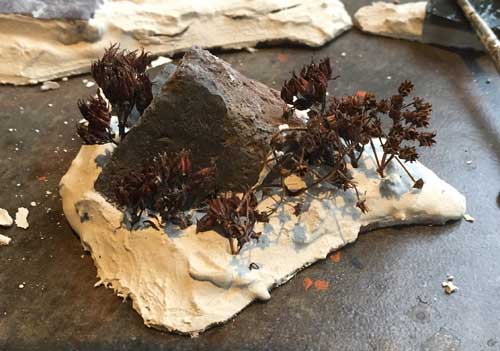 Work in progress – needs paint and flock
So I have succumbed. My problem is that I have so many bits and pieces that could be used that I have to decide where to start. I have one of the GW Manor house sets that would look good, so the start is to construct bases to put these on. I have also purchased a hot wire table from ebay to hopefully make styrofoam construction quicker. I have to try and stop myself from flitting from one thing to another and never actually finishing anything.
This is just the first base and I haven’t even painted the building which goes on it, but I’m posting this because I’ve used a couple of things from discount stores here in the UK which others might find useful.
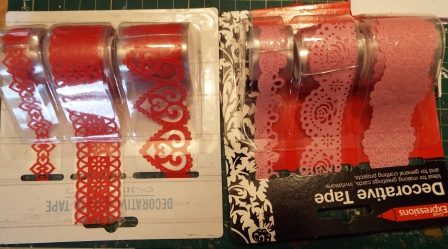
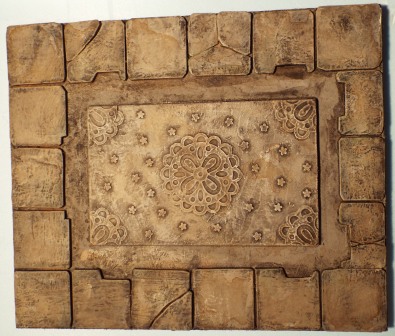
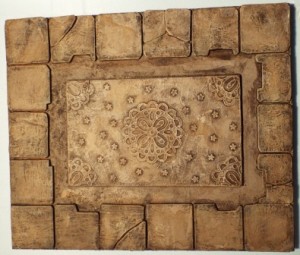
The first items are from Poundland – each consists of 3 plastic tapes with ornamental shapes. These can be applied to floors or walls and overpainted to look like decorative stonework.

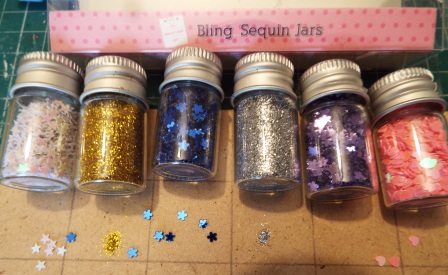
I have used a section of the rightmost tape to put some texture on a floor. I have also used some sequins from a set bought from The Works. This has 6 jars, 4 of which contain 3 shapes of sequins, and the other 2 have tiny circles of Gold and Silver which look like tiny coins, and would look good in a treasure chest or open moneybag. I have used some of the sequins on the floor.

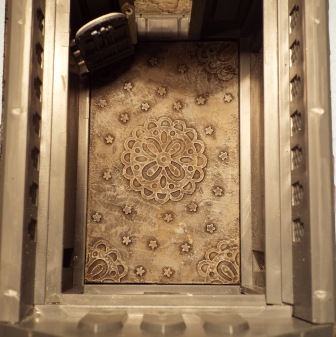
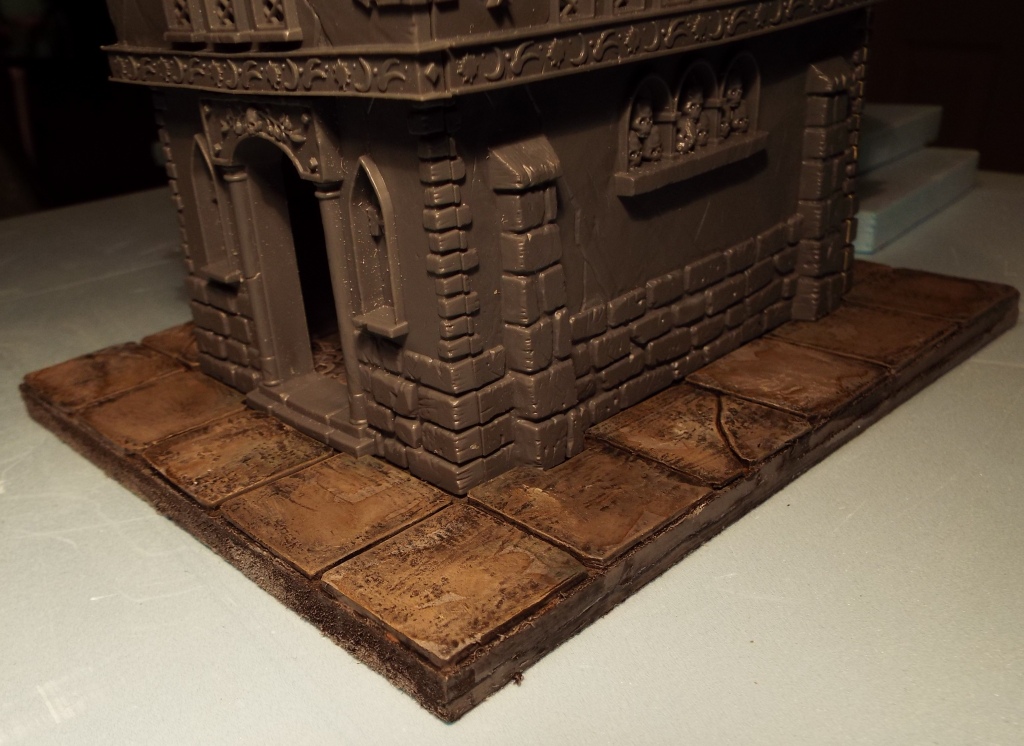
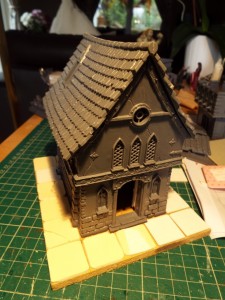
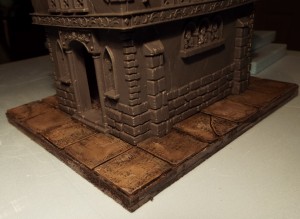
Here we can see the building sitting on the base. Outside the building there are flagstones, each approximately 1 inch by 1 inch, some of which have been damaged. I used this convention when I was doing some scenery for a period when I was into D&D 4th edition. I loved the combat mechanisms and I think I might apply the idea of Frostgrave and warbands to create a 4th edition skirmish. The flagstones have been cut to allow the building to sit into them.
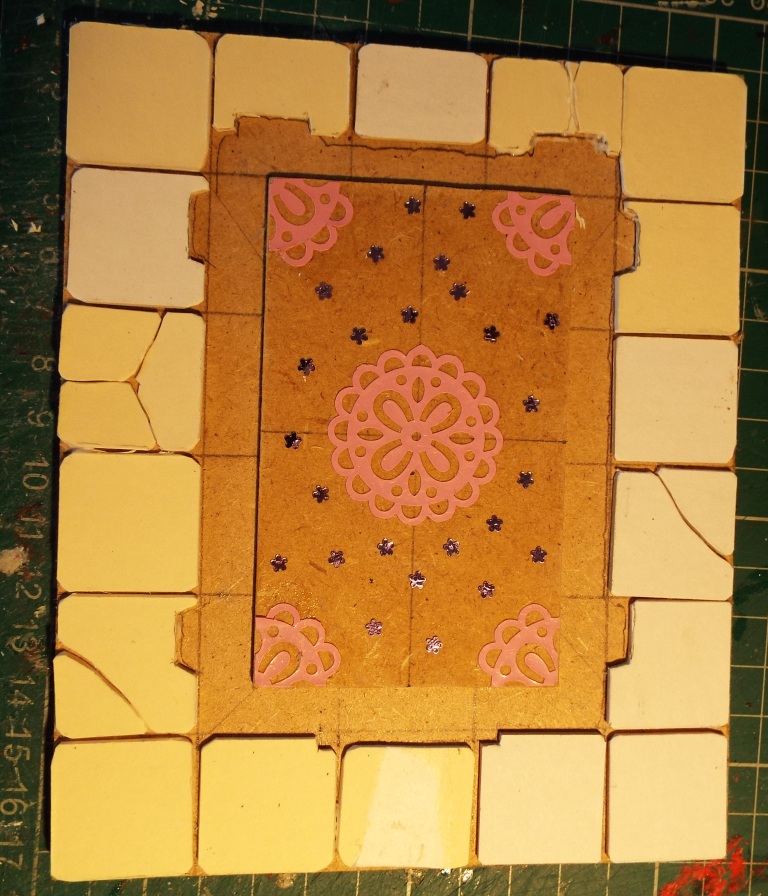
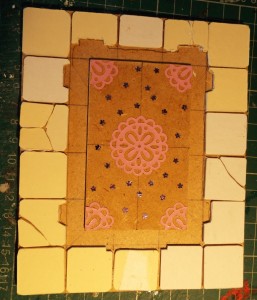
 Here is the base without the building showing the interior floor. The pink tape is self-adhesive and has been applied to a 3mm piece of mdf which has been glued to the MDF base. The darker spots are some of the sequins glued with PVA to break up the flat area. Here is the base without the building showing the interior floor. The pink tape is self-adhesive and has been applied to a 3mm piece of mdf which has been glued to the MDF base. The darker spots are some of the sequins glued with PVA to break up the flat area.
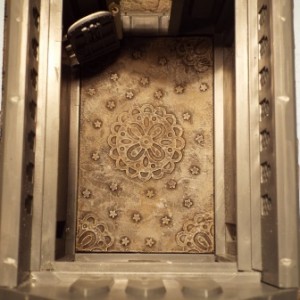
 The next job was to spray the base with a matt grey primer. When dry, liberally apply a wash of black and burnt umber acrylic. When that is dry, dry-brush with white, toned down with a small amount of the black/burnt umber mix. A very watered down wash of burnt umber has then been applied – I have deliberately made this a bit patchy to try and make it look like muck has been deposited by rainwater runoff or snow-melt. The final bit, which you can’t really tell from the pics, are a few splodges of a green wash close to where the building walls will sit, to represent algal/liverwort growth in the damp. The final picture, which makes the base look browner than it is, shows the building sitting on the base. I modified the door to allow it to open and close. I have an ambition to detail the internal walls, but whether that ever happens, only time will tell. The next job was to spray the base with a matt grey primer. When dry, liberally apply a wash of black and burnt umber acrylic. When that is dry, dry-brush with white, toned down with a small amount of the black/burnt umber mix. A very watered down wash of burnt umber has then been applied – I have deliberately made this a bit patchy to try and make it look like muck has been deposited by rainwater runoff or snow-melt. The final bit, which you can’t really tell from the pics, are a few splodges of a green wash close to where the building walls will sit, to represent algal/liverwort growth in the damp. The final picture, which makes the base look browner than it is, shows the building sitting on the base. I modified the door to allow it to open and close. I have an ambition to detail the internal walls, but whether that ever happens, only time will tell.
I think the tape will look particularly good on decorative wall friezes, and I’ll be giving that a go on my next blue foam building. Hope the tips are useful.
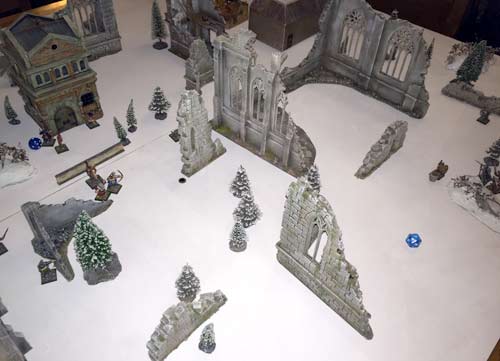
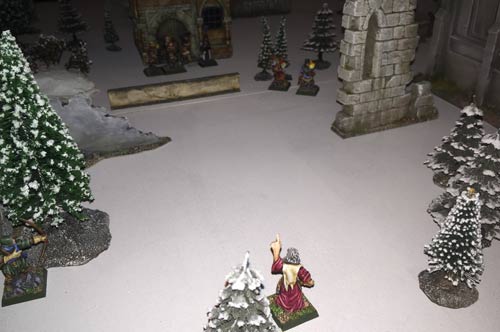
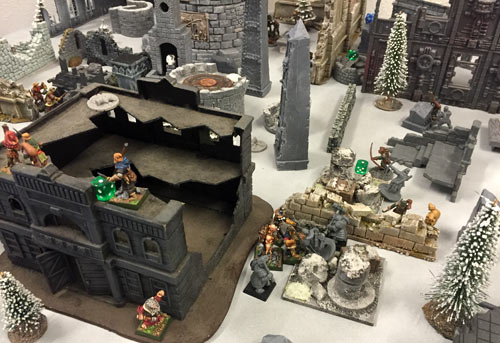
First proper table set up at home. This was a 4’x4′ table on two boards. I was going to use a piece of snow fleece – the sort of thing used in Christmas shop window displays. It looked pleasingly fluffy, like fresh snow, but we rapidly discovered that nothing would stand up on it, and it kept snagging on the corners of the bases. I whipped out a small paint roller and some acrylic primer and gave the back of the MDF boards a quick coat of white. A few minutes with the hair dryer and we were ready to go. Probably close to the record for the shortest time between painting a gaming surface and actually using it – I was setting out one end while the other end was still drying.
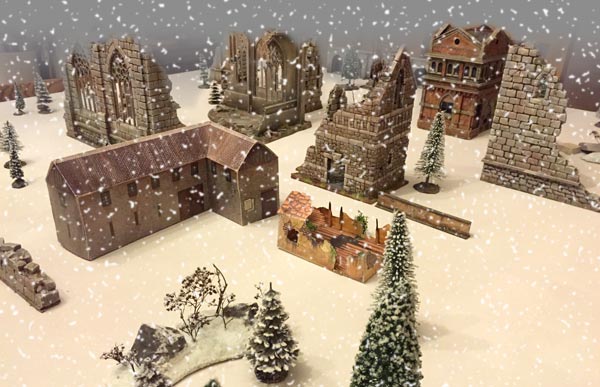 Snow falling in Felstad There’s a mixture of some really old and some really new scenery. I’ve cunningly taken this photo so the best stuff is in the background, but I didn’t realise that at the time. In the foreground there are two Warhammer townscape buildings. Behind that is a stone hall with two colours of stonework. That’s scratch built from foam, and then some new gothic ruins and a very old brick Linka tower.
Rowan and I were joined by Joe for a three way skirmish. He didn’t have a warband so Rowan picked him one – mostly old Citadel Norse led by a Harlequin Miniatures Gandalf.
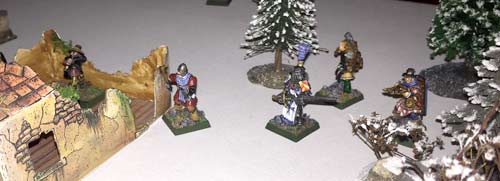
 Frostgrave warband deploys Here my warband rushes off to grab the loot, the warhound lolloping off in front. I took all these photos with the flash on – I rather like the gloomy distance it creates. At the front was Jeremiah Crow, the thaumaturge, assisted by an archer and a massive barbarian. I had Joe on my right flank and Rowan on my left, so this was potentially tough. However, we were playing with the Yaktribe campaign rules which basically mean there’s not much incentive to kill each other. Experience is mainly earned for spell casting and there’s nothing for killing each other.
It was a big table, even for three players, so there is quite a lot of space between us.
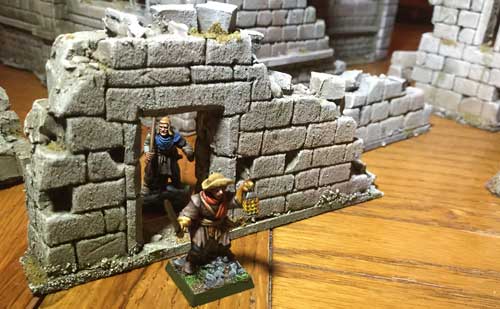
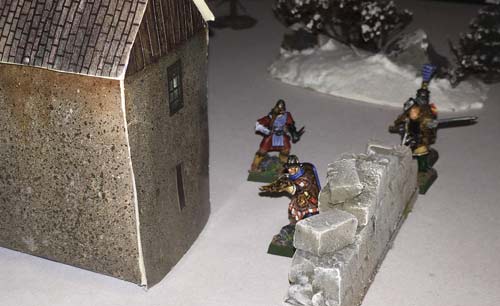
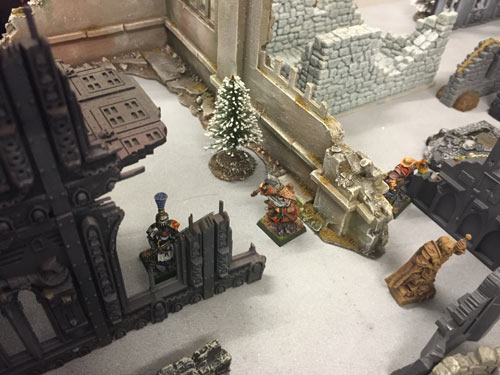
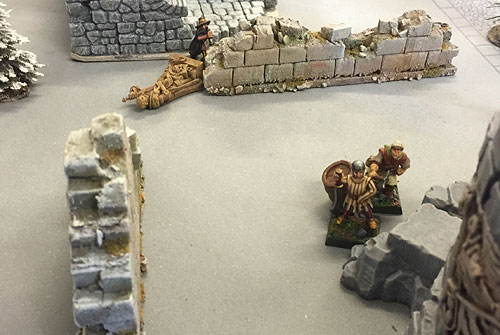
 Frostgrave ruins Over on my left flank, Rowan was advancing cautiously. With a Templar and two marksmen he had some heavy hitters. The Templar was wielding a magic sword and he enchanted both the crossbows.
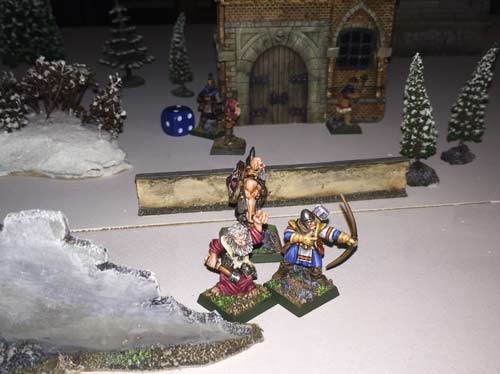
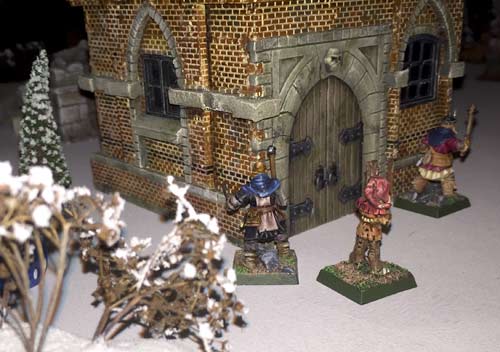
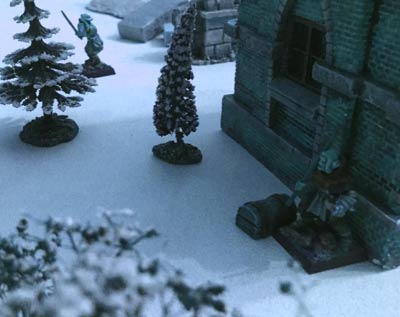
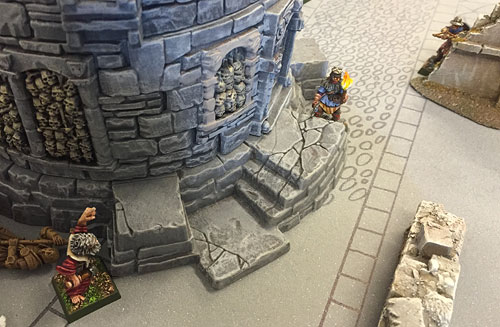
 Rowan’s – templar and marksman Accompanied by my apprentice (Talisman pilgrim), my thief reached the corner of the building and started to climb. There was a piece of treasure right on the top, which he was hoping to retrieve without being picked off by a crossbow bolt. Not much magic so far, although I had successfully cast Shield on a couple of my key people.
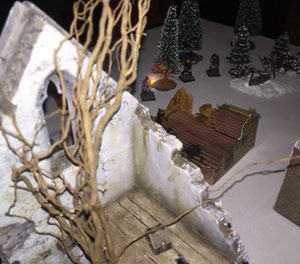
 Thief prepares to climb for treasure One treasure chest was on the top level of a ruined hall – seen on the left with Rowan’s warband advancing from the forest in the background. At the end of the game much blood was to be shed over this particular chest, turning a successful hunt into a borderline disaster for my warband.
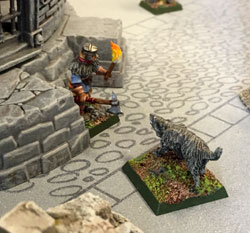
 The fateful treasure chest Soon a couple of bits of treasure had been grabbed and some wandering creatures showed up. Over on Rowan’s side, a couple of wild dogs showed up, but were soon dispatched by a thug and a marksman.
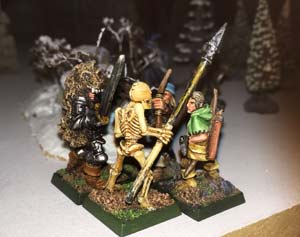
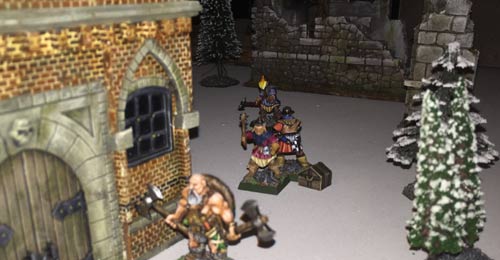
 Rowan’s thug about to seize some treasure 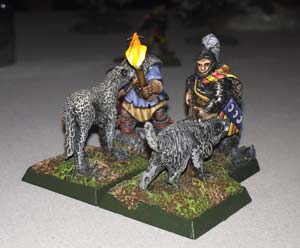 Wild dogs’ bark is worse than their bite On Joe’s side they were bothered by a skeleton. An archer and a ranger shot at it unsuccessfully and had to be bailed out by his bearskin clad knight.
 Skeleton gets permanently killed Meanwhile my warband rushed up the centre. With the thief retrieving one chest from the top of the brick tower, and another one secured by a thug, and no casualties so far, there was a third chest within reach – the cursed chest that was to bring misfortune on its bearers.
Meanwhile Rowan was advancing towards Joe. A marksman, wizard and apprentice prepared to open fire. Then, in one of those things that only happens in multiplayer games, they struck a deal. Rowan’s crossbowman held his fire, and Joe’s wizard would use his telekinesis to retrieve a treasure precariously balanced at the top of one of the ruins for him.
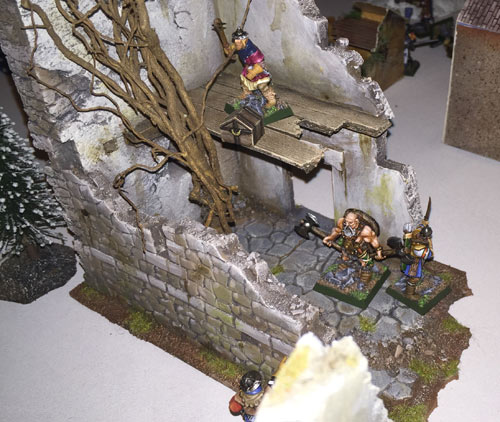
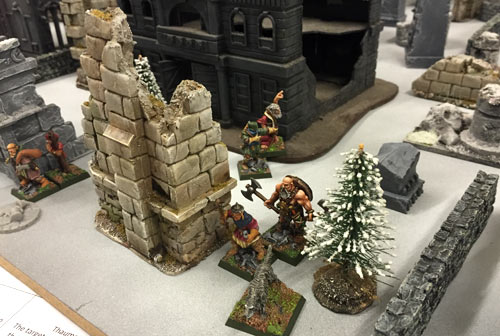
 Rowan’s warband advance With no such supernatural help available, a thug climbs a tree to get the treasure chest, while some others of my warband stand guard.
 Thug climbs for the treasure He got hold of the box, but nearby Rowan’s warband were gathering, and they had their eye on this loot.
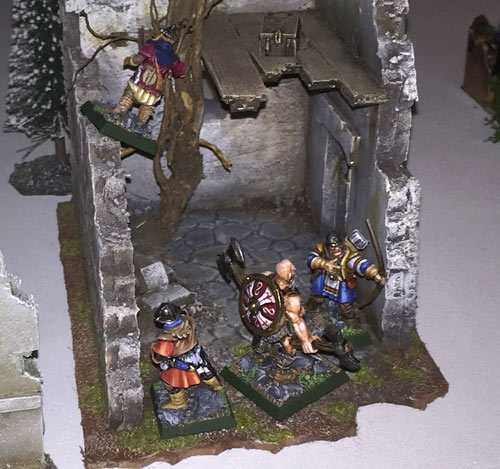
 Got it, let’s go home! After retrieving a chest by Telekinesis, Joe’s wizard successfully summoned an imp for more supernatural treasure gathering and sent it off to the ruins. My thaumaturge was already there. After nipping round the corner to avoid the crossbow bolts, a piece of treasure was almost in his grasp when the imp turned up. Lacking magical weapons, there wasn’t much my warband could do to get rid of him. Thinking quickly, Jeremiah drew an explosive rune on the wall next to the treasure and scrambled through a window out of the way – let’s see the imp fetch it now. Unfortunately the following turn, Joe’s wizard used his telekinesis again to float the treasure away from the rune and into the waiting hands of the imp who scurried off back to the wizard.
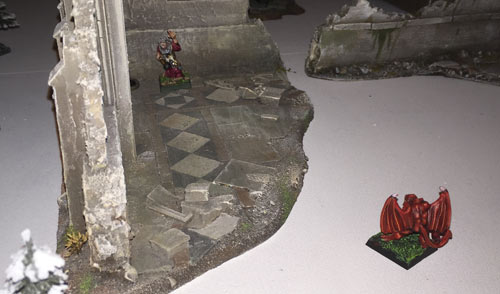 “Begone foul hellspawn” 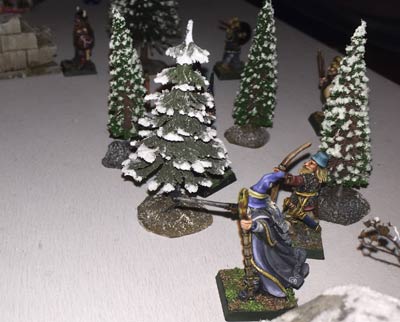 Joe’s warband watch the imp from a safe distance My thief had successfully climbed down the tower with the treasure (we have a house rule that throwing treasure off high buildings has a risk of destroying it), but Rowan’s treasure hunter was on the prowl, and they are formidable fighters. He hurried for the edge of the board and safety.
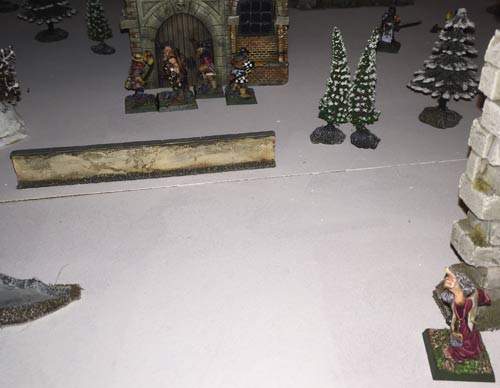
 Thief and enemy treasure hunter The archer fell to Rowan’s enchanter’s grenade, but the rest of the group hurried away with the treasure, pursued and surrounded by their enemies.
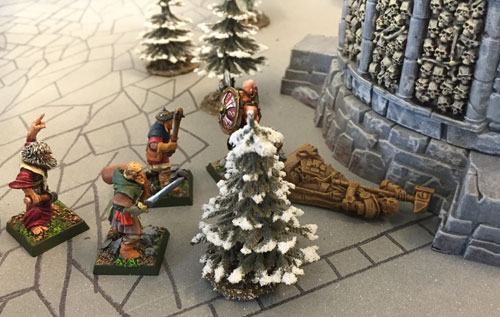
 The journey home The group found their way blocked by a treasure hunter, whilst a templar and a thug backed by two marksmen were coming up behind. It was looking grim but then Jeremiah sprung to his henchmens’ rescue. In a rare bout of successes with a previously useless spell, first he blinded the treasure hunter with Blinding Light.
 The fight develops The templar killed one of my thugs, while another fell to a grenade. Then Jeremiah managed to blind the templar too.
 Barbarian’s last stand Meanwhile, his three bits of treasure safely away, Joe’s wizard and apprentice came forward and started throwing Elemental magic into the fight, wounding both sides indiscriminately. Their interference cost them dearly when Rowan felled Joe’s apprentice.
 The End The barbarian struck down the blinded treasure hunter and templar, but then was killed himself. Jeremiah and his archer watched helplessly as Rowan’s enchanter retrieved the box. I got away with two bits of treasure (and only four surviving warband members), Joe got three for the loss of an apprentice and Rowan emerged the winner with four treasure – albeit with nearly half the warband dead. The curse of the chest struck most keenly after the game when my barbarian and Rowan’s templar (who had a magic sword) rolled ‘Dead’ in the after game recovery. If only I had just left it behind….
A few thoughts after our third game. Three players worked well, possibly better than both four (a bit slow), and two (not as interesting). It’s important to have a spread of spells, if you have two of similar type (e.g. two attacking spells) then whichever one is harder to cast won’t see much use. Again, I shouldn’t have been so greedy, but at the time the upstairs chest looked very achievable.
A follow up to my earlier post on Frostgrave trees, I’ve added three new types of tree to my collection. They were all ordered from eBay
A – 50x Dark Green Trees Model Train Railway Park Street Scenery HO Scale 6.5cm (361360991044)
B – 20 FIR TREE 9CM MODEL TRAIN LAYOUT ARCHITECTURE WAR GAME DIORAMA SCENERY HO (361393091231)
C – 10pcs Layout Scenery Landscape Model Cedar Trees 8cm-12cm Vary Scale To choose (251143618482)
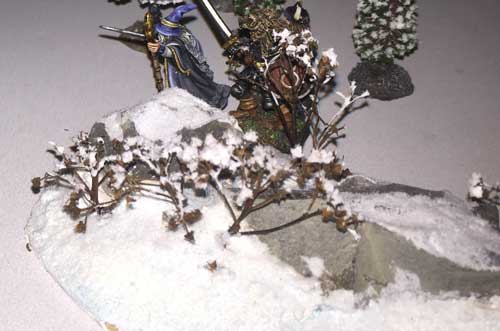
They were all very good value, ranging from about 8p each to 30p each for the big ones, however, they were pretty cheap and cheerful. None of them had bases – just the stalks, and the C trees just had a twisted bare wire, which is just about visible between the foliage, although not so noticeable once the snow has been put on. In addition a lot of the smallest trees (A) which have plastic trunks, were a bit bent and wouldn’t easily straighten. For comparison, D & E are trees from my previous posts. D has been snow flocked with baking soda and PVA, whereas E has Woodland Scenics snow on a mixture of PVA and white acrylic.
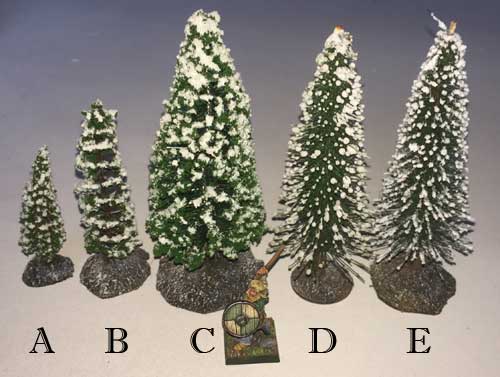 Comparison of trees for Frostgrave The new trees were all plain – I wanted to add snow to match the others. I based the small ones on pieces of heavy card – poked a hole with a scalpel, pushed the plastic trunk through and stuck it with PVA. Then when the glue was dry, I cut it off flush with a scalpel.
The large ones were more of a challenge. I wanted to weight the bases – I used 2 pence coins, but then I couldn’t easily make a hole to stick the trunk it. I solved this by cutting small pieces of pie dish foil, squirting PVA on them and then wrapping them round the wire. They flared out and were very solid when dry. I then PVA’d these down to the top of the coins. The next step was to cover the bases with plasterboard adhesive. This weighted down the small ones and created a smooth mound on all of them. Finally I covered them with PVA and sand. As well as a ground texture this is very hard wearing and prevents any chipping of the bases. All of these were snow flocked with Woodland Scenics on a mixture of PVA and white acrylic. Some of them could do with another coat as the foam flock is more absorbent than the other trees I bought.
Just before Christmas I bought a package of second hand trees on eBay, mainly because it contained one of the Britains oak trees – as used in WFB3 on ‘that table’. It also included some rather ropey conifers that I thought would come in handy for the Frostgrave project I was starting up. Here’s what I did with them.
There were two types of conifer. The first was the ‘bottlebrush’ style shown on the left. It was recognisable as a conifer but it didn’t really look like one. ‘Never mind’, I thought, ‘I’ll put some snow on’. I didn’t have any snow flock, so I used baking soda. I painted on neat PVA (good quality Evostick not rubbish craft glue), and sprinkled with baking soda. This made a massive difference – as you can see on the right.
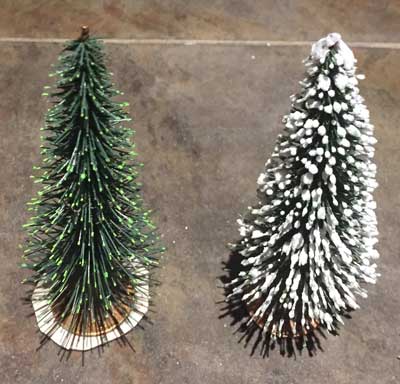 Bare tree and with baking soda I wasn’t sure about the baking soda on two fronts. Although it was crisp and white and made the tree look a thousand times better, it was a little blobby in texture rather than frosty and I was worried about using it on bases and where it might come into contact with white metal – it’s a strong alkali and there might be some kind of corrosion/reaction. So I went and bought a Woodland Scenics snow flock bottle. It was quite expensive at about £10, but you do get a lifetime’s supply.
The first use was a bit disappointing as you can see below. It was frostier looking but lacked the whiteness and body of the baking soda.
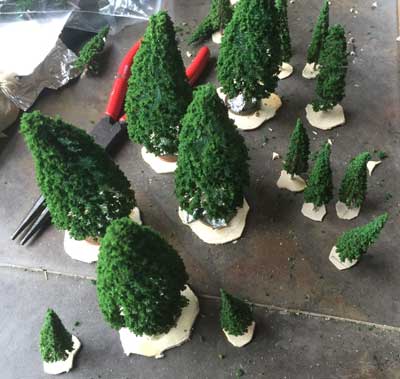
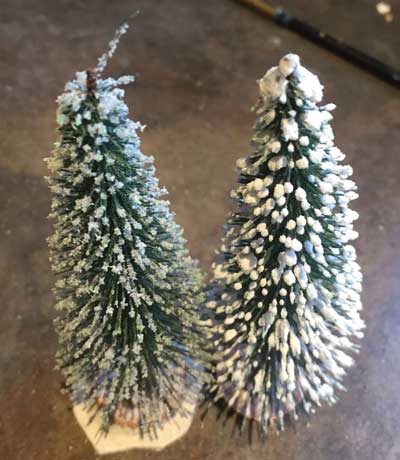 Snow flock on left, baking soda on right The next experiment was to mix white acrylic in with the PVA – not very much (maybe a quarter paint to three quarters PVA) and paint that on. This worked much better with it coming out strongly white in a single coat. It was the best of both previous attempts. I went on and did the rest – see below, including the second type of tree which consisted of individual plastic layers in soft plastic that stack up into a tree. Here they are in the flocking tray – and looking very atmospheric. Just need a lamppost and you have Narnia.
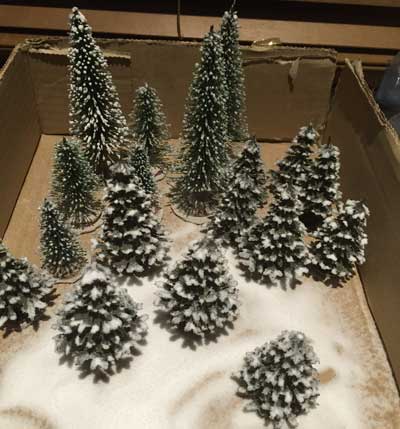
The trees themselves were glue gunned to pennies, which in turn were stuck to card bases to help them stay upright. These were then painted dark brown and drybrushed with a very pale colour. Here they are before base painting, and behind them you can see my half finished Gothic ruins. More on how they were constructed in a future post.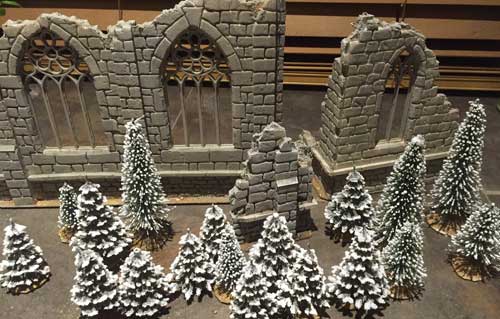
This weekend, starting on Friday, Rowan and I built this Norman motte and bailey castle for his History homework. It’s built to 6mm scale (1:300) in the classic shape. Most motte and bailey castles were pretty small – this, with its 15 metre high mound and three storey keep, represents one of the larger examples.
It’s on a plywood base, built up with cardboard and then covered with plasterboard adhesive (which is like a hard plaster). Once dry it was all painted with a mid-brown (emulsion tester pot) and drybrushed with a very pale cream colour, to create an earth texture. Finally it was painted in patches with PVA and covered with two kinds of flock and dried tea (from teabags). The moat was given one coat of Woodland Scenics water. It could have done with more, but there wasn’t enough time.
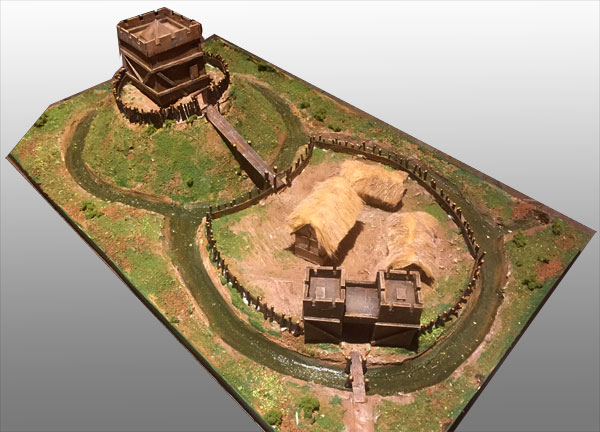 Motte and Bailey castle The keep is mounting board and balsa, with a small pitched roof inset, and then a walkway around. The log palisade is made of little bits of birch twig. To make the fence stay up, we had to stick a strip of mounting board down first – hopefully it’s not too obtrusive. It seemed more realistic to use whole logs – unsplit timber would have been easier to collect than planking larger trees and wouldn’t rot as quickly as split or sawn surfaces.
Inside the bailey are some mounting board buildings, with a few balsa wood details. Luckily Norman buildings didn’t have much in the way of doors and windows, which kept it simple. The thatch is teddy bear fur – a bit thick for the scale but it’s got the right look. They should have raised smoke holes, but it’s impossible with such a rough material. One of the buildings is a larger two storey structure – a hall with storage underneath. The other two are simple one storey huts. We were going to make stables with a row of doors, but the Fanaticus forum feedback was that they wouldn’t have had those at this point. Ideally there would be a couple more buildings in the bailey, but we ran out of time – it had to be handed in this morning.
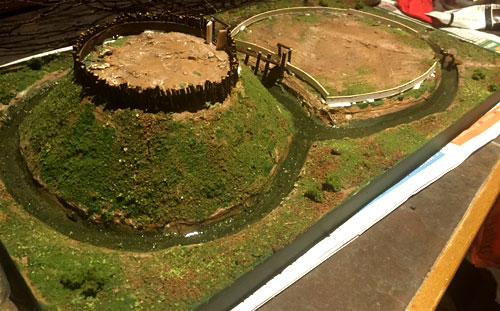 Motte under construction – buildings were stuck on at the end. The gate towers started off as a mounting board arch, which was then clad in balsa, with a couple of diagonals to give it interest. The bridges are strips of balsa with more birch twigs stuck to the sides as supports.
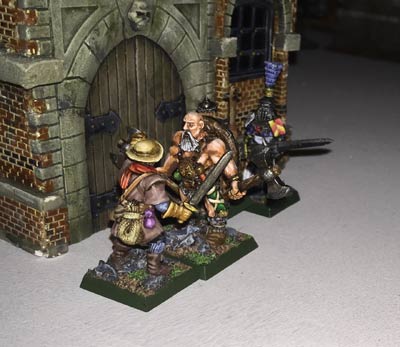
I am working on a scenario for BOYL 2016 called “Inquisitor Cynole and the Temple of Gloom”. It’s based on a snippet from the Book of the Astronomicon – read more about it on the Oldhammer forum here.
One of the factions is the “Trading Guild” and I have just painted this as a potential leader. He’s actually from a Wargames Foundry Colonial/Victorian range. I simply added a green putty bionic eye, a ‘plasma’ end to his revolver and a wire with a few putty details on it.
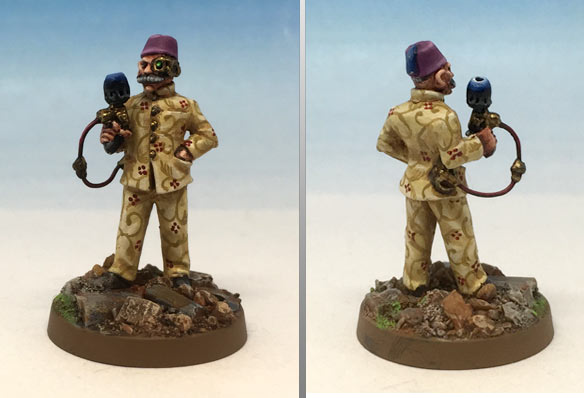 Trading Guild official
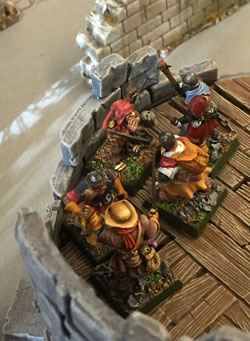
For our second ever Frostgrave game, we played a four way game. After a quick reincarnation, my warband came back exactly as it had been at the start of the first game. Rowan’s was enhanced by adding a couple of higher quality henchmen such as a knight. We played on a 3’x3′ table again, with even more scenery. I thought it would be too small, but it actually worked pretty well – although 4’x4′ might have been better. The other two warbands were a bit more experienced, but in Frostgrave the benefits of this are relatively moderate so it didn’t feel unfair.
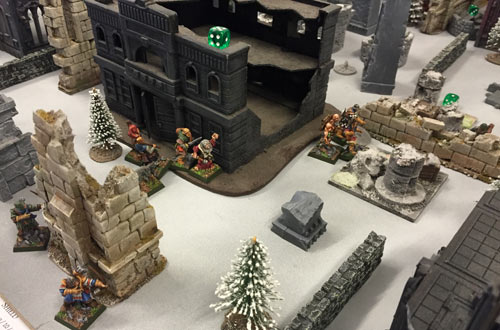 Rushing for the treasure Here you see my warband. The barbarian has led one group to grab some treasure (the grey disk near the wall). There’s more treasure around in the form of giant gems in the shape of dice, although at least two are illusory. I’m about to meet another warband rushing in from the right. On my left flank was Rowan’s warband. He covered me warily with a marksman but didn’t fire for fear of provoking my wizard. We weren’t going for the same treasure so there seemed no reason to fight (and we were using the Bad Karma rules which give no XP for killing).
 Melee A turn or so later, the thief has climbed the building and retrieved a bit of treasure – luckily it turned out to be real. The apprentice and a thug are advancing to recover another bit (the grey disk). On the left Rowan’s warband advances, and in the foreground the barbarian and his companions are in desperate melee with the other warband. The warhound has been sent in to protect a thug while he tries to get away with the treasure. In Frostgrave, escaping with treasure is impossible without your comrades protecting you, because it halves your move.
 Enchanter warband advances Meanwhile Rowan’s enchanter was advancing into the middle of the table. He managed to drive off the Chronomancer’s advance on one side by shooting one model and grenading another in the same turn. Above you can see one of his new acquisitions – a templar knight. He didn’t have much treasure on his side – in this game the gold statue was representing a medium construct, so no loot there.
I had much better luck this game. The warhound killed its opponent with two lucky rolls, and the barbarian demolished another. Whilst my thug escaped with the loot, the rest got stuck in to their single remaining opponent – a ranger. Sensing victory, I threw an archer into the fight, only to suffer my only casualty of the game when the ranger calmly killed him with a single blow. My wizard occupied himself by repeatedly trying to cast Blinding Light, but never strongly enough to do any damage.
Up on the tall building, the apprentice and a thug secured another piece of treasure and climbed down inside the building with it in order to retreat as safely as possible. The illusionist warband had taken a beating – in addition to his bad luck in the melee (three dead), my archer shot one of his archers as he tried to climb over a wall to help the ranger, and another of his men was shot by Rowan.
By this point I had recovered three pieces of treasure and having learned from the last game, I decided to beat a retreat while the going was good. An archer and Jeremiah, the wizard, covered the rest of the warband as they filed off with the loot.
 Time to go home What did I learn from this one – concentrate on the achievable treasure, stick together and don’t be too rash. Frostgrave for four works pretty well, although it is a bit slower. As there is a separate phase for wizard, apprentice and others, in effect it takes three circuits of the players to complete each turn. However, the magic is pretty quick, and there are no cumbersome magic points to track. I particularly like the way the wizards can choose to drain their own health, for the points required to bring a roll up to the number needed for success. It adds an interesting tactical twist and also fits in well with the atmosphere.
 The scene is set On Saturday, Rowan and I headed over to the Games Emporium at Mansfield to try out Frostgrave. A helpful member of staff helped us through the first couple of turns while we got the hang of the rules. We both had starting warbands. I fielded a Thaumaturge, Apprentice, Barbarian, 2 Archers, 3 Thugs and a Thief, while he had an Enchanter, Apprentice, Marksman, Treasure Hunter, 5 Thugs and a Thief.
We used the ruins I had just built, with a few pieces of Emporium stuff – even on a 3′ x 3′ table we needed extra.
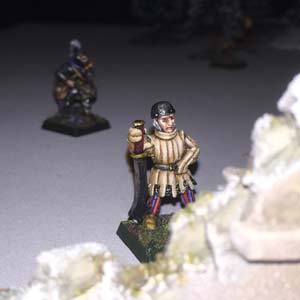
 Advancing to the first treasure Here the barbarian leads a couple of thugs to the first bit of treasure – a statue, urged on by Jeremiah Crow. All good so far. The skull festooned wall is the large central building where much of the action was to take place.
 Marksman and Thaumaturge face off In an effort to protect the warband, Jeremiah tried to cast Blinding Light on the enemy marksman (taking cover at top right) – but failed to make the casting roll, a pattern which was to become all too familiar.
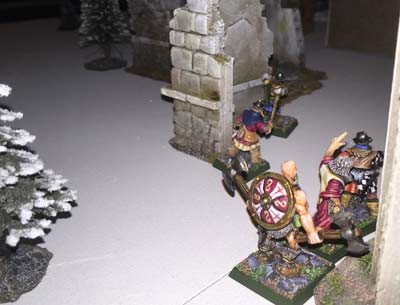
 Treasure is dragged away 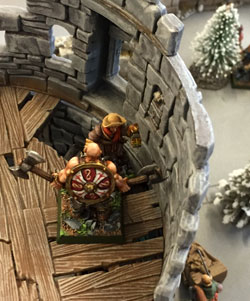 You shall not pass Over on my left flank, Rowan’s thief had found another statue and started dragging it away. Two thugs picked up a ‘magic’ barrel and one pulled it while the other stood in front as a human shield. You can take cover behind other models, so the use of cannon fodder to protect more valuable models seems to be a standard Frostgrave tactic.
My barbarian climbed up the side of the central tower and attempted to block the enemy treasure hunter as he climbed the stairs. Sadly there’s no combat bonus for holding the higher ground. Barbarians are one of the best melee fighters, but treasure hunters are also strong, and he was forced back, allowing a thug to come up and support the treasure hunter.
Down below, a thug was advancing round the tower and getting dangerously close to my Thaumaturge. I sent the warhound forward to block him and to draw fire from the valuable wizard. Unfortunately it’s quite easy to kill a warhound in the open with a crossbow, and down he went.
 Release the hound I had got one piece of treasure safely away by this point, and another well on the way. I should have been happy with that and backed away but I wanted to claim that central treasure. The barbarian fell to the thugs and treasure hunter, but I sent in more – a thief, a thug and the apprentice. By this point, Rowan had discovered ‘Grenade’ – his favourite spell and both wizard and apprentice were hurling them at anything that moved.
I eventually got the treasure away, but model after model fell in close combat, and once you are outnumbered, it gets ever harder. Here, the apprentice, realising the desperate situation he is in resorts to a quick prayer before being hacked down.
By this point, other than the two thugs who had crept off with treasure, there weren’t many survivors. My wizard was slain, the apprentice was slain, I did get Rowan’s wizard with a lucky arrow, but I only had one archer left on the left flank. The thief tried to drag the treasure from the tower towards him before being cut down. The battle was over.
 Last stand After the battle, I rolled to see what would happen to the wizard – and rolling low discovered that he was dead. At that point it didn’t seem worth totting up the rest – I’d have to start again with a new warband. Rowan fared a bit better, finding a valuable Staff of Cursing, amongst other bits, and upgraded a few henchmen with the proceeds.
What did I learn? Well, don’t get greedy was one lesson. Enchanter’s throwing grenades are very dangerous was another. Another key point is not to get outnumbered in melee – models on their own die easily, even if they are your best. It’s also worth having a couple of cheap models as treasure carriers – if all they are going to do is disappear off the table with the loot, it’s not worth spending too much on them.
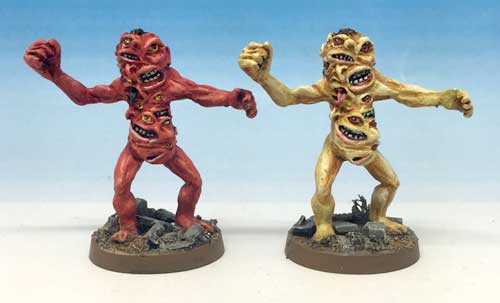 Chainsaw Warrior Mutant Models 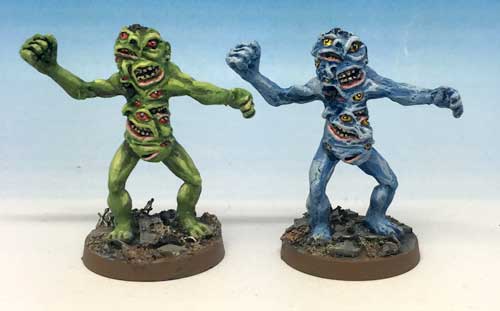 More Chainsaw Warrior mutants 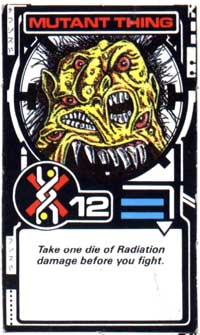 Original card Last year I created a game using Space Hulk rules in a Chainsaw Warrior setting, which I’m finally getting round to fully documenting here (and I still need to finish the rules so that they can be posted). I needed models for all the key cards, which was difficult as most had never been released; in many cases the only source was a small picture on the card of the head, so I didn’t even know what they were supposed to look like. In the game there are four mutants, one each of red, yellow, green and blue. As individual characters – and pretty powerful ones at that, they needed to be well-represented. I thought they would probably be a bit larger than human size, as they have good close combat values. The red mutant is the weakest at 10, then 12 for yellow, 14 for green and 16 for blue. That makes the blue mutant the second highest combat value after Darkness – higher than even the Meat Machine.
The models that I have used are my own sculpt made from green putty on a thin wire armature. I have cast them up at home as described in this blog post. The casts weren’t perfect but pretty good – these were painted without any additional putty work. I wondered about making variants, but then I decided that I rather liked the way that they were identical, echoing the original cards which were also identical apart from the colour.
On the photo below, you can see that I have painted their close combat score on the back of the base for reference. Originally I was going to simplify this a bit in the Space Hulk game and give all the mutants the same score, but it’s pretty easy to remember and you can always keep their counter to hand for reference (plus it’s on the base).
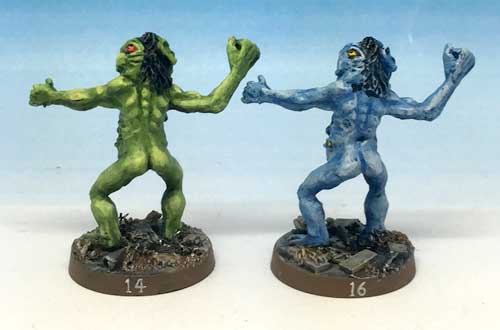 Back of mutants
|
|