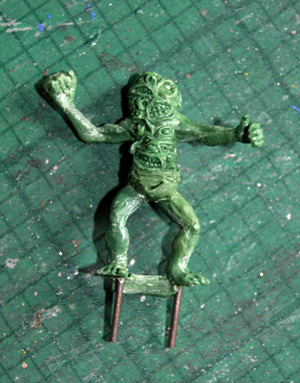
Mutant /. demon green putty sculpt
I’ve been getting steadily more successful at home casting some of my sculpts, so I thought I would share my methods. Note that the models for sale in my shop via Lancer are not produced in this way – they are spin cast in a commercial set up.
You will need:
- A master sculpt
- Thick wire
- Milliput/plasticene
- Mounting board
- Scalpel
- Superglue
- PVA glue
- Steel ruler
- Cutting mat
- Silicone rubber (RTV heat resistant)
- Plastic cups
- Stirrer (e.g. plastic spoon or bamboo skewer)
- Disposable gloves
- White spirit
- A small pan to heat metal
- White metal
- Cardboard
- Elastic bands
- Talcum powder
Stage 1 – Mould casing
The first step is to make the mould casing. I’ve used green putty, but you could also use bits of plastic, other models, beads, wire etc. etc. I don’t have a vacuum chamber to force bubbles out of the silicone rubber, so I cast them standing up. This means that any bubbles are likely to be trapped underneath in not very noticeable places, rather than somewhere like the face.

Mounting board base
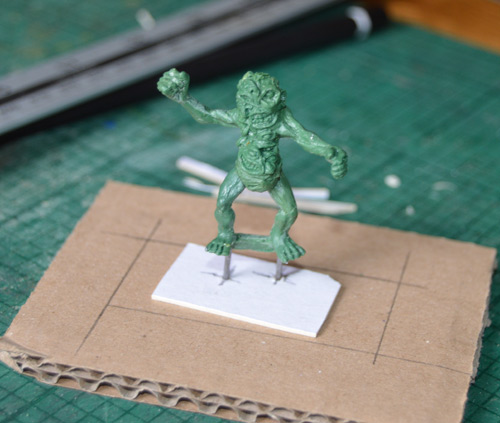
The bottom of the mould will become the top for casting, so ‘underneath’ the model, I’m going to need somewhere to pour the metal in. To make space for this I’ve superglued two bits of thick wire to holes in the bottom of his feet.
Next I need to attach him to a base. I’ve cut a rectangle of mounting board, held the model on it and marked the wire positions as two small crosses. Using the tip of the scalpel, I open up two small holes.
The wire is poked into these and superglued in. This holds him very strongly.
I’m going to make the casing for the mould from cardboard. Some people advocate using Lego. I’ve tried this, and it takes as long to build the casing as it does from cardboard. Not only that, you are restricted to the module of the brick stud, and also the rubber leaks between the cracks and takes ages to clean off the Lego bricks. The only advantage of Lego is that if you are doing more than one pour, the precision of fitting the bricks together enables you to locate two halves together just right.
Making the mould casing
The pencil rectangle above represents the inside face of the mould. The mounting board base is deliberately a bit smaller; you’ll see why later on. Next I worked out how high to make it. Allow at least 10mm of rubber above the highest point of the model. If you cut it too fine then the mould will be liable to leak at that point, which will cause you a lot of trouble later. I made the cardboard another 5mm higher than that – you can see the level for the rubber as a pencil ‘tide mark’ round the inside of the mould.
You really need to cut the cardboard with a scalpel and metal ruler to get it accurate enough. Any small cracks and the rubber will leak. I’ve used corrugated cardboard, but mounting board would probably be better because it can leak a bit at the edges of the cardboard.
Note the walls are stuck in a sort of rectangular spiral, and I’ve been generous with the PVA to help seal it.

Completed mould casing
The final preparation step was to form two cones of Milliput round the wire stuck into the base. This will form the two cavities to pour the metal into. I’ve used plasticene for this, but it’s quite hard to clean off the mould when you take the master out. Stick the base into the box with a dab of PVA.

Master ready to go in the mould
Stage 2 – Making the mould
Once the PVA has set, you are ready to pour the rubber. I used Polycraft HT-3120 Heat Resistant High Temperature RTV Silicone. It’s a bit brittle – more so than some old moulds I made twenty years ago, so next time I’m going to try Tiranti. I measured each dimension of the box and multiplied them up to work out the volume (which came to 81ml) and added 20% for wastage and safety margin. I didn’t bother deducting the volume of the sculpt. To measure the rubber, I used a plastic cup – I poured 100ml of water into it to see where it came to. Apparently you shouldn’t get water in the silicone, so to avoid contamination I used an identical dry cup and poured the rubber in to the same point. This rubber is stained red (some rubbers are white with a coloured catalyst), which makes it particularly messy – it’s stringy, it’s sticky and it colours anything it touches. Move anything that might stain well away, and wear disposable gloves. Once I poured it, I left it for ten minutes for the bubbles to come out, and tapped it frequently.
I was then ready to add the catalyst. A good way to work this out (and it only needed 10ml because it’s 10:1) is to use digital scales, but I don’t have any, so I measured it with a plastic syringe and squirted it on top. Then I gently stirred it in. As I don’t have a vacuum chamber to get bubbles out, it’s important to try to avoid putting any in to start with. I later found the very bottom of the leftover rubber never set, so next time I will use a plastic spoon to turn it over a bit more rather than just stirring.
I then left it for a few minutes for bubbles to rise to the surface again before pouring it slowly into the mould. I poured it away from the model rather than over it, so the level rose slowly up until it was completely covered, as a way of avoiding trapping air bubbles. Once it has been poured, I tapped it for a couple of minutes to try to dislodge any bubbles and make them rise to the surface.
Use white spirit to clean the rubber off hands, surfaces etc.
Stage 3 – Cutting the mould open and preparing it
Once the mould has been poured, leave it for 24 hours to ensure that it has fully set. (Yes, I know you are getting impatient). Peel away the cardboard casing and the mounting board base to leave a block of rubber. The next bit is the trickiest bit, but it has always worked for me, even if not perfect. Starting at the points where the base cones are, start cutting the mould open with a sharp scalpel. If you pull the halves apart with one hand you can stroke along the middle with the blade and part the rubber. You need to follow the centre line of the model as best you can to avoid undercut. This is difficult, particularly if you have lots of wiggly sticking out bits, but luckily the rubber is quite flexible and you can get away with a surprising amount (more than a vulcanised rubber mould as generally used in spin casting). This is one point where I’m aware that the Polycraft rubber is more brittle than the previous batch I had because it’s more prone to rip and tear. Keep going until it’s in two pieces and you can gently prise the master out. I slightly messed up the cutting in half on this one – on the far left you can see the arm goes into a hole rather than being open – luckily it can be pulled out through a slit in the rubber.
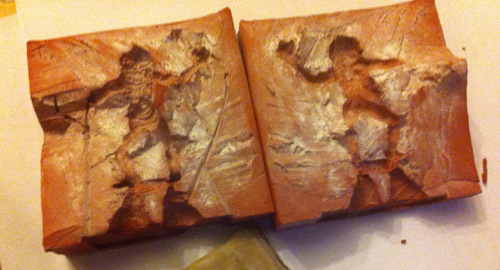
Two halves of the mould
Once it is in two halves, you will probably need to cut some air vents. Air tends to get trapped in the deepest dead ends of the mould, stopping the metal getting to the end, so you need to provide an escape route. In the left-hand half above you should just be able to see some fine tracks running from the arms to the bottom (which will be the top when casting). These were cut in with the tip of a fresh blade. Join them together in a sort of tree, and cut them to what will be the top, not the sides or bottom so that metal can’t leak down them.
Because you have cut it in half from a single piece, the two halves will fit tightly together with no problems ‘locating’ the two halves together. To hold them when casting, I used two elastic bands. To give a bit of rigidity and stop them biting into the corners of the mould, I’ve cut two rectangles of corrugated cardboard slightly larger than the mould. Put the bottom elastic band on quite low down – you don’t want the bottom splaying out slightly and giving the metal an escape route between the two halves.
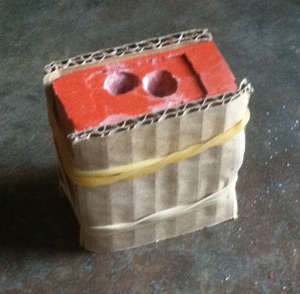
Mould ready for casting
Before putting them together, dust generously with talc and bang the two halves together to distribute it. If you don’t do this, the surface of the metal will be pitted, the edges won’t be as sharply defined, and it may not come out of the mould as easily – leading to mould damage. Note there is a recessed rectangle at the top where the mounting board base was. This is useful because it stops the metal dribbling down the sides of the mould when you pour it.
Stage 4 – Casting the model
Safety warning: Make sure the mould is absolutely dry – any water will be boiled instantly by the molten metal with explosive and devastating results as it is hurled back out through the hole you just poured it through.
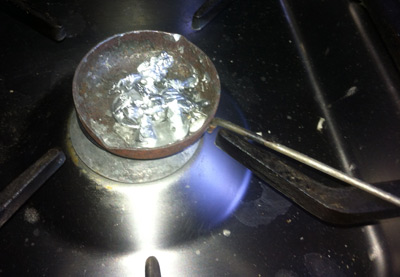
Heating white metal
Sit your mould on something heat resistant next to the cooker. We’ve got tiled work surfaces, so these are OK if any spills but I wouldn’t like to see what happens to laminate. Now heat your white metal in a little pan (you can get these on eBay). I’m just holding it over the gas hob on a low setting. Swirl it around to encourage it to melt. Don’t melt too much at once – it solidifies almost instantly once you take it off the heat. Once it has all melted give it a few more seconds to make sure, and then pour it down one of the holes until it starts coming out at the top. Ideally get an assistant to gently tap the mould with something like a wooden spoon while you pour, to encourage the metal to completely fill the mould. If you don’t have an assistant, then either tap it yourself as soon as it is poured, or, if you are good at patting your head while rubbing your stomach then you might like to take on both jobs at once.
Casting the model
Leave the mould for a few minutes and then take it apart. Be careful, the rubber will be hot, and the metal will be very hot. Use some long nosed pliers to take hold of the metal and ease it out of the mould. One half of the mould usually comes away more easily than the other, so do this one first. You can then extract one beautiful new shiny model and you are ready to melt the metal for the next one. Once the cast has cooled a bit, use some side cutting pliers to clip away the excess metal and put it back in the pan. Re-talc the mould in between each cast. Usually the first couple of casts aren’t quite as good – I think because the mould is heating up, so don’t worry if the first one isn’t perfect. If any extremities haven’t cast then consider cutting more air vents. I’ve also seen little triangular ‘reservoirs’ cut in to encourage the metal to the ends of weapons etc.
That’s it! It’s incredibly satisfying to create a model from nothing, which compensates for the odd imperfection. I’ll post some pictures of the results from this casting soon.

Leave a Reply