|
|
Can’t remember where I picked this tip up from. Most of you will probably have seen it elsewhere, but for them as haven’t it might be useful. The finished photos are not very good, even by the standards of my photography, but they will give an idea. I’m going to pass the finished items over to the ww2 buffs in the group in Horsham where I very occasionally game in the hope that they will work with their 20mm collections.
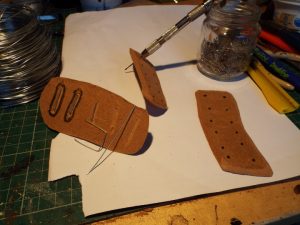
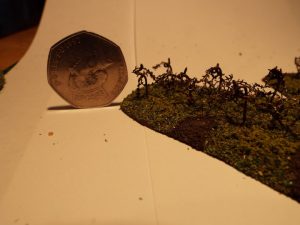
Trawling through the bits box found some of the zinc mesh that is used to create the coils of barbed wire. The barbs are a bit overscale but they provide the best option I have found. I decided to base them on some 4″ and 8″ strips of mdf, and to use some soft wire to create the ‘pig stakes’ (so called because the twist at the top of the stakes are supposed to resemble pigs tails.)
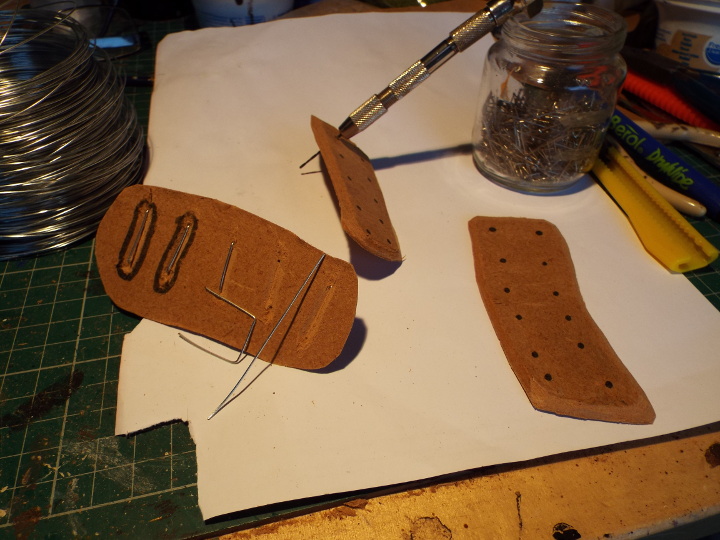
First I cut some strips of 3mm mdf, as usual using the craft knife at an angle to chamfer the sides. I then use a marker pen to mark the position of each stake on the mdf.
A pin vise is used to drill a hole at each of these points, and then used a craft knife to cut a groove in the underside of the mdf to link pairs of the stake holes together. I then cut a piece of the soft wire long enough so that it sits in the linking groove for that pair and when each end is put through its hole there is enough protruding from the top of the mdf to provide the pig stake. Pairs are used because they are more stable than 2 single stakes. In this picture you can see the underside of the left-most piece of mdf where a couple of pieces of wire, outlined with the marker, have been put in place, and the 3rd piece of wire has been bent into a staple shape to slot into its groove and the holes at each end of that groove.
Some gorilla glue has been smeared into each groove to hold the wire in place, and of course the grooves mean that the wires are set in to allow the bases to sit flat on the terrain.
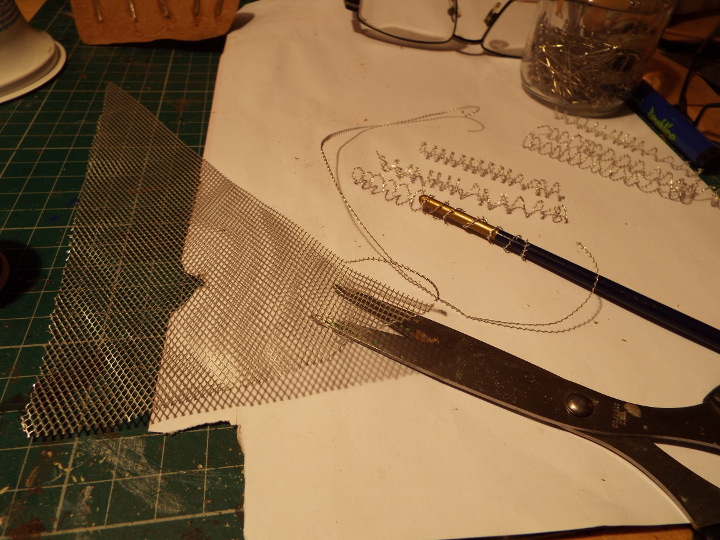
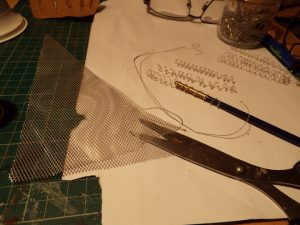
Next I create the barbed wire coils. In the picture below you can see that I have started to cut the next piece parallel to a strand of wire in the mesh. The mesh is soft so scissors are fine, and you can see that it gives me a strip of wire 1 strand thick. This will be wrapped a round a brush handle to create the coil, and as you can see I have a number of these completed.
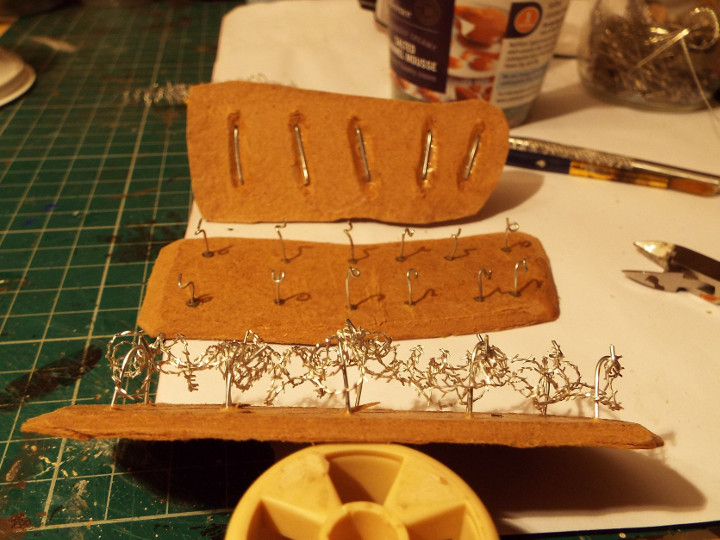
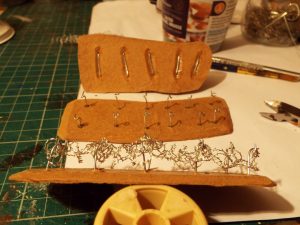
Next, using a narrow set of pliers I twist the top of each stake into the pig-tail shape. I don’t twist them too tightly at this stage – I’ll tighten them later when the ‘barbed wire’ has been added to keep it in place. I then add the coils of barbed wire to link the stakes to get the effect I’m after, and when it’s ok, I’ll tighten the pig-tails on some of them. There are probably patterns for positioning of stakes and laying wire which I should have looked up, but I was lazy. In the picture below the top base shows the wires glued into their slots, the next shows the tops of the stakes bent to create the pig-tails, and the lower a side shot with the barbed wire added.
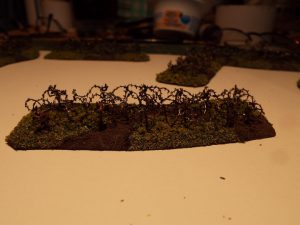
Next it’s just a paint and flock job. I wanted to create the impression of old, rusty wire. Coat the wire with a mix of black and brown acrylic, to which a bit of water and pva has been mixed. Some bits of wire will reject the paint and stay silver. No matter, I want some bare metal showing anyway.
Let that dry and apply a good few daubs of brown paint, and then use a mix of orange and fine playpit sand , applied erratically but with some emphasis on the stakes, to give a rusty effect. Usual basing of sandtex latex masonry paint, flocking most but adding sand to some areas and highlighting as bare earth once the base coat has dried.
Finally a very slap-dash dry-brush with some silver on the barbed wire to bring up some of the barbs a bit, lots of swearing at my crappy photography and it’s done. The coin is a uk 50p for scale. Might be that the stakes should be longer – I have certainly seen some with 2 or 3 twists in them. It’s up to you.
Hope that’s useful.
Al
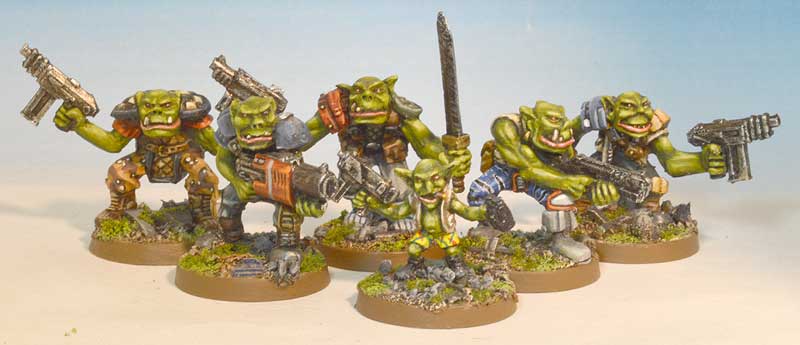
For anyone who hasn’t seen it yet, I’m proud to have put my first sculpts on a Kickstarter. It’s already funded so will definitely go ahead, and the group below is available for only £14 including UK P&P (bit more if you are overseas). It ends in less than a week, so get on board now!
https://www.kickstarter.com/projects/231062375/orc-invaders-28mm-sci-fi-orc-miniatures
They are 5 orcs and a goblin, traditionally sculpted and cast in metal. Ideal for assaulting agricultural homesteads or perhaps an underpass.
Bonzo the dog-faced boy was originally made for the Oldhammer 2016 Chaos villagers project. Everyone enters a model and then one lucky winner gets the lot. Bonzo never made it, because I mislaid him until long after the competition had ended.
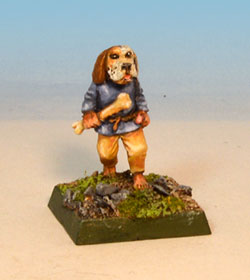 Bonzo the dog-faced boy Here’s the Forum post, where you can see lots of other weird and wonderful creations.
http://forum.oldhammer.org.uk/viewtopic.php?f=29&t=7649&sid=c1d546f0f7f1f8160e18cc09fa92fb01
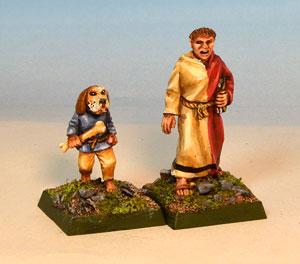
The model was converted from a Black Tree Design villager child, with a green stuff head. He was carrying a small, toy sword, which I altered into a bone to build on the ‘dog’ theme. You can see just how small he is when compared to this Black Tree monk.
This is a way of storing items which might be a bit too tall for conventional storage boxes, allows you to create storage of a height to meet the needs of what you need to store, can stack, and will cost you nothing but a bit of wood glue and maybe some supermarket visits.
I’ve done some for a whole load of jungle type scenery, but it would also work for other tall items of scenery such as towers. The only restriction is the footprint of the item – about 19 inches by 13 inches is the limit.
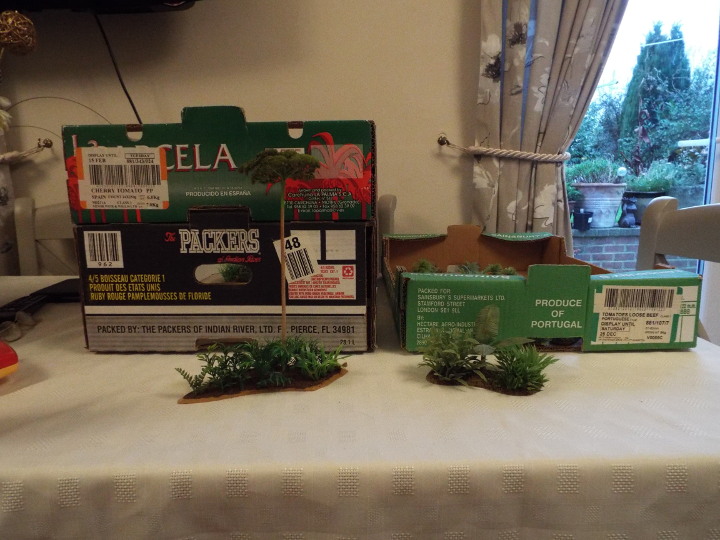
They are cardboard fruit boxes which you should be able to pick up for free at your local supermarket. They are made to stack on each other, and seem to be to a fairly standard size in length and width, but which vary in height. I have used boxes which range from 4 inches to 7 inches in depth.
This picture shows 3 of them used together to store some jungle trees I have and they have a combined depth of 20 inches.
Simple to do. If a single box gives you the depth you require you don’t have to do anything.
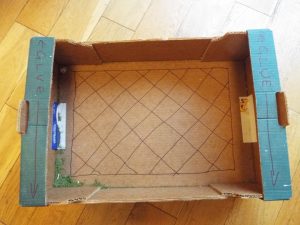
If you need something higher, you cut most of the base out of the boxes that are not at the bottom, as per the hashed area in the picture below. This leaves a lip around the base. The lip at the narrow ends will be glued onto the top lips of the box underneath and it’s this glueing at each end which holds the boxes together. At risk of stating the obvious – don’t apply glue to the top lip of the box which will sit at the top of the pile! I’ve written it on the lips of the box below just to make it clear where the glue goes on those boxes not at the top.
I leave a lip along each long side just to give a bit of strength to the sides.
This pic is a bit superfluous but serves to show where I have used different heights as needed by the scenic items I want to store.

If you wish, you could make them more dust-proof and stronger by sticking card to the side of the tower to block the holes or using a spare box-bottom as a lid, and improve the appearance by painting them with cheap emulsion – maybe stencil a note of the contents on the side. I’ve done the former on a couple of mine, but not the latter as they get stashed in the loft rather than a place where appearance matters much.
I recommend that you don’t remove the tabs that stick up from the top ends of any of the boxes. They are there to stop boxes piled up on each other from sliding off, and leaving them on means you can stack your different boxes on top of each other reasonably safely.
There you are – not the sort of tips we normally put up but I hope they will be useful to some of you.
There is a possibility that this one might turn out to be more about learning from mistakes, although I hope there will be some ideas in here for some people.
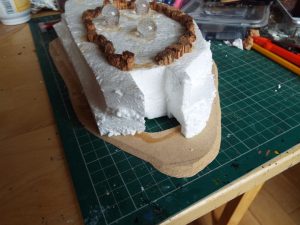
Most laborious element of this is about adding cork and grit for texture, painting the rockwork black and highlighting it. Fairly comfortable with what I intend to do with the top of the piece, but not yet sure about the sides. With hindsight I don’t think I would have made it as tall, and I should have given more thought about how to position troops on the side of it. However, making the sides steep makes the positioning issue trickier, but it does make for a smaller footprint for the piece and so we don’t end up with too much wasted space.
Putting bits of cork on there is time-consuming and makes painting take longer. Looking back I think I would have done better to use a number of thinner sheets of polystyrene and used my hot-wire table to make them very irregular, then I could have made some stepped areas which troops could sit on. If I try something similar again I’ll do it that way, so a useful lesson learnt.
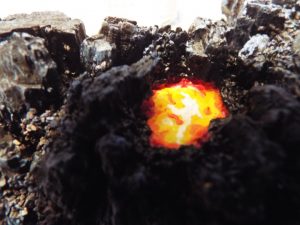
Going to try the molten metal effect in silver for the crater. I’m going for a surface effect rather like lava, where the consistency will mainly be fairly gloopy, but the hotter it is the more runny the consistency.
I mixed some filler powder – Polyfilla is the UK brand name, with a bit of Gorilla white glue, some cheap craft silver paint, and some water, resulting in a thinnish paste. It continued to thicken, because of the filler, while I was working with it. I poured it into the crater and worked it around the crater edge, the big bubbles, and had it flowing down the smaller exit crater with a kind of waterfall effect. I wanted an undulating effect on the top rather than a flat surface that a more fluid surface would produce. Adding water to the paste in the mixing pot, I used the brush to put drops on the surface to try and give the effect of hotter bubbles of metal pushing up through the surface. A day later and it still isn’t dry, so patience is required. I’ll wait until it is fully dry to see what I do with the surface finish – I want it glossy.
Meanwhile, what to do to make the sides more interesting? First try involved using 2mm plastic tile spacers, available from tiling shops or diy stores. These are small tubes, about an inch long. There is a small variation in the length of them. I am trying to make it look like they are crystal outcrops, so attached groups of them at an angle to small pieces of clear plastic sheet using a hot glue gun. I painted them blue and sprinkled turquoise glitter on them in the hope that if they are lit up from below with leds, they would look like crystal. To me, looked like a reject from My Little Pony’s garden, so discarded them.
These were fiddly and not worth the effort. Rather than bore you with the details, if you want to know ask through the comments box I’ll tell you what I did – you might find them useful for scratchbuilding multi-barrel weapons for 40k, Epic or BFG. Following pic shows the basic construction. I’ve left out any painted pics on humanitarian grounds.

Failure 1 left me with a few holes in the side, which I could light with leds. Next attempt was to take pieces of sponge in different colours, place these in the holes and then use different leds to see what the effect was. It’s possible that a good effect might be achieved, and it doesn’t help that the configuration of the led set restricted what colours could be used where so it’s just a bit too multi-coloured for me. I should apologise at this point for my failings as a photographer – especially when it comes to photographing lights. Contrast and true colour-rendering were a bit too much of a challenge. Following pic illustrates this stage, although one of the green holes has a plastic green crystal in it rather than sponge, to see if that looks better. Not enough of an improvement for me, unfortunately, so that made failure 2.
Decided that I would have pockets of lava in these holes instead. The lava effect will then tie in with the lava on some of the other scenery pieces so that when they are out together there is more integrity to the landscape. While I’m feeling a bit philosophical about such things, I may as well make the observation that model scenery, or even units when you mix figures come to that, looks better to me when there is some kind of consistency about it. One obvious aspect of this is basing – if your figures, scenic items and playing surface have bases that largely match, they look better. If you throw lots of ideas together then even if each idea is individually good, there is a danger that it just looks like a lot of random stuff thrown together and the overall effect is not consistent. That doesn’t mean that they all have to be the same – just not different in every respect. Most buildings in an area will probably have some aspects in common, such as brick walls, tiled roofs, but might differ in colour. Some famously picturesque Scottish or Italian harbour towns have buildings that have been painted different colours, but the style is consistent and you can see they belong together.
I used a cheap craft knife to cut slots in the sides so that a piece of clear plastic sheet can slide in over each hole. The following pic shows one being put into lace, and shows the highlighting of the grit and cork surface with a mix of blue and white. Bits of cork were fiddly but I’m actually quite pleased with the effect.
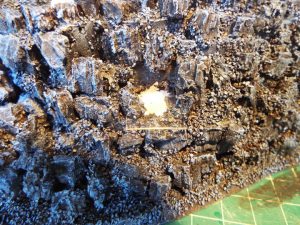
Painted these with the lava style I used on the tree pieces, then used grit, cork and black paint to disguise the edges. Result is in the following pic. It might seem so, but in this shot the led underneath has not been turned on – the contrast with the black rocks means that the white shows up as much brighter than it does to the eye.
Happy enough with them, but I might add other features to the sides – perhaps crystalline ‘vegetation’, around the lava pools, if I get the time and inclination.
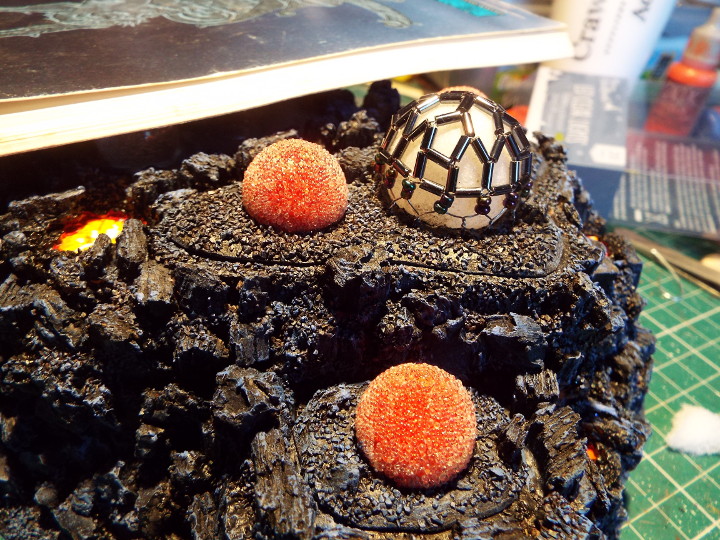
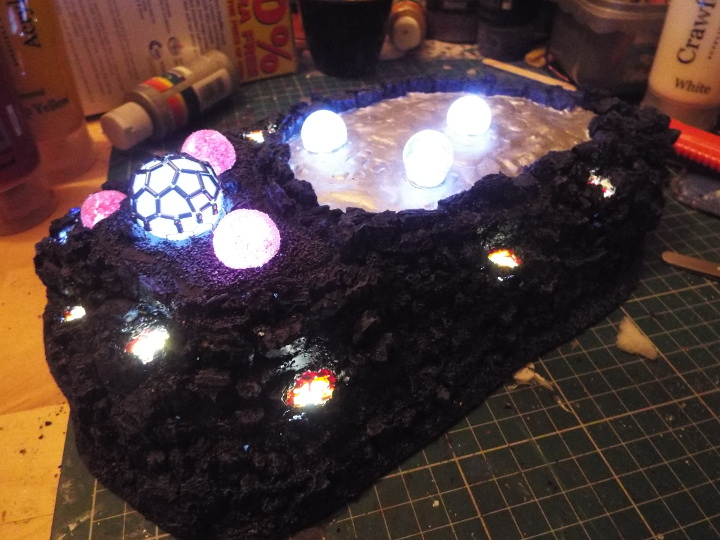
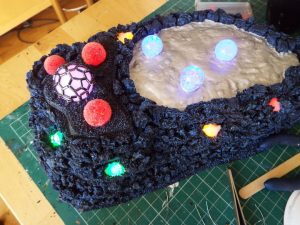
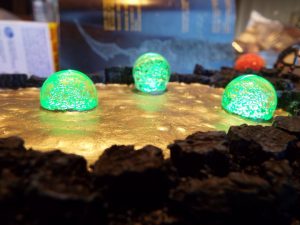
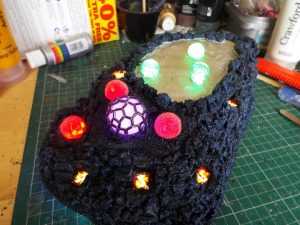
Back to the domes on the top of the piece. Happy enough with the smaller red domes, but wanted to add something to the bigger white dome. Came up with the idea for some kind of exoskeletal structure on the outside, using 2 types of beads and some fine wire. A sort of Geodesic dome arrangement. The wire is fine enough to allow 2 strands of wire to go through the beads. Fiddly and time consuming, and sometimes I had to rework a bit to get it to sit fairly snugly around the dome. Ideally I’d have got a very regular pattern, but variations in bead size, and probably because it was a first attempt, meant I didn’t manage that. Close enough for me, anyway. Once I got around half-way down the dome all round, I put 2 smaller beads onto each pair of wires, then brought one strand from one pair of beads and twisted it with a wire from the pair next door. You can see this as a Y shape in the picture below. I then drilled holes in the mdf base with a pin vise, and brought each twisted pair through its own hole. On the underneath of the base, I twisted a wire from each pair together with a wire from both its neighbours which tensioned these anchor wires into the base. Overall this took time, but I like to put in some little details like these to try and lift a piece. The first pic has the led under the dome turned on – the other has no added lighting. The lava pool on the left looks like it is underlit, but that is a trick of contrast.
 
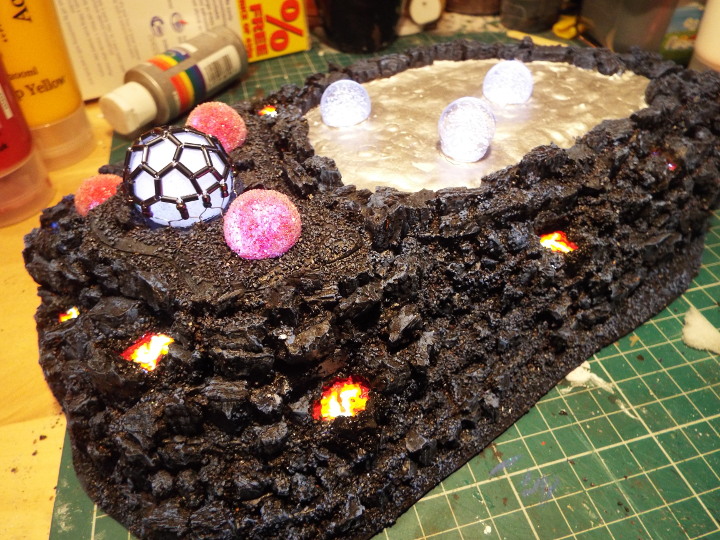
Then it was a matter of deciding how I wanted to light the base. The following 2 pics show it lit with a set of clear white leds, the first with dimmed room lighting. The eye handles the contrast much better than my photography.
 
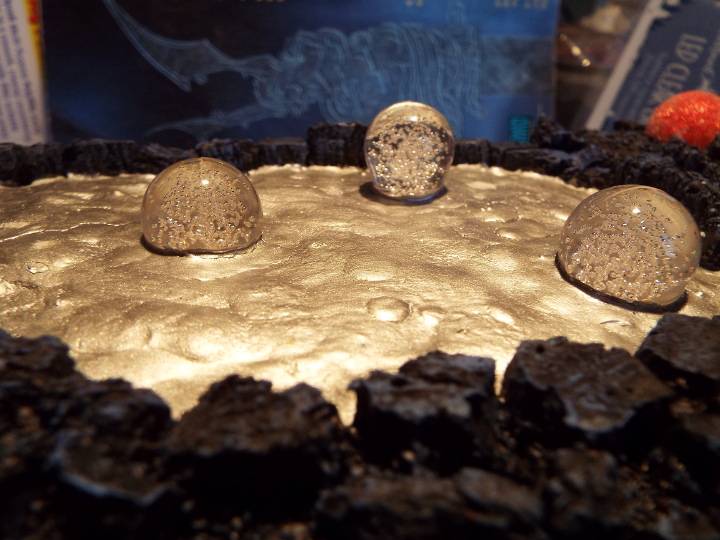
The following pics show the bubbles rising from the molten metal in the crater. I shot them from a lower angle to try an cope better with the surface reflection. I think there is a bit of curvature coming from using the camera very close up – the one on the right is not really on a slope. First one is unlit, the second has green leds under each bubble. Blue looks good with the silver as well. I think if I change it to a more conventional lava effect, then red or yellow leds might be a better option.
On the final pic I have 2 led sets in use. White leds are under the lava pools, while the spherical bits have coloured leds. I’m going to get some coloured cellophane, probably from some sweet wrappers or similar, and cover some of the white leds to see if they give me the colour I want. That way it will only need a single led set, costing 1 whole £.
I started out with the idea of having 2 further small bases to match those with the red spheres on them, but with plant-like things on them which I can underlight. I have started constructing these, but to finish these I’ll probably pick up some cheap Christmas decoration which have fibre-optic strands in them which I can reuse. If I did that, I could postulate that the bubbles emerging from the crater surface are natural phenomena and that the feature has not been developed. With the configuration above, I could claim that they are floating extractors that are part of the mining complex/research station or whatever.
Even if the overall piece is not of interest, hopefully there are a few bits in there that could be useful in some way.
Next bit is to take advantage of some cheap led lighting sets from Poundland. Other stores such and Poundstretcher and The Works also have sets, and I suspect that if you bother to look into led lighting more then there are a host of other sources which allow you to have exactly the number of lights and colours that you want, as well as avoiding the AA battery backs that are a bit bulky and mean that you have to make the pieces a bit bigger than you might want.
One thing to bear in mind. Many of the cheap sets come with decorative mould in plastic or metal around each bulb. On the Poundland sets these are easily detached to expose the bulb. On some of the others they can be glued on, which can mean that they are useless unless you actually want a set with those mouldings on. I recommend you check this out before you buy if it matters to you.
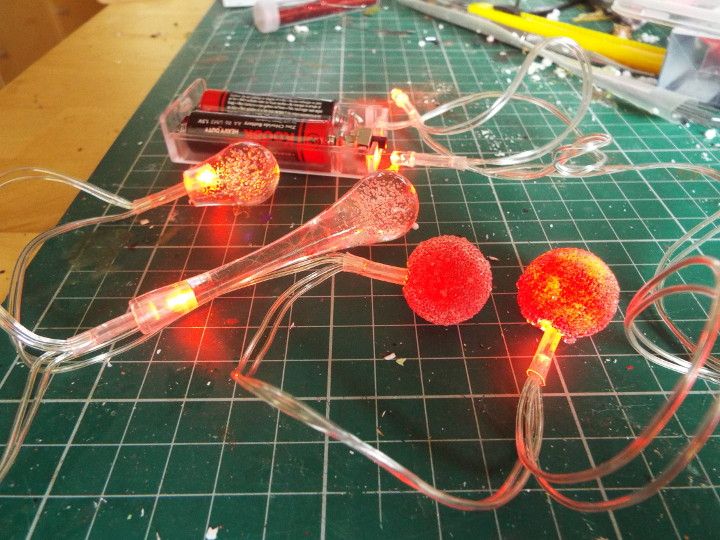
I selected 2 sets from Poundland which had moulding that I thought I could use. Here is a pic where I have substituted or meddled with the moulding.

The LED bulbs are red, and in the pack they come with the spherical red moulds. In the other pack, which has violet LEDs, the moulds supplied are the elongated ‘drops’ as per the second from the left. In those, the bulbous area at the end have a lot of bubbles and these are underlit by the bulb. For my purpose these were too long, so I used a razor saw to shorten it, then drilled a new hole into which the led bulb can be pushed. I wanted 3 of these for the terrain item. I also wanted 3 of the spherical ones that came with the set. As supplied these are spheres of expanded polystyrene which have been coated with a red plastic layer, to which a lot of tiny clear spheres have been glued. The filling cuts down much of the light showing through, so I have used a dentists tool to carefully extract much of the filling. As you can see by comparing the 2 in the picture, the one on the right shows more light coming through as a result.
The idea behind the piece is to have a raised crater filled with either molten metal or lava, through which large bubbles of material are slowing pushing through the surface. For the molten metal I am torn between silver or lava. There is an outflow from the crater where the liquid disappears down a smaller hole.
On the raised area to the other side of the crater I am planning to have either domes or some exotic vegetation. The idea is that I can swap a couple of bases over depending on which one the scenario requires. Both are intended to be underlit for effect. The sides of the crater will have some tubular outcrops – although who can say if these are innocent extruded rocks, or a cunningly designed missile/laser defense system!? I’ll break up the bare rock with some crystalline growths of some kind.
The following 2 pics show the emerging bubbles glued into the crater surface, with some cork pieces outlining the crater edge. The slot in the second picture is where the outflow hole will be.
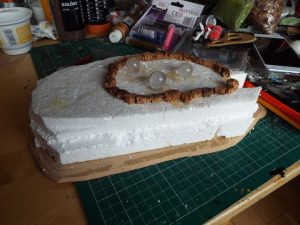 
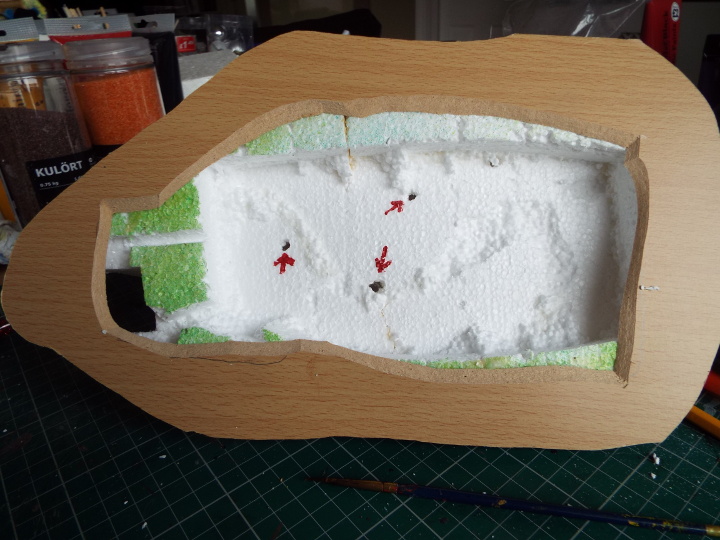
The following picture shows the underside hollowed out to hold the wires and the battery pack. The arrows show where I have made the holes through which the Led bulbs will get into the bubbles on the surface.

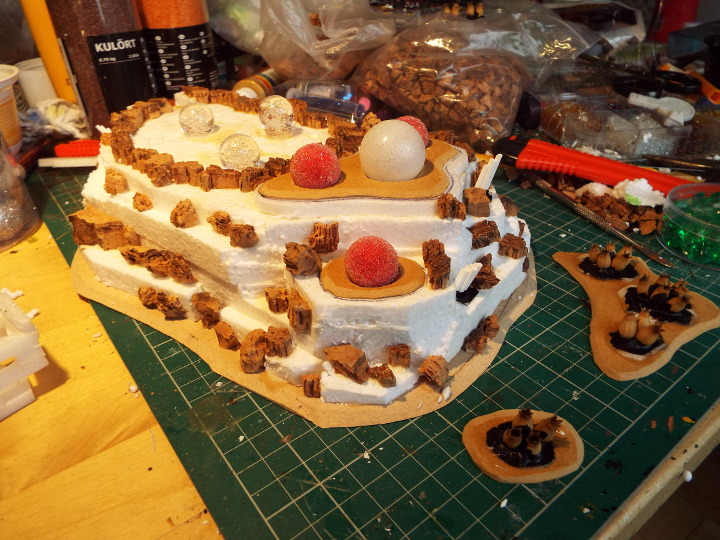
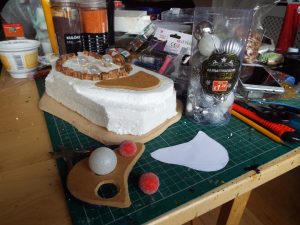
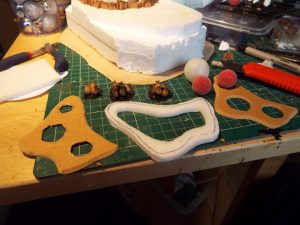
The next pics show where I have cut a paper template to give me the size and shape of the swappable bases. I didn’t allow quite enough room for the third smaller dome, so you can in the second pic where I have reduced the base size to avoid wasting that space. The bigger white sphere is from a cheap set of small Christmas baubles. The second pic shows a piece of foam sheet on which the bases will sit and which creates more space underneath the bases in case I need room to adjust the positioning of the bulbs when I swap them over. It also shows where the bases have had holes cut in them to let the bulbs shine through where they need to. On the right are the spheres, and on the left, some seed cases from the garden which will be my exotic foliage. They have holes at the bottom as well as the top, and have been attached to pieces of clear plastic sheet with a hot glue gun, which dries clear. Black paint has been applied to the bases when the cases have been glued in place so that the light only comes up through the centre of the seed case.
The following pic has a few more cork pieces for texture, and the sharper-eyed will note a few clusters of tubes sticking out at angles. At this stage I realised that it would be easier to paint it before putting lots of small bits of cork on there to avoid having bits of white polystyrene showing.

Next instalment soon, I hope.
As part of a clearout I dug out a pile of epic 40k stuff and put it up for sale on the Oldhammer site. Not sold yet, unfortunately, but I made the cardinal mistake of looking at some of the posts on the subject. Not so dumb in itself, but given that I don’t have a great deal of time left to live, so will never play a game with it, deciding to have a go at some ideas for some alien scenery seems a bit daft. I quite enjoy trying to come up with ideas, so thought what the hell.
Still need to get rid of the epic stuff though, so if anyone is interested let me know. I’ll probably throw in my scenery attempts as well.
Anyway – on to the ideas. A load of grit picked up from an IKEA sale, tubes of acrylic paint and packs of beads and crystals sourced from the Works, some chopped cork pieces, and perhaps some led light sets from Poundland gave me some vague theme around a hot planet with crystalline/inorganic planty things, maybe coral-like, and pools of lava or molten metals.
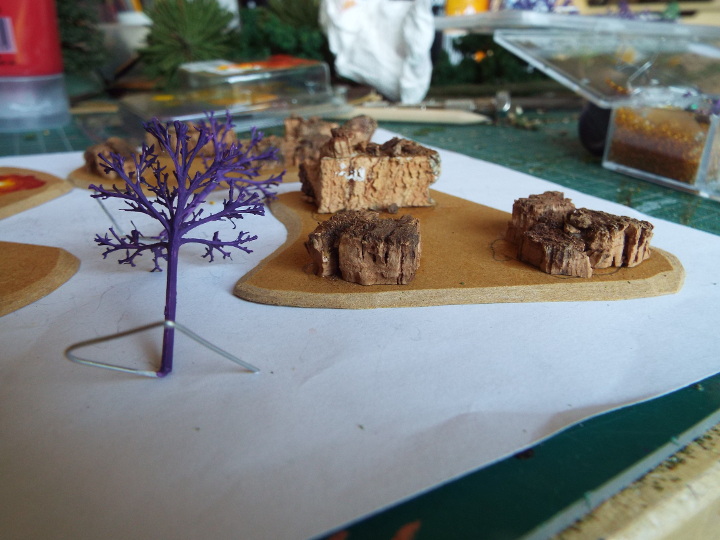
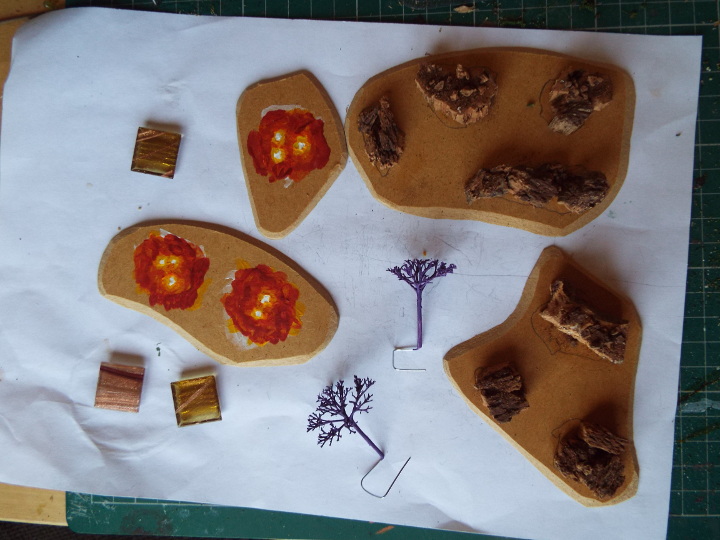
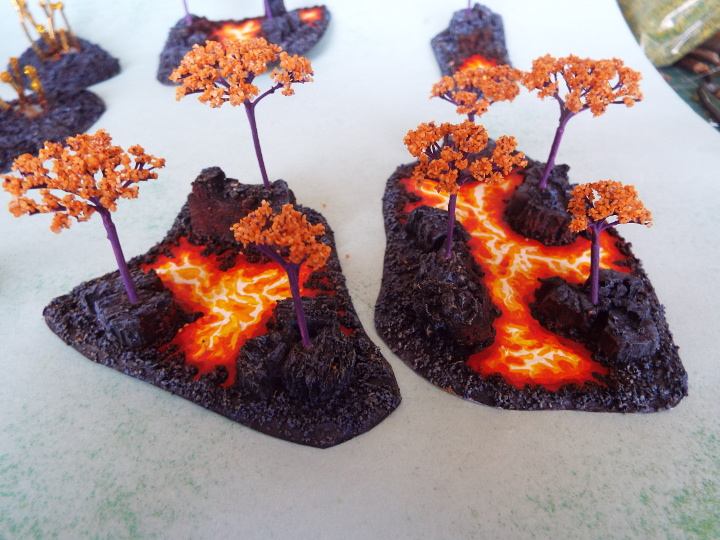
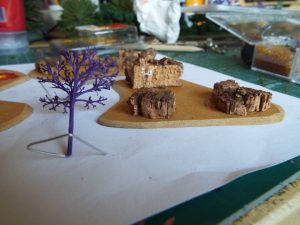
Started with some dried flower heads which I used to create trees for my 10mm WW1 East Africa project. They are on a separate post on this site. To go for a more alien look I decided that the ‘tree’ trunks and branches would be purple, and that the ‘foliage’ would be some small orange grit from IKEA. The grit is angular with flat faces so it looks a bit crystalline.
- trim off the flower heads with a small sharp pair of scissors.
- Using a pin vise and a very fine drill bit say – .7mm – gently drill out the stem. Not as hard as it seems because the centre is pithy rather than wood.
- Insert a short length of fine wire, coated in a pva type glue, which leaves a short length of wire sticking out of the bottom of the tree. I recommend that you try and get the wire up the length of the trunk as it will make the tree trunk more robust. The bit sticking out of the bottom will be pushed into some cork to fix it to the base.
- Paint the trunk and branches white. Let it dry.
- Paint the trunk and branches purple, or any other alien tree colour of your choice. You could phone the Royal Horticultural Society for advice on suitable colours but I suspect they will put the phone down on you. Let it dry.
- Dip the tips in pva or another suitable glue, and then dunk it in the grit, and set aside to dry.
- Create the base in the material of your choice. I use thin mdf. It cuts very easily if cut at an angle using a craft knife. Remember that you cut even easier, so be careful.
- I decided that my trees would grow from outcrops round lava pools. The outcrops are small pieces of cork which have cut edges which I stick to the surface of the mdf in an arrangement of my choice. The mosaic tiles and the painted bases relate to the terrain idea below.
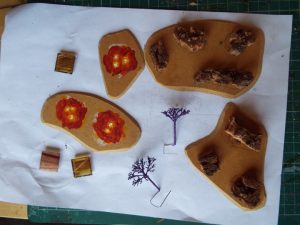
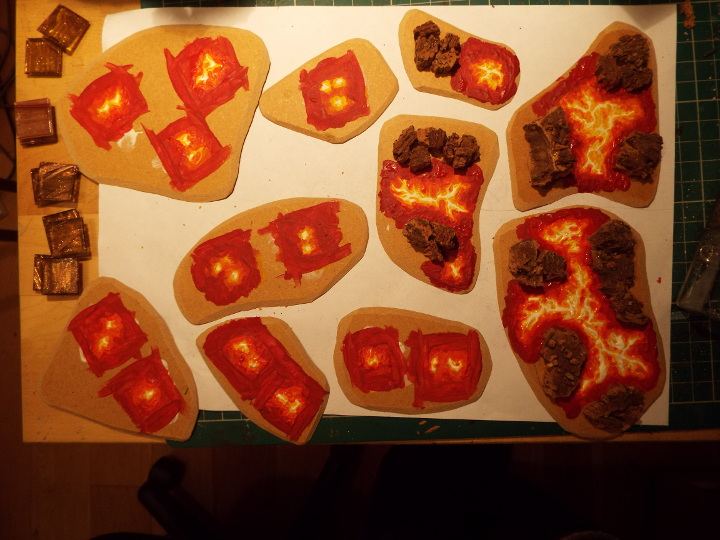
- Next paint in the lava. I applied cheap acrylic to create some undulation in the surface. Hottest is white in the centre, then yellow, orange then red, darkened towards the edges where it will be coolest. Blend to your heart’s content. I have gone for a pattern I can only describe as swirly – the pics describe it better than I can.

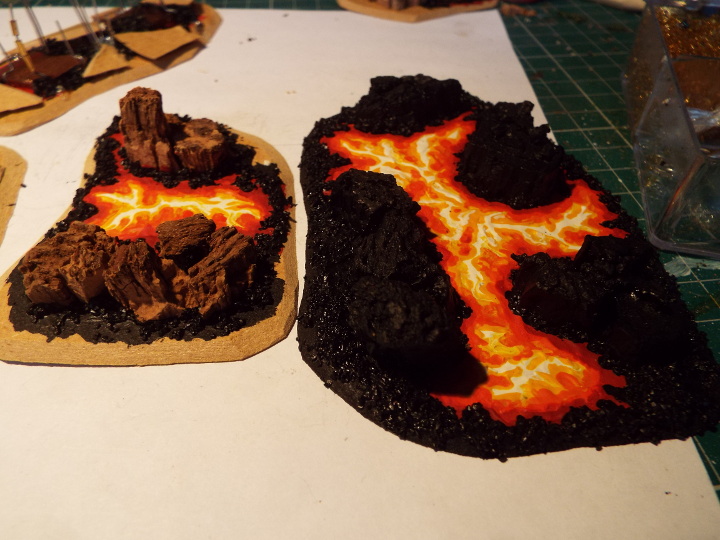
- Mix some fine dark grit with cheap acrylic black paint. The paint will cover it so the grit colour doesn’t matter too much. Apply it around the lava and on the rest of the mdf, and use it to texture any flat areas of cork that are exposed.
- Paint the cork pieces black.

- Highlighting to finish off. I have used light/mid blue to highlight areas away from the lava, because I decided my sun issues blue light. Around the lava, I have used red and orange to represent the light given off by the molten rock.
- Stick the ‘trees’ into the outcrops.

Second idea.
Not as happy with this, but I completed it in the hope that someone else might be happy with it, or that some of the ideas could be used to better effect by someone.
Again, mdf is used for the base as above, and the base grit is used and highlighted as above. These use glass mosaic tiles which have a part-transparent metallic gold surface. These can be got from tile shops if you don’t have some left over from a bathroom project as I have. The thinking behind this is that metal/crystalline material is being forced through the crust, and that it grows through tubes, ejecting material from the top which when there is a number of these grouped together, forms sheets of glass-like material between them. The chemistry and physics behind this is probably nonsense, but if I’d worried about that sort of thing I probably would have stayed awake at school.
Important note – These tiles can be broken with wirecutters, but they are glass, so if you do this wrap them in something that will prevent glass splinters being thrown about, handle cut edges carefully, and dispose of any bits properly. If youngsters are reading this, get your parents to help with this bit, and if there is no-one available to help – Don’t do it. Your models will look rubbish if you bleed all over them. The tiles can be left out, and I suspect that leaving them out might make the pieces look better anyway.
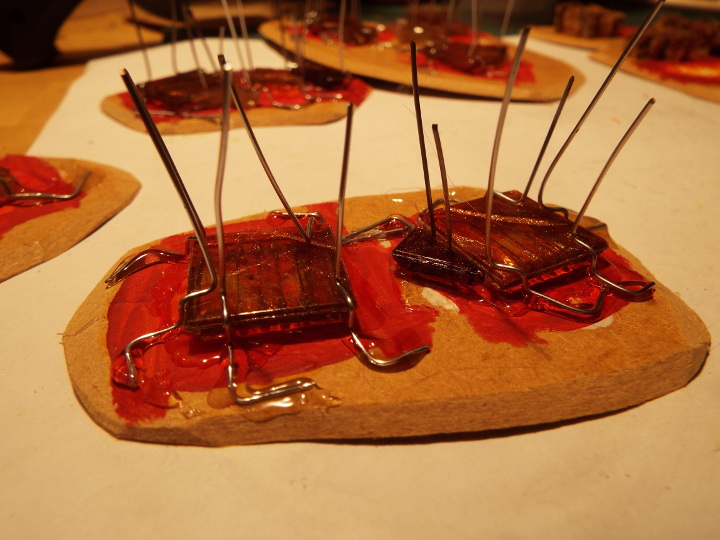
- Cut some mdf bases as before, and paint smaller patches of lava where the tiles are to be positioned, so that they give some impression of the molten rock beneath the surface. You can see where I have done this in the pictures in paragraphs 8 and 9 above.
- Using a hot glue gun, attach some pieces of fairly fine wire – these are the crystal tubes that will rise above the surface. They are various lengths, but I reckon the longest is only around an inch. It is supposed to be Epic scale, after all. Note that I have bent them so they don’t all come up at the edge of the tile. I didn’t want to end up with squares that look too regular. That’s also the reason for the broken pieces of tile.
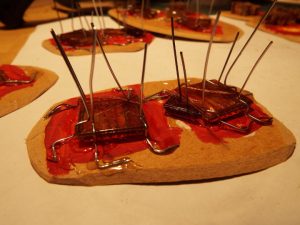
- These tiles are thicker than I’d like – translucent paint on bits of clear sheet plastic would probably be better. A further downside is that it takes more grit and black paint to bring up the level round it. Realising this I used a lot of small mdf scraps to pack it and save paint and grit.

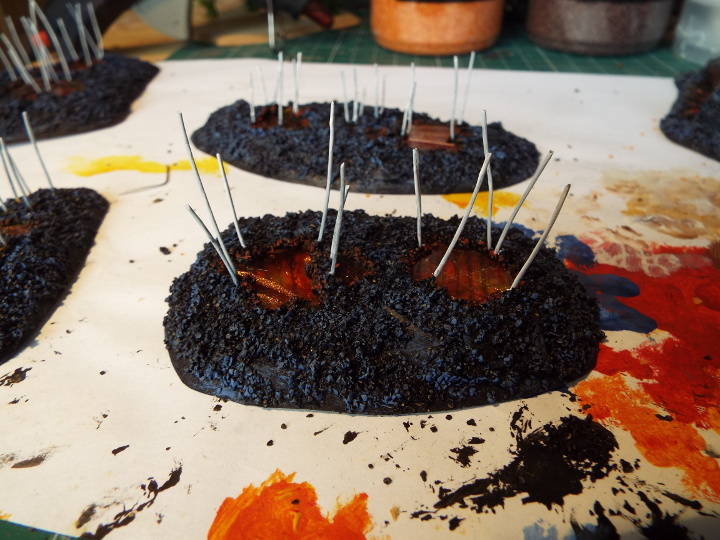
- When they have dried in place use the grit/black mix to cover the base and shape the pools. When that is dry, I painted the wire white. With hindsight, I should have used gold. Highlight the surface as for the tree bases – blue for most with orange around the pool edge.

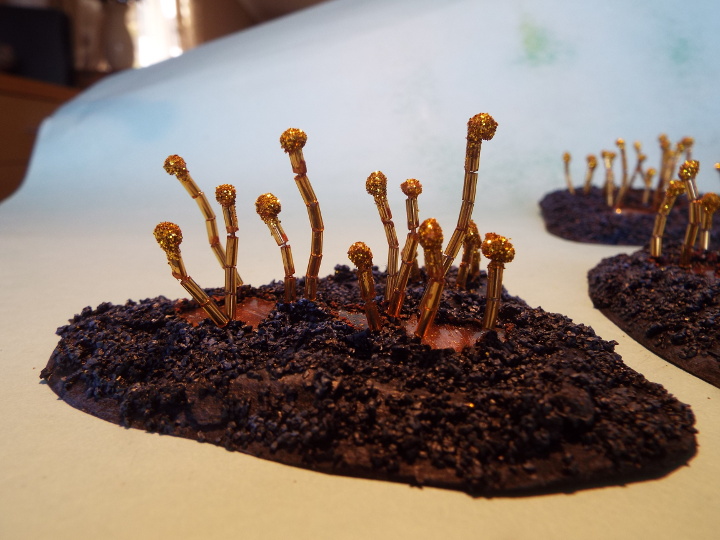
- Next, the crystal tubes. These are small tubular beads, bought from The Works. It comes in a partitioned plastic container which has 6 or 7 different types of small beads. Slot them onto the wires, leaving 2-3 mm of wire protruding from the topmost bead. They vary between 1 and 5 or 6 beads per stem. I carefully bend each one at the joint between each so that each stem has a series of angular kinks rather than being straight.
- I then mix some fine sand and gold paint and put a blob on the exposed wire at the top. Allow that to dry. I then give each blob another coat of gold, and while that is still wet dip it in a small pot of very fine gold glitter, again sourced from The Works. The final result is here;

Personally I prefer the first of these 2 items. I’m not overly happy with the tops of these stems. and there is too much bare base around the edge. I may pick up some red glitter tomorrow, and mix it with some varnish to create a kind of crystalline moss. If it works I’ll add it to these and post an updated picture on here.
Meanwhile, I have a couple of other ideas involving plastic tubular tile spacers and some plant seed cases I have used for a number of purposes, along with some led light sets from Poundland. If you have any ideas for improving these, let’s hear about them.
Recently bought some palms from one of the Chinese Suppliers via ebay. I was fairly happy with them, and the price is very good, but wanted to give them a bit extra and make them a little bit more realistic. At the same time, found some bunches of bananas that I had made a while back and decided to give them a paint job, and add them to some banana trees I constructed years ago – suspect the instructions for the trees are on the old warfactory pages.
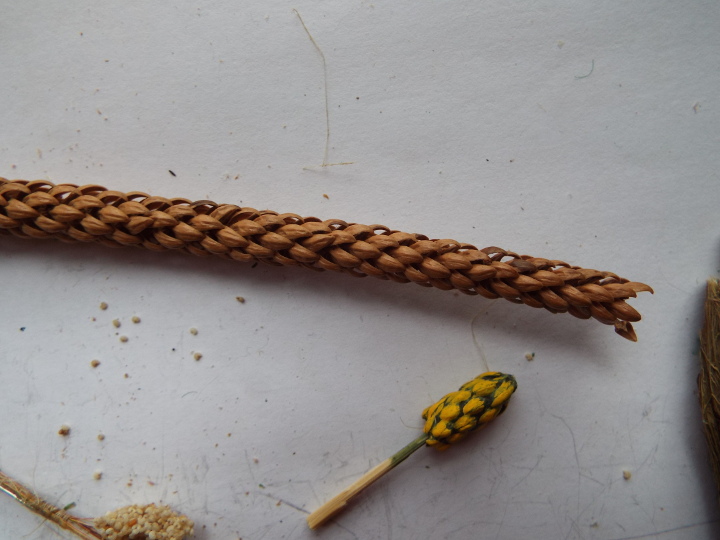
Starting with the bananas, I came across some twigs when on holiday in Cyprus where the dried leaves on the stem have something of the shape of bananas. I also used a section of them, added to a dowel, to give the impression of carved stone leaves at the top of a 15mm column used in my biblical temple.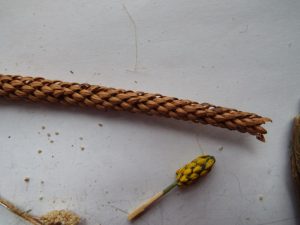
As a brief aside, I think that a more accurate impression of bananas would be got by using Caraway seeds available in food stores. They make great 28mm scale bananas, but building a bunch of them would be fiddly. My method is quicker if you can get similar twigs to those in the picture, but they are over-scale. I think the impression is acceptable though- it’s for you to judge for yourself. For a bowl of individual bananas, use the seeds and paint them.
The construction method is to use wood glue to fix a section of cocktail stick into one or both ends of a section of the twig. When the bunch of bananas grows on the tree, the flower juts out at the bottom of the bunch. Do a search of banana tree images to see what the bunches look like. I made the mistake of attaching the bunches to the tree the wrong way up until a friend burst my bubble!
When the cocktail sections have dried they can be used to handle each bunch. I you think the top of the bunch is too open, take some dried leaves from a spare piece of twig and glue them to the top layer around the stem.
I then apply further layers of wood glue, pushing it between the dried leaves so that there are no spaces in there. I suggest you mix some dark green paint in with the glue to colour it – the glue I used didn’t take the paint very well at the painting stage.
Then use yellow to hint at the bananas. An unripe bunch would be green and I suspect that these might make better green plantains, but I opted to have them yellow. The flower looks quite exotic if you wanted to model it, but I wanted a few for attaching them to trees, and some for porters and baggage. The one below has the stem attached to the tree and stem jutting out of the bottom where the flower, or riper fruit which has been harvested, would have been.
If you are interested in the construction of the tree and can’t find the description elsewhere on Warfactory or a link, let me know and I’ll try and figure out where it is. Basically they are paper leaves on florists wire, and the stem is a spiral of masking tape cut with pinking shears to represent the bases of older leaves.
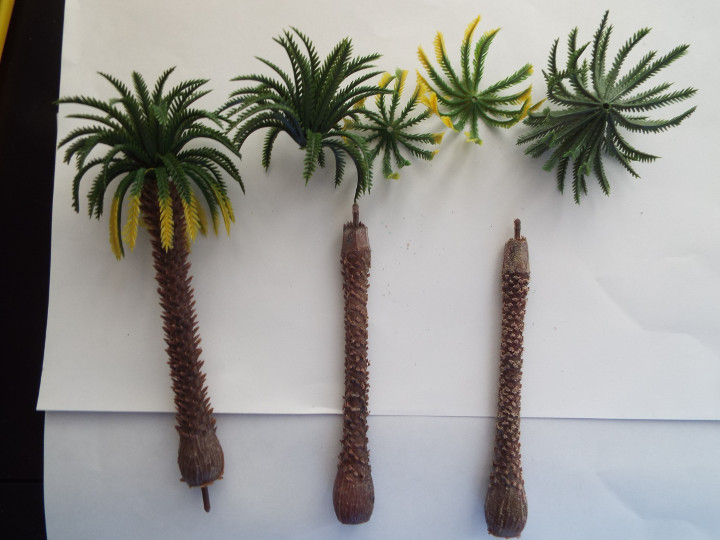
On to the date palms. These are from a pack of mixed sizes but all of the same design. Wasn’t keen on the jagged stem, so cut the spikes back with a cheap craft knife. This is easier if you pull the leaves off of the lug that holds them in place. I think that palms look better if you try and replicate the remnants of older fronds hanging down from the crown, and in this case I wanted to have bunches of dates added in. The models bulge out near the top of the crown, I guess to represent this mass of vegetation. I trimmed it back with the craft knife.
Next think was to rub the stem with some coarse sandpaper. It frays the cut spikes, to represent the less manicured appearance you would get in the wild as opposed to botanical gardens, where neat trimming creates a smoother appearance. I then painted the cut section at the top with a layer of wood glue and allowed it to dry.

Looking at images of date palms, they show the fruits growing as bunches of long slender clusters, arching out from the trunk and hanging below the fronds. The fruit stems and fruit start as green, then the stem ripens to yellow, and the fruit will then ripen through yellow to brown/black.
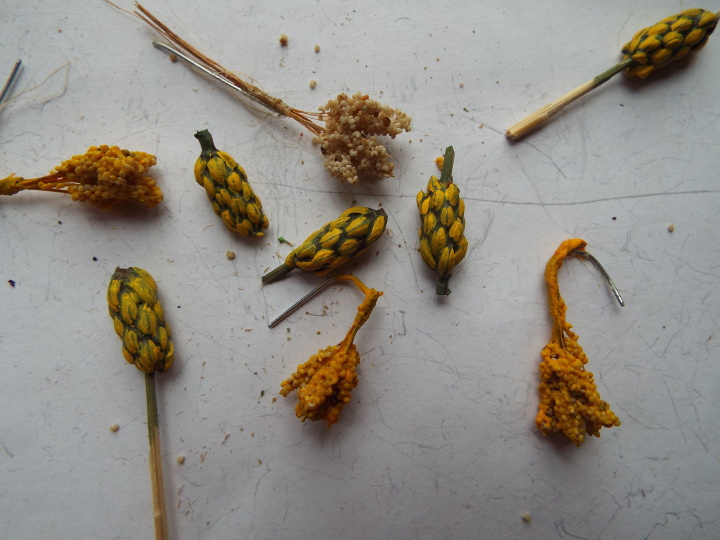
I started by dipping around 1 cm of the end of a strand of coir in wood glue, then rolling it in some yellow poppy seeds and letting it dry. The seeds are available in bags as cookery ingredients. Comes in handy being keen on cooking and gardening as well – always on the lookout for useful modelling materials. For me, these suit 28mm- for 15mm I think I would use fine sand but I’m not entirely sure I would bother with this below 28mm.
I then bundle 6 or 7 coir bunches together, together with a short length of flexible wire, a small amount of wood glue and wrap them together using a few strands of hemp – anything very fine will do. Once dry, I painted the whole thing yellow, mixing a little glue in with the paint to reinforce it. More glue and poppy seeds if you want to bulk up the bunches – these are quite substantial things. finally, bend the wire to get the arching effect. The bunch at the top in this pick shows the unpainted and unbent stage.

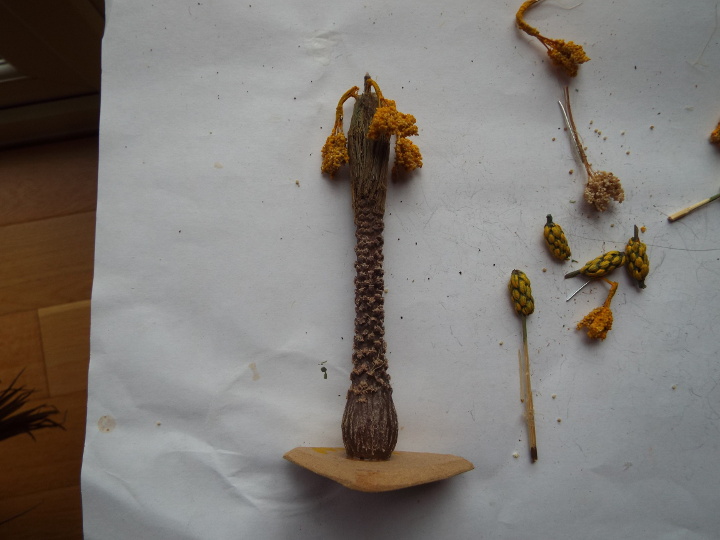
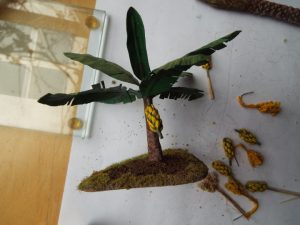
Using Plumbers hemp or some other suitable fibres, glue a clump around the top of the stem and allow to dry. Next, using a mix of green and brown paint with some glue, paint the fibres to glue them back against the trunk. Add more fibres to thicken if you wish – with hindsight a slightly more ragged appearance would probably be better. When that is dry, highlight with a light brown/yellow/white mix to get the effect you desire, When it has dried, use a pin vise to drill one or more holes down into the top of the trunk – then dipping the wire on the date clusters in glue, insert these into the holes.

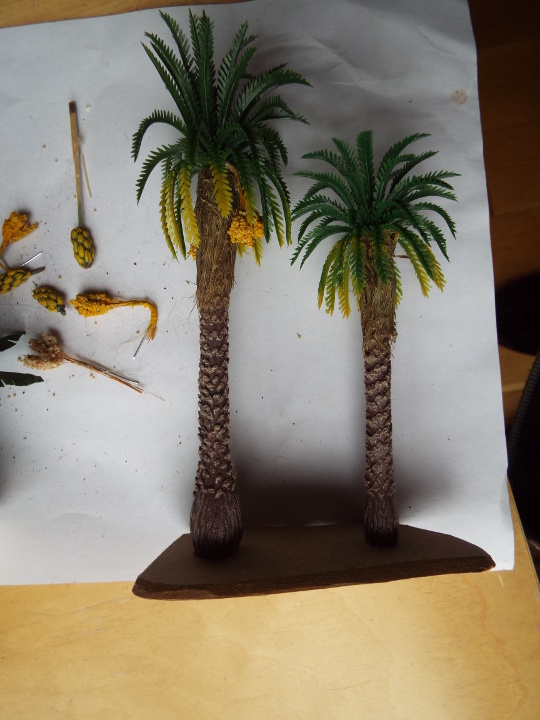
Put the leaves back on to the lugs to get the final effect. For basing, I cut off the lug at the bottom of the stem (NOTE – not the top one!) and use a power drill to drill a hole a centimetre or so deep through the bottom of the tree up through the step. I base them on mdf, and drill a hole through the mdf, then cut a recess around that hole on the underside of the base, then fix the tree to the mdf using a small screw dipped in woodglue. The recess is to make sure the mdf sits flat when the screw-head is in place.

I think they are worth the extra trouble, although if I wanted a 100 of them I’d probably be less enthusiastic.
Hope you like them and if you have similar ideas to share we would be glad to hear from you.
Last night I dug into the tray of half-painted models and tried to push a few over the line. One that made it was this characterful sculpt from Tony Yates. He was a giveaway from BOYL 2016, and would make a great NPC for any sci-fi skirmish.
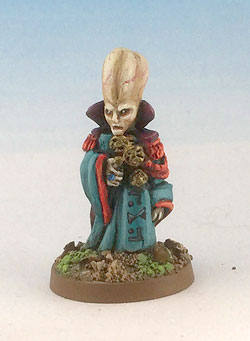 Alien Potentate
This is going to be a big report, so I’ve decided to split it up to make it more manageable (and get something posted).
First, I’d like to thank all the players that made this game a success. Right up until it started, I didn’t really know how it was going to go; the complicated scenario could have degenerated into a total mess, or maybe just a basic firefight. It worked because everyone really got into the spirit of the thing, and played their faction with character and gusto. In addition James supplied a great selection of beasties (particularly important as I had forgotten mine), Niibl brought the Trading Guild – creative conversions done specifically for the scenario, and Fimm produced a beautifully converted set of AdMech in white, copper and green.
Disclaimer: This was a fast moving and anarchic game – although I GMed it, I may well have got some of this wrong, so if you played and have any details or corrections, please do post them in the comments section. I have a number of the paper notes passed during the game – these appear in italics.
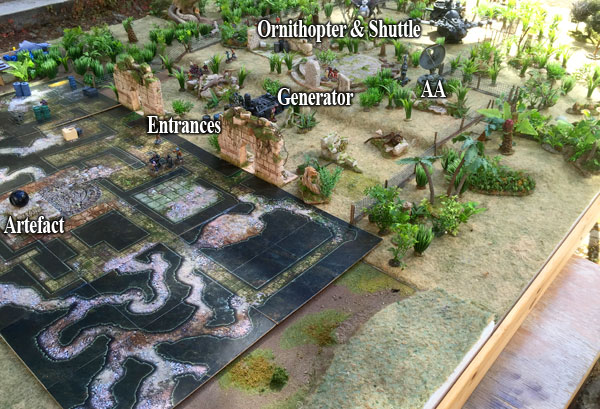
The game opened with the Inquisitor flanked by his two marine bodyguards advancing into the temple to inspect the mysterious artefact. Also inside the temple were the Trading Guild, who had been using one end of it as a store room. Their political rivals, the Mechanists were just outside – the advance party being led by the eccentric Dr Moenkhaus. Their primary objective was to secure this potentially powerful technology for themselves – another group of then was unloading a grav-trolley from their ornithopter to carry it away. Over by the gate the first conflict of the game was developing. A large group of natives had turned up – according to their folk lore, a powerful demon was imprisoned inside the cursed temple, and they feared that the ignorant city dwellers would release him. To save their people the natives had to stop them at all costs.
 Start of game – temple end The inquisitor and bodyguards, and a few Trading Guild started in the temple.Everyone else was outside.
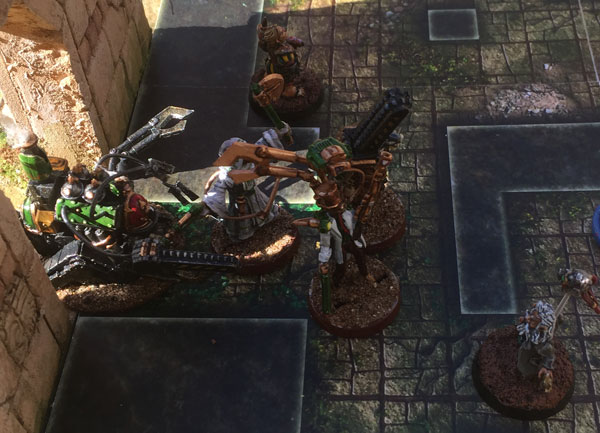
 Start of game – compound end At the far end of the compound was the Mechanist’s ornithopter and the Trading Guild shuttle. The shuttle is particularly Oldhammer because the original chassis was made out of a shampoo bottle in 1987, inspired by the famous deodorant grav-tank.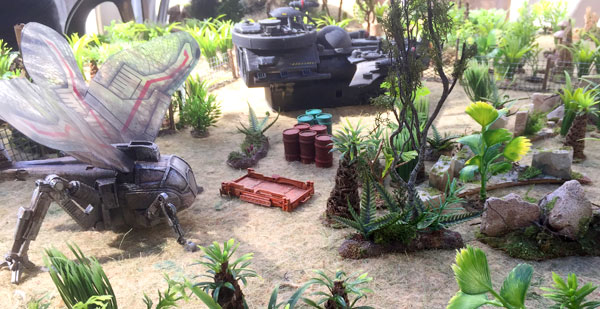
The large compound encloses a lot of ruins and jungle, so there’s plenty of places to hide. Here you can see mercenaries (employed by the Trading Guild) moving to block the natives coming into the compound (bottom left corner). On the right, the Nobles’ hunting party heads for the nearest temple entrance, while in the middle of the compound some of the inquisitor’s experts examine a mysterious carved stone.
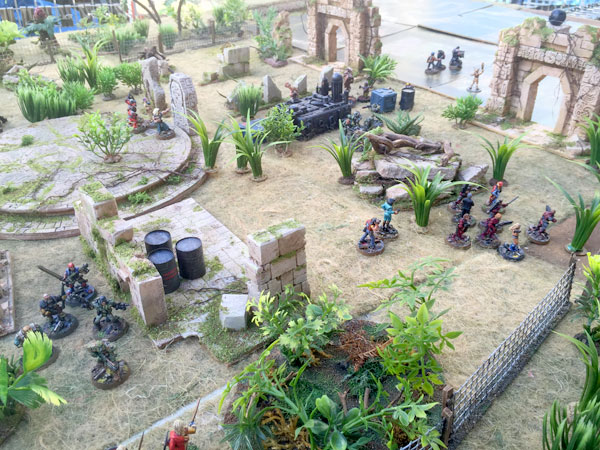 Starting positions Another shot of the start (around 3.30pm). Mercenaries are moving away from the temple to help the other squad with the natives. Trading Guild are milling around the generator.
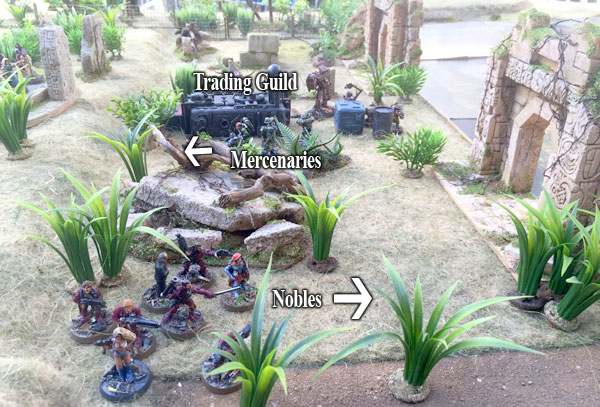
At the start of the game, a squad of mercenaries, hired by the Trading Guild to secure the site, lined up against the natives entering the compound and tore into them with their auto-guns. Natives ran in all directions – some retreating back into the jungle, others scattering and trying to hide in the meagre cover inside in the compound. Five or six went down and their mission seemed headed for failure when it had barely begun. Luckily they had a few tricks up their sleeve, and the city dwellers were not as united as they might have appeared.
Meanwhile, the mechanists were coming up with their grav-trolley in the hope of carrying away the artefact.
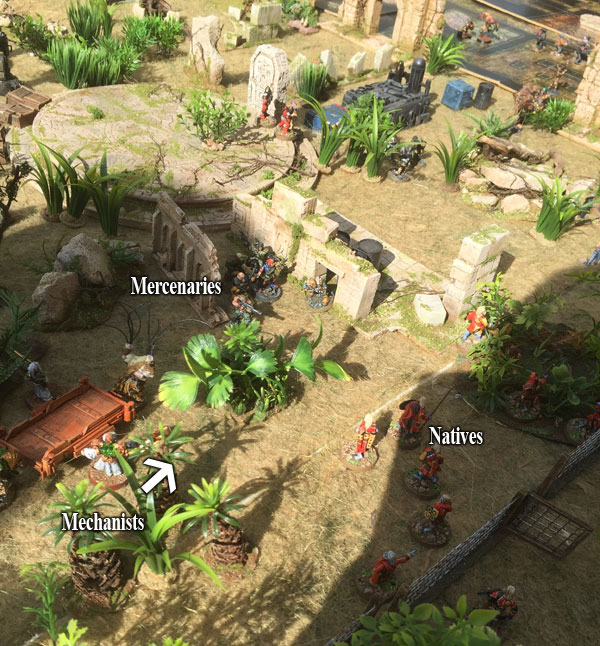 4.30pm The sun had come out – we were playing on an outside table next to the marquee, and I remember it being atmospherically hot as the sun beat down. The Mechanist advance party, led by Dr Moenkhaus and attended by a lab-bot with typical scientific instruments such as a chainsaw and massive pincers had entered the temple to be met by the enraged Trading Guild.
 Dr Moenkhaus enters the gloom of the temple
The Mechanists and the Trading Guild are political adversaries and to make matters worse, the Trading Guild had things to hide. They were running a secret, unlicensed spiridium mine in the tunnels of the temple, and with unfortunate timing, a Slann merchant was visiting them to negotiate the purchase of a smuggled consignment. The Trading Guild suggested that the Mechanists might like to go somewhere else..
The natives continued to find themselves on the wrong end of civilisation’s firepower and the survivor’s were reduced to hiding in the bushes. The chief’s guard blew his horn to summon more tribesmen.
A quick prompt about game objectives was needed.
GM to Trading Guild: “Remember you don’t want conflict with the natives if possible”
The Trading Guild, preoccupied with the Mechanists, realised what their mercenaries were up to, and after a quick word the natives were allowed to escape.
Next part coming soon. I’d be interested to get any feedback on what people remember – does anyone have any good photos?
|
|