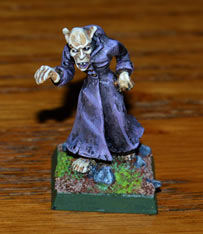
Wargames Foundry Vampire
|
||||||
|
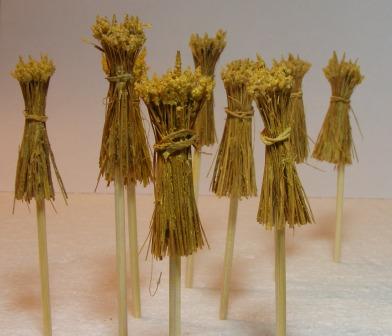
Wargames Foundry Vampire I’ve been experimenting with my brand new camera. The flash didn’t go off for this one, but what it lost in clarity, it gained in atmosphere. Imagine peering out of the window one frosty night and seeing this lot shambling towards you. 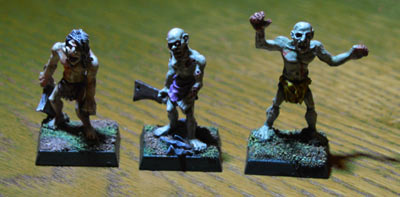 Citadel Zombies This is an unconverted 80s minotaur lord, which I painted a few years ago. I used not to like the model very much, but after I had worked hard on this one, it’s now one of my favourite minotaurs. One of my favourite bits is the dark bronze metal, which if I remember correctly is mostly Tamiya copper mixed with black, and the studs on it which are just a lighter shade of the same mix. 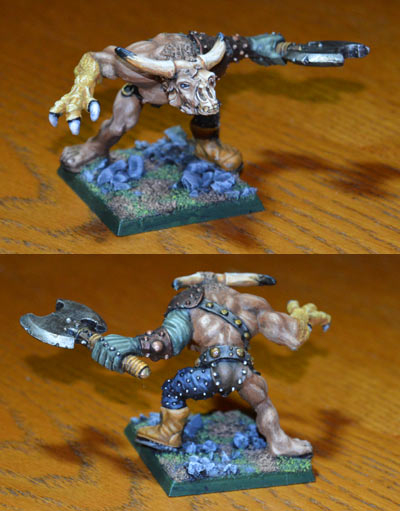 Mutated minotaur lord These are the finished articles. I haven’t yet decided how I’ll base them, so I’ve just popped them on cocktail sticks for the photographs.
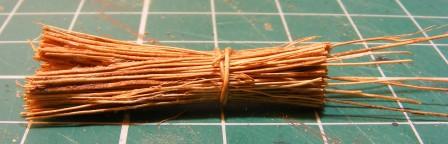
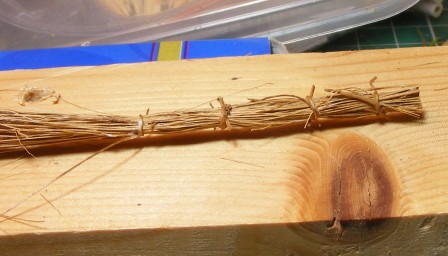
Start with a bundle of Coir. I’ve made my stooks around 3 cm long, on the basis that historic crops stood taller before we bred out the height to create the modern varieties. They might be a bit tall – no reason why you can’t trim them at the base. Tie the bundle 1 cm from the top using a length of Coir on which some PVA or wood glue has been smeared and draw it tightly – I then loop it round to tie again, but once would probably do.
Take a few offcuts of coir and glue a few long strands into the top. When dry, trim them back so that you’re left with a few longer strands protruding a few mm from the top. Splay the top and bottom as much as you can so that both ends are wider and the strands are slightly separated.
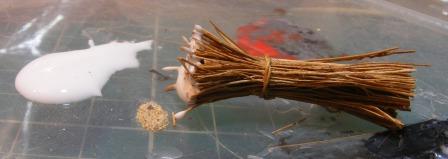
Dunk the top end into the Glue.
Use a cocktail stick or similar to spread the glue a few millimetres down the stems – don’t use too much.
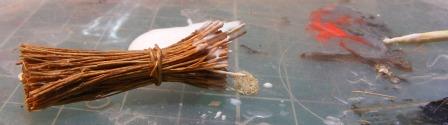
Dunk the glued end into fine dry sand – I use playpit sand.
Finally paint using a watered down mix of white and yellow to the shade of your choice. I was in the mood for sculpting a putty shield, and picked this model out as a suitable candidate. The shield was sculpted in a single session, the model is an unconverted 80s Khorne beastman. When it came to painting, I tried out some more unusual metal effects, inspired by other people’s models I had seen recently. The bronze armour got a touch of verdigris, and the mace and shield surround were painted terracotta and just given a metal wash to add a touch of metallic reflection.
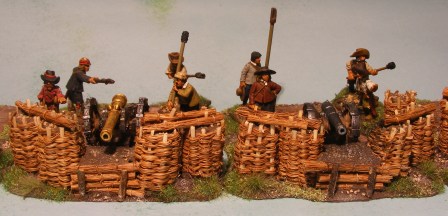
To give an idea of what the final product should look like;
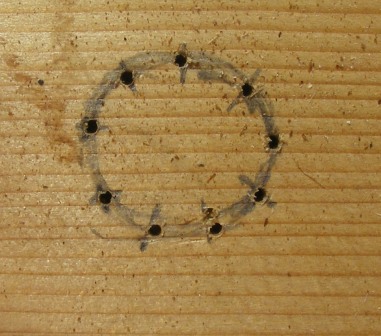
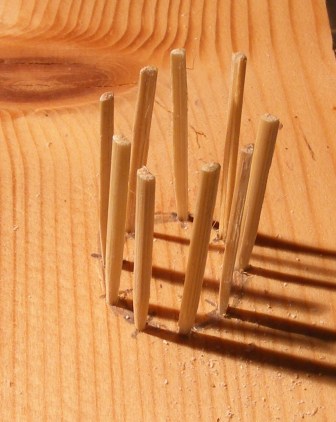
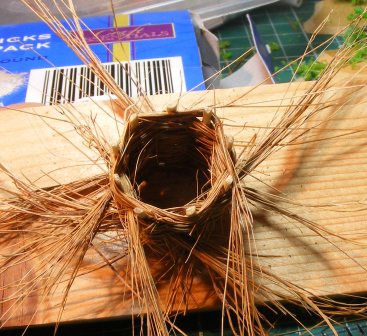
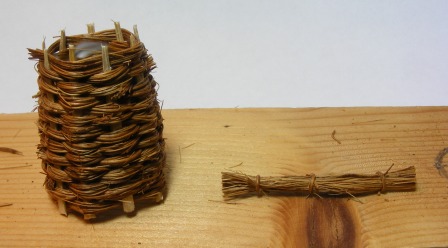
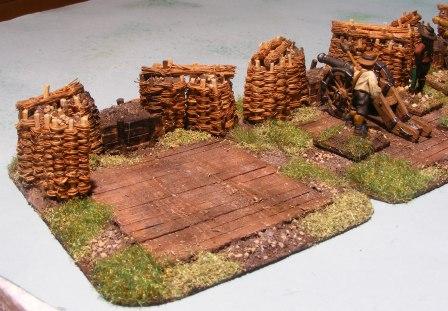
This shows Gabions topped with fascines held in place with pegs driven into the tops of the gabions. The fascines are also used to front the lower central sections which allow the guns to fire through. The staves are cut from Bamboo cocktail sticks. The advantage of bamboo over other cocktail sticks is that the grain is tight and seems to run straight from top to bottom. The brush used in the gabions and the fascines is coir – coconut fibre. These are sold as nesting material for birds in pet shops, in thick bundles of straight fibres around 6 inches long. The earth fill consists of the Sandtex masonry paint I use for bases and terrain tiles. It’s a mix of Bitter Chocolate and Beige. I add grit and playpit sand for bulk, with a sprinkle of additional grit for texture on top. Bases are 3mm MDF, chamfered at the edge. This was the first batch I made, and I think I made 2 mistakes. One was that I varied the size a bit, and the other is that most of them tapered a bit from top to bottom. From photos of their use in the Crimea and ACW, I think they would have been consistent in size and straight cylinders so that sat tightly together, with no gaps through which balls or bullets might pass. For this tutorial, I decided that the best chance of fixing this was to use the same wooden template, so I marked a circle around 1.6 cm across and drilled 9 holes to take the stakes using a pin-vise. I think it’s a 1mm drill bit. You could use more or less depending on the size of the gabion, but it must be an odd number of staves to get the weave right.
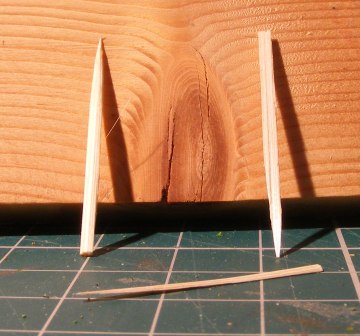
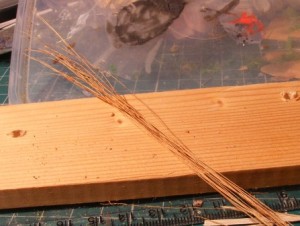
Next cut the staves. I cut a cocktail stick in half. I think the whole sticks are too thick, so first time round I shaved each half-stick down to create one thinner stake. Took time and made lots of mess which impressed the wife no-end! I decided a quicker approach would get me 2 staves from each half and be much quicker. I carefully shave off a narrow section from each side which I discard – I guess it would be ¼ to a third of the thickness of the stick. I then slice right down the middle of the remaining piece to get 2 staves as per the following picture;
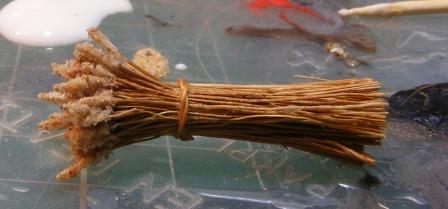
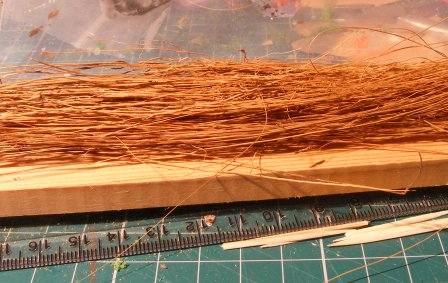
Now for the Coir. This is a thumb-sized bundle taken from the much larger bundle I bought. Other potential uses for it are straw and dried reed – it’s a bit thick for hay.
Take a smaller bundle of say 10-12 strands which will be the first layer.
Place 9 staves into the holes in the template.
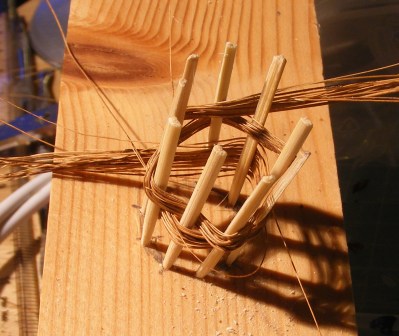
Weave the first bundle in between the staves. This is the trickiest one because the first loop will pull half the staves inwards and push the other half out, and the second row will counteract that. You are aiming to keep the staves upright to get those straight sides. You need to try and make that your objective as you add each bundle, and you will find yourself having to pull it quite tight as the tendency seems to be for it to get wider if you don’t. I made that mistake again as I did this demonstration gabion – But it will come with practise. As each bundle goes in, use a spare cocktail stick or similar to push each layer hard down to the base – try and get it quite tight. If your staves are splaying outwards, tighten the weave. If they are drawing in, loosen it.
Repeat with similar bundles. As you add each new bundle, overlay the end of the previous bundle with the start of the new, carrying on with the weave as if it were a single long bundle. Don’t bother trimming it off at this stage. Continue until you are left with only a couple of millimetres of the tops of the staves showing. Remember to push each bundle down when it’s in place, to try and get a tight weave.
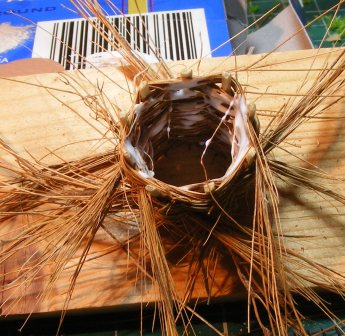
Now spread some wood glue around the inside for extra strength. It will hold together without it – in fact you’ll have to lift it from the template to get the glue to the bottom layers. Set it aside to dry before trimming it.
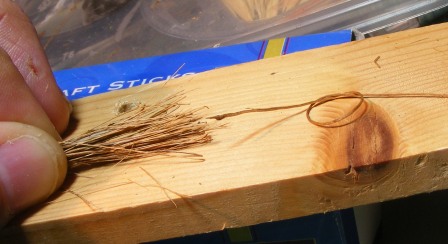
Now for the fascines. These are slightly thicker bundles of Coir, tied together with a strand of coir.
Spread some glue on the loop of the tying strand and slip it over the bundle, then tighten it. Trim the tying strand ends and trim the end of the bundle to neaten it. This makes sliding the other ties over it a bit easier.
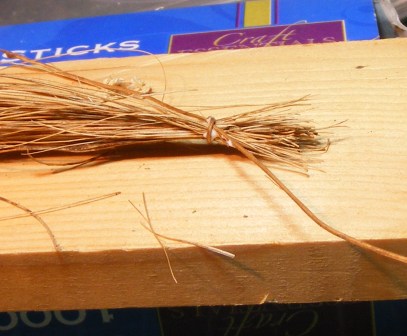
Depending on the length of the fascine I want, I will opt for 3 or 4 ties for the fascine. In this case I am making a fascine around 3.5 cm long with 3 ties. The reason for the 4th in the picture below is so that the bundle holds together for the next fascine when I cut the completed one off.
The completed fascine alongside the gabion which has been trimmed with sharp scissors.
This shows a rear view of the completed bases. I have distressed the ground boards to represent the effect of the heavy cannon being moved back and forth, and drybrushed the fire aperture with black paint to represent deposits left from the discharges. I suspect that they may have had to keep it wet to prevent it catching fire. I have put balsa boards at the back of the aperture rather than fascines simply because I think the frontal fascines and the earth would be intended to absorb the shock and they would have wanted something more solid at the back, but I don’t really have evidence for that.
I hope that makes it clear as to how it is done – happy to take questions if you are unsure, or suggestions for improvements. If you have a go and like the results, please share them. Alan Over the Christmas break, Rowan and I played our first game of Necromunda with his Redemptionist gang. I used a Goliath gang that has already played a couple of games. The scenario was one from Outlanders, where the Goliaths had been hired to protect a Guilder caravan from a Redemptionist raid. It was played in conditions of Grim Darkness – not just the ordinary grim darkness of the 41st millenium, but a specific terrain condition which shortened visibility to 16″. As both gangs were quite close combat orientated, this didn’t have as much effect on the game as it might have done. 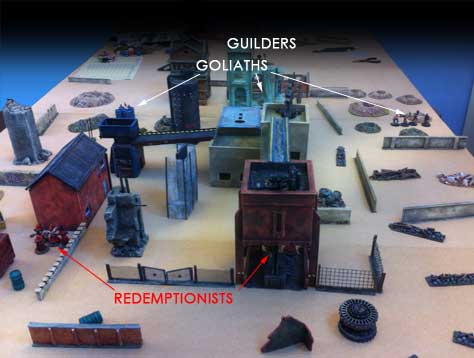 ‘North’ is at the top of this picture The Goliaths deployed in a long line across the field, the Redemptionists in two tight groups near the centre. The centre contained some big buildings but cover at the edges was pretty sparse. 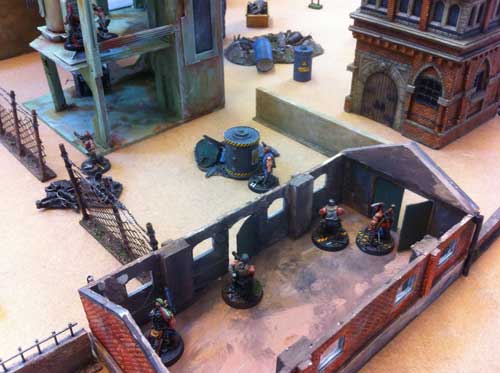 Goliath gangers hold the central building 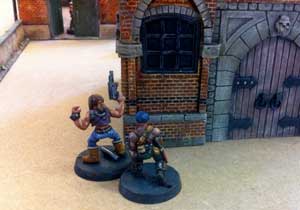 Juves run to hide behind something solid Near the north edge of the table was a big building where I deployed most of the Goliath gangers, including the leader. The flanks were held more weakly, mainly by juves. The pair on the west flank seemed particularly exposed, so I pulled them in closer to the gangers and behind some cover. The Redemptionists charged up, spending each turn running forward. The eastern group moved diagonally across towards the other and it soon became apparent that both groups were going to attempt to break through along the western edge of the field. Goliaths from the eastern edge started running forward and across the field in an attempt to encircle them, while the flamer Goliath and a juve climbed up the central structures. 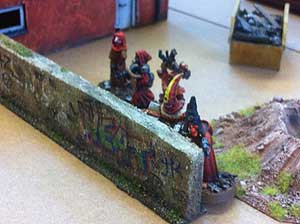 The first group of Redemptionists push forward 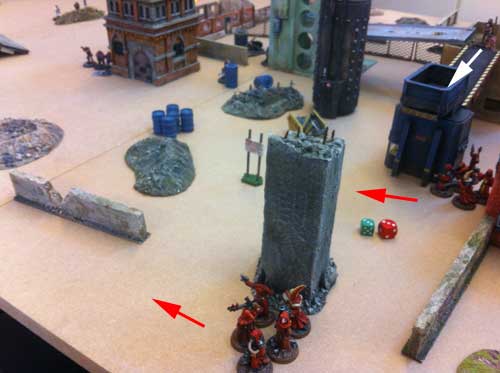 Both groups of Redemptionists rush toward the West flank The pair of juves who had initially run for cover had to be sent back out as it became clear it was going to be difficult to stop the Redemptionist surge. They took up positions behind a low wall that ran along the north edge of the field and readied their weapons. 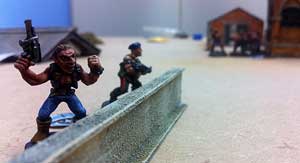 Two juves prepare to be steam rollered, while their comrades shout encouragement from a safe distance A juve high up on the central structures managed to get close enough to fire at one of the novices with his autopistol, it was a difficult shot, but he brought him down in the first casualty of the game. The Redemptionists moved up behind the cover of a long wall, while Goliaths closed in all around them. There was a brief pause while one of them exchanged shots with a Goliath at the corner of the brick tower, then the Redemptionists realised that pressing on was their best option as the Goliaths were closing in all around them. 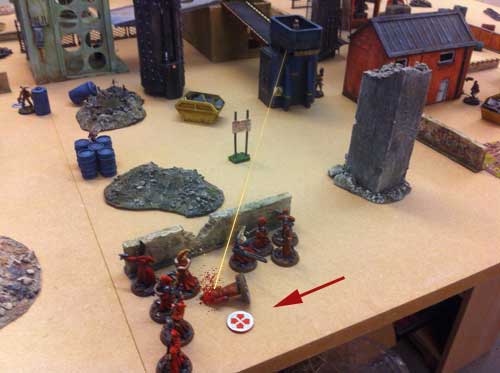 Novice goes down to a well placed autopistol shot Not much had happened yet – the Redemptionists had rushed forward trying to avoid contact, and had been particularly successful given the darkness. Then, in the last couple of turns, it all kicked off as they ran across the last stretch of open ground before their objective. Two redemptionists escaped off the table edge to raid the caravan, the zealot charged one juve with his massive chainsword and hacked him down, while the other Goliath juve took a blast from a flamer. The flamed juve escaped unhurt, while the flamer ran out of ammunition. (Too much time praying, not enough maintaining weapons, probably). In the following turn, the surviving juve gunned down the zealot before being shot to pieces by the remaining redemptionists who had closed to point blank range. They in turn came under a hail of autogun fire from the Goliath gangers lined up by the brick tower, which knocked down three more Redemptionists. In their next turn these downed Redemptionists crawled off the edge of the table and the game ended. The Goliaths escaped relatively lightly with just two juves down, compared to six Redemptionists, but the Redemptionists managed to get four gang members off the north edge, with another four crawling off after being downed. 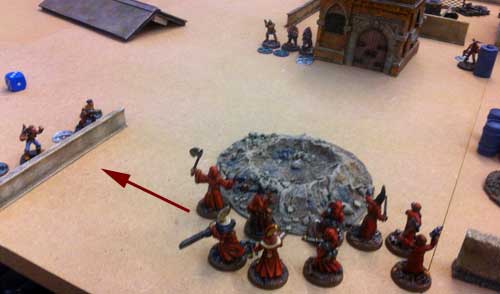 The final charge As the scenario didn’t mention the condition that the gangers had to be in, I gave him the benefit of the doubt and counted those too. With eight outlaws, the Guilder caravan was well and truly looted. No payment for the Goliaths, and the Redemptionists went away with a great haul. These were going to be my entry for Orctober, (see Oldhammer forum here http://forum.oldhammer.org.uk/viewtopic.php?f=6&t=4270&hilit=orctober), but I didn’t get them finished in time. I bought these three at BOYL 2014. They didn’t have shields, so I decided to scratch build something suitable. I’d been doing a couple of classic green putty ‘ugly face’ designs, so I thought I’d do some kind of face, but I wanted something a bit different to emphasise their character as savage orcs not just ordinary orcs. I googled “tribal masks” and copied some of the features, trying to make them a bit more orcish. They are made from a layer of green putty over a mounting board shape. The one on the far left was sculpted by my 11 year old, who is trying to get to grips with a bit of sculpting, and I think it has come out really well. My old orcs were all Goblin Green, highlighted with Bilious Green. I’ve branched out a bit with these ones – the middle one is Foundry Phlegm Green and the one on the right is Goblin Green but with far less yellowy highlights. I briefly considered some kind of brown for the skin, but for me orcs really ought to be green. 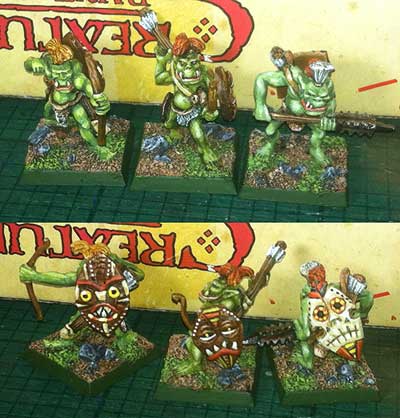 Savage orcs with scratch built shields Ash Waste Nomads seem very popular at the moment, so here’s my first one. He’s a Plague Doctor, plucked from the £1 bargain bin at BOYL 2014. The hat reminded me of that classic Blanche picture of some kind of wandering renegade (next to a short mutant with only one leg), and that image was very much in my mind when I worked on him. The backpack is a Bauhaus Warzone plastic, same for the grenades, water bottle and knife. Autogun is from Foundry street violence and the machete previously belonged to an Alternative Armies Eastern goblin. I connected the mask to the backpack with a wire ‘pipe’. Finally he was garnished with green putty, I added the badges on his cape and hat, the pouch, gemstone and bottle on his belt and the feather in his hat. The feather seemed to nicely echo the bird mask, and I liked the idea of someone in the Ash Wastes having one. Just imagine how far it might be to the nearest living bird – it would have to be highly rare and exotic object, probably he believes it to have magical powers, or at the very least to bring luck. 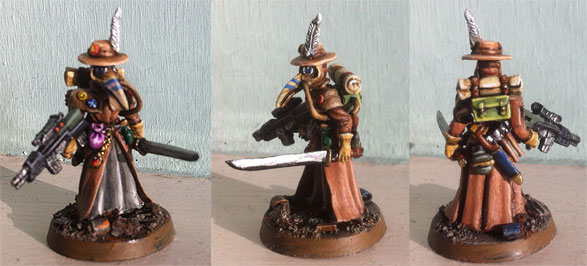 Ash waste nomad “From the ashes a fire shall be woken, from the shadows a light shall spring”. Long term visitors to the site will know that I’ve not made many updates, and that there has been more than one false dawn. I’ve been doing more painting and sculpting recently than I have for many years, so I thought I’d try posting some new content. This time I’m using a blog rather than the antique framework I lashed together myself at the close of the 20th century. Note that I’m putting in some older content with dates from the past, so slightly confusingly, although this was the first post, it isn’t any longer. |
 Warfactory range available from Lancer Miniatures
 |
|||||
|
Copyright © 2025 WarFactory - All Rights Reserved Powered by WordPress & Atahualpa |
||||||