|
|
Next week I’ll be meeting up with some Oldhammerers at Warhammer World for a bit of Rogue Trader skirmish. Nothing says Rogue Trader like a zoat (well, maybe slann), so I’ve dusted this one off and cleaned up a few details. Along with some Eldar renegades, he’ll be taking the field against whatever the 41st millenium turns up. There were only ever four 40K zoat models. I’ve got this one and two of the bolter ones. Zoats obviously weren’t popular at the time, but I love them. The gnarly muscle, the organic armour, the scale pattern, and the sheer weight of one of these beasts when you pick it up, all works for me.
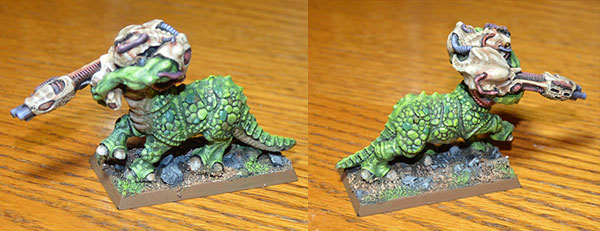 Zoat with multi-melta
I’ve been going back through the collection to find things of interest to photograph, and I thought I would quickly document the changes in my basing technique. Pretty much all my fantasy models are based like one of the samples below.
 Evolving basing technique Technique 1 (1986-1987) – On the far left we have the very first basing technique – crunched up Oasis (that’s the green foam blocks for flower arranging). It looked better when it was fresh, but it crumbles away leaving a very thin layer stuck to the base, and has also turned brown.
Technique 2 (1987 – 1991) – The next ‘standard’ method is ‘sharp’ builder’s sand on PVA, painted black, then drybrushed with Goblin Green (incidentally Foundry’s French Gun Olive Green 109B is an exact match for this), and then with a final top drybrush of Bilious Green. The edge of the base is black.
Technique 3 (1992-1993) – Technique 2 was OK, but a little primitive. This became refined by adding areas of brown (Bestial Brown), highlighted with a mixture of that and Bleached Bone. The edge of the base has been lightened, I think generally this was a mix of black and Striking Scorpion Green.
Technique 4 (1993+) – Generally the basing technique evolved because I did a little extra on a special model, and then liked it so much that I adopted it as standard. This is technique 3 with more stones (kept in a separate pot to the sand and sprinkled on first) – painted grey mixed from black and white. I also found the ‘foam’ flock for the first time. Prior to that all the flocks in model shops were ‘wood chipping’ style – they looked like tiny sharp green stones. For the first time you could get something mossy looking, so this has a few thin patches of foam flock added on at the end. This gives a softer and more natural feel to it.
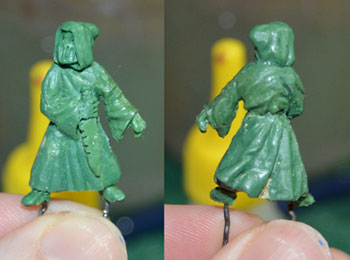
I have been sculpting a set of cultists, and here is the latest. He is getting very near complete. A little more work on the feet, and a few details – I’ve been thinking about giving him a set of throwing knives attached to his belt at the back. He has been made on an armature of florist’s wire, roughed out in milliput (you can still see a little showing at the bottom of his robe at the back), and then finally covered in green putty. The knife blade was made separately and attached when hardened by drilling and pinning.
 Cultist sculpt in progress Here is the original concept sketch – about twice life size. The idea was that he would look as if he was creeping round a corner, about to spring out on someone. It’s not turned out quite as I had it in my head, but I think the pose still works. The knife is a lot bigger in the sculpt and he isn’t leaning so much onto his right leg.
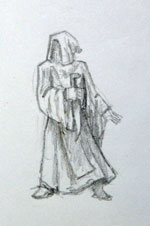 Cultist concept sketch
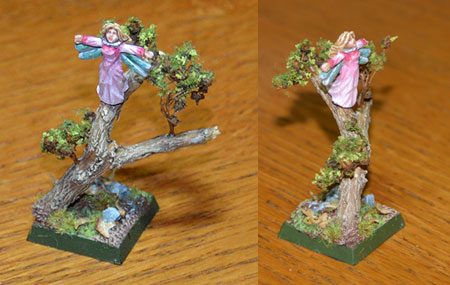
The Oldhammer forum is having a challenge where people have to post a newly painted model of a type that they have never painted before.
I had to think quite hard to come up with something that I hadn’t painted before (and I had a model for). I got this fairy as one of the freebies at BOYL 2014, and I thought she might serve as a familiar for a good wizard. As she would have looked a bit small and puny on a flat base, I made a small tree to perch on. The twig is rosemary (lightly drybrushed to bring out the texture), the foliage is some unidentified shrub dipped in glue and flock, and on the base are a few leaves made from birch seeds.
Next stage was to paint the walls. This is where you find out that the paint from 20 years ago is a bit different, so I decided to give all the walls a coat of Light Stone masonry paint from Homebase. The ground is a cream coloured paint but I wanted to differentiate it a bit. Not sure what the colour would have been in reality. They used lime plasters to waterproof cisterns so they might have done the same on the walls to protect the mud brick underneath, which I guess might have been white, but I think it would have become grimier over time.
One piece of advice – the coverage of that paint is not as I would like, so use the white face of the card mounting board as the exterior if you can – coloured card takes more effort to cover it.
Maybe I’ll try a more weathered effect at some point, but I haven’t really decided how – ideas are welcome.
The wooden supports are probably too dark, but again I wanted them to stand out.
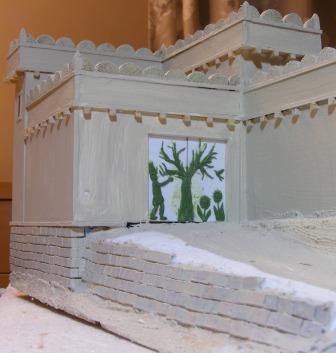
First mistake of many revealed itself next. I had to paint the main gate – would have been much easier if I’d have done it before sticking it down.
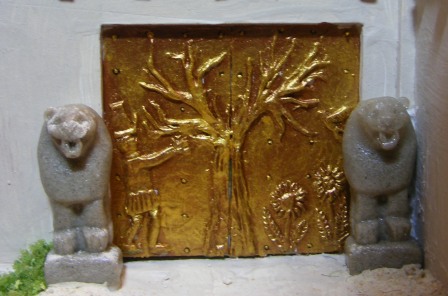
I wanted a gold-leaf effect on a bit of religious imagery, so I used green stuff to put in a scene based on some images I had seen. Rule 1 for bronze-age gods – wear a funny hat.

Bronze paint dry-brushed with gold did the job . I added in some fixing bolts with a fine permanent lining pen and some dots of gold.
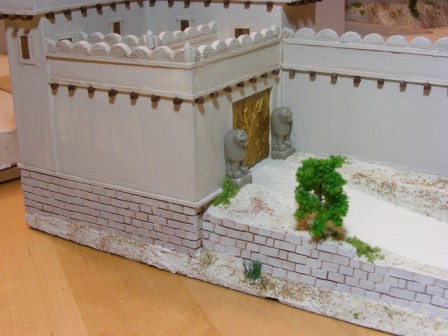
Next mistake – should have left a bit more room for the lions. These are from Steve Barber models and I’ve been waiting to use them for ages. I’d like to have them set back a wee bit more, but I couldn’t shift the wall. I’ve left them as they are supplied as I like the grey stone look.

Next job is the groundwork. Basically it is smooth cream sandtex paint, painted on and then bulked up with more of the same paint but with some fine sand added. Sprinkle on patches of different stone scatter and a couple of types of flock.
To neaten the interior I painted the surface with the sandtex. Once the buildings and bases are in place then it won’t show much but it makes it neater.
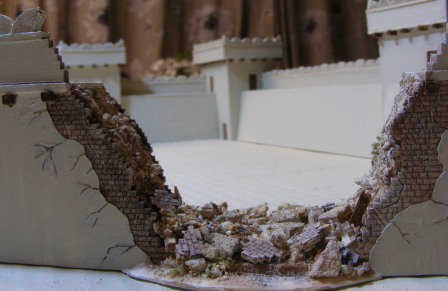
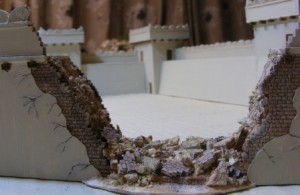
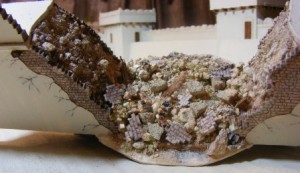
One of the wall sections has been made detachable so that I can substitute in a breach section.
Made a couple of mistakes with this – bit of a theme with this instalment. The main one is that the mud-brick walls should be several bricks deep, but too late to do anything about that . The daft one is that I had some fibres mixed in with my rubble and they show up, so there’s a tidying exercise there. Happy with the appearance of the bricks – they are sections of mounting board card which have had the joints embossed with a dentist’s tool and dry-brushed. The plaster coating is a sheet of paper into which some cracks have been cut.
Here are shots from front and top. Bit of ground work needs doing but that can wait.
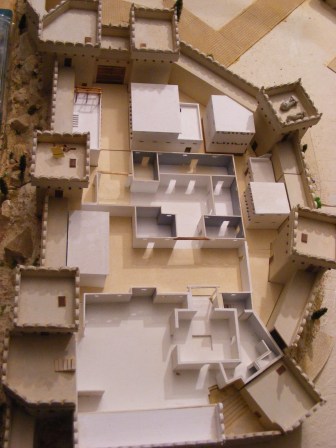
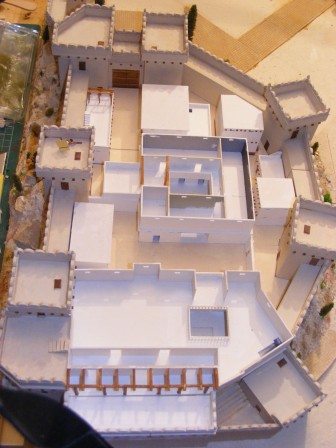
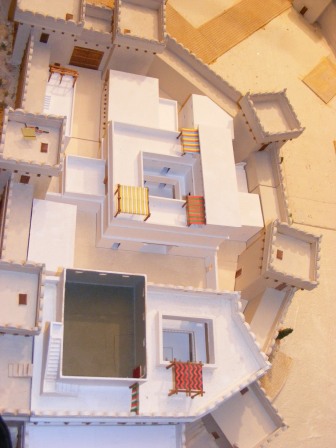
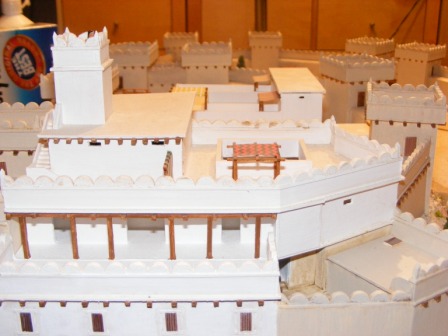
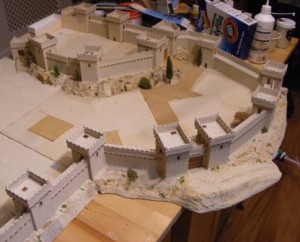
Final bit is to put the citadel buildings back in place – I had these constructed already. I have done the bigger buildings in layers, so that I can do the interiors if I ever wanted to get round to it. More likely that I’ll add to the exterior detail. They are a bit dull at the moment.
Pics of the various layers are here. Hittite lookout at the top – they must be in charge in the Levant at the moment. Pharaoh might have something to say about that, or maybe the Sea Peoples.
   
Next stage will be to add the buildings and lanes to the lower part of the city. I have most of these done, but there are a couple of bits I still need to do including a temple and perhaps an open market.
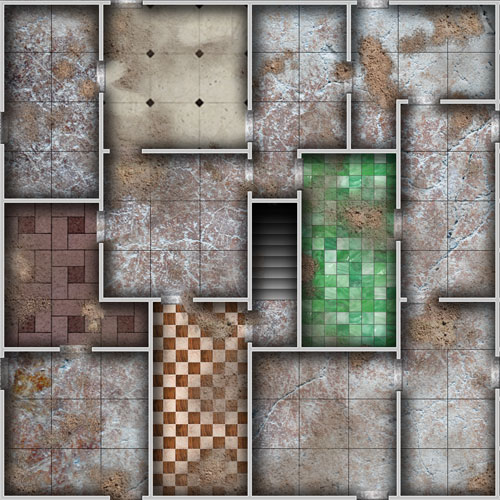
I have been working on a hybrid of Space Hulk and Chainsaw Warrior – basically using Space Hulk movement and turn sequence with Chainsaw Warrior models and equipment. I created a basic layout in Photoshop of a 10×10 square grid of rooms, 1 foot in total and printed off four copies. These represent two floors, with each staircase connecting to the one above it.
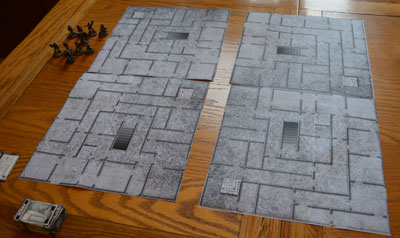 Prototype Chainsaw Warrior Board I don’t have all the models yet, so quite a few stand-ins had to be used. A big minotaur for the Meat Machine, a wraith for Darkness and Plaguebearers for the mutants. The zombies are fantasy zombies – we’re working on some modern style ones from Wargames Factory. The rats and chaos agents are in their final form though.
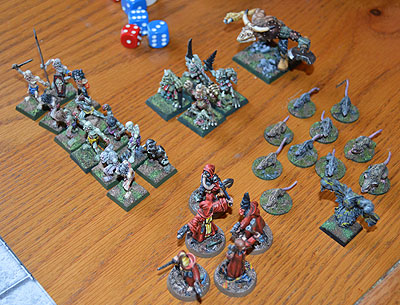
There were two Chainsaw Warriors, each leading a squad of four troopers, who had 60 minutes of real time to fight their way through to Darkness. Each time they got LOS into a new room, a room card was turned over. Doors were found to be locked on a roll of 6, and wandering zombies were simulated by one zombie coming in each turn from a stairwell.
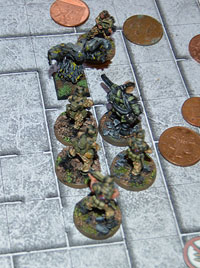
The Chainsaw Warriors managed to fight through to Darkness, and in the closing minutes one was killed, but the other managed to get a successful shot in with the second laser lance as seen above (pennies were being used for doors). It was a very useful playtest, revealing a number of things:
- The layout had too many tiny rooms. Since then I’ve done a new layout with fewer, larger rooms.
- There needed to be more enemies in the blips and not as many in the rooms. As it was it encouraged them to just shuffle through the map in single file, with the Chainsaw Warrior at the front of each squad demolishing the monsters one by one. Later on when the wandering creatures had built up a bit, it became more exciting as they started to come at the troops from all directions.
- We originally envisaged laying out cards in the rooms to be turned over as they reached them. As we started to set up, we realised just how long this would take and how messy it would be, so we switched to using a card stack and taking one each time they reached a new room (putting a cleared counter into each room where a card has been turned).
- The shooting is a bit over-powered if you use the original odds, in Space Hulk you typically get 3 or 4 shots at an enemy before close combat, in Chainsaw Warrior you only got one.
Since then I have created two new layouts, so the next playtest will be done with them, and the rule changes above.
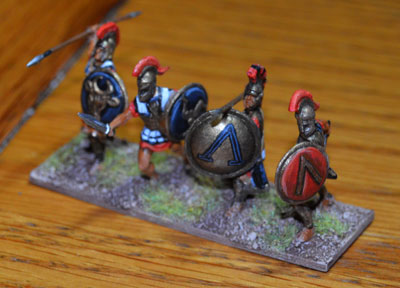
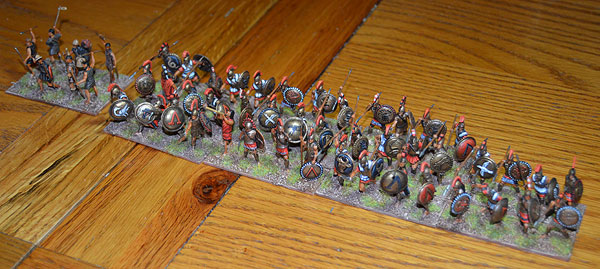 About 5 years ago I fancied trying out De Bellis Antiquitatis. This is normally played with 15mm models on 40mm wide bases, but these seemed a bit small, and many of the manufacturers sculpt in a style which is too ‘blobby’ for my test – oversized heads, thick limbs etc. In addition I was impressed by the quality and massive range of 1:72 plastics as shown on Plastic Soldier Review, and these tend to be scaled in a much more naturalistic way. I decided to go for these, mounted on 60mm wide bases and since then I have collected a number of armies in the Classical period – Greek, Macedonian, Carthaginian, Roman and Celtic (which between them can stand in for a high percentage of the armies from that period). About 5 years ago I fancied trying out De Bellis Antiquitatis. This is normally played with 15mm models on 40mm wide bases, but these seemed a bit small, and many of the manufacturers sculpt in a style which is too ‘blobby’ for my test – oversized heads, thick limbs etc. In addition I was impressed by the quality and massive range of 1:72 plastics as shown on Plastic Soldier Review, and these tend to be scaled in a much more naturalistic way. I decided to go for these, mounted on 60mm wide bases and since then I have collected a number of armies in the Classical period – Greek, Macedonian, Carthaginian, Roman and Celtic (which between them can stand in for a high percentage of the armies from that period).
These Spartans are principally made up from 3 boxes – Zvesda Spartans, Zvesda Hoplites and Caesar Hoplites. One problem with plastics is that not many poses are available and the plastic is hard to glue which makes conversion more difficult. It really helps if you can find more than one box that can be intermingled – although the style and scaling from different manufacturers is often too different, even if the subject is appropriate.
There are 11 elements of Spears, including one which is a general, and a unit of Horde (helots). This could be substituted in the army lists for another Spear, but I haven’t got that option.
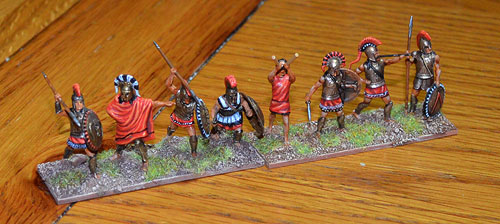 Spartan Command In DBA there is only one general element, but I happened to have two generals. From left to right, 2 is from the Zvesda hoplites (based on an actual bronze statue), and 4 is a Caesar hoplite. All the others are Zvesda Spartans. I particularly like the strange instruments – a double shafted woodwind instrument and some kind of tube with a brass ball on the end.
Here you can see some of the shields. The Zvesda shields are moulded on, with patterns in relief. The Caesar ones are separate (and a more realistic shape). All the Caesar spears have been replaced with ones made from florists wire – I hammer a point onto them, as they were too bendy to look right. I also replaced many of the swords with spears – they are supposed to be Spears in the rules and it didn’t seem right for half of them to be waving swords instead.
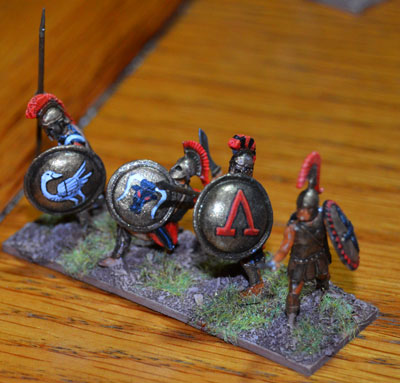
All 3 on the left have hand painted shields. The bull and bird are based on motifs found on pottery. They may well have just been moulded reliefs in the bronze but I’ve painted them on to brighten things up a bit. My Greeks are quite multi-coloured but with the Spartans I have stuck to a limited palette of red, white, black and bronze, which I think gives an appropriately martial feel to them. The second one along did have a moulded shield but I cut it off. Having the same repeated motif draws attention to the fact that the same pose is repeated, and it is also often inappropriate – this one did have a Theban club,, which is a bit odd for a Spartan. On the historical accuracy front, I am also mixing quite early Hoplite armour (far right), with much later – the white linen on the far left. In addition I think there was a fairly swift switch from Spartans carrying different shield symbols to them standardising on the Lambda chevron – they probably weren’t mixed as they are here for very long. Still, relatively little is known about uniforms in this period, and I think a certain amount of artistic licence is fair.
When moulding Linka blocks, I always make a full batch, because it’s as easy as leaving some out. Some of the resulting elements are a lot more useful than others; some are great blocks but are difficult to use in significant quantities. The large 2×2 castle door is a good example of this, so I ended up with a pile of them.
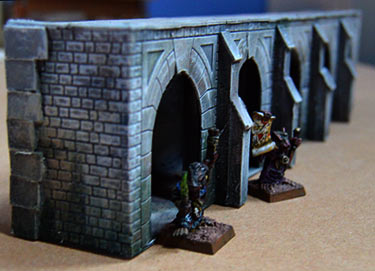
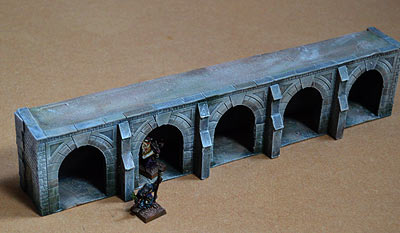
Inspired by the Mordheim stuff on the Necromundicon site, I thought I might have a crack at some basic ‘foundations’. (Those in search of further inspiration might also want to have a look at the cityscapes on Shifting Lands and the Mighty Pages). The first piece has taken the form of this colonnade, the idea being that it can be placed along the edge of a foundation block in order to permit a level change.
The base is a piece of heavy card, with a rectangle of foamcard along the back to give it some strength. The arches of the colonnade are Linka castle door pieces with the doors scored gently but repeatedly with a scalpel till they fell out. These were stuck in next, along with the side pieces, which are two standard stonework blocks on each side. To give the colonnade sufficient depth, the blocks were glued to the foamcard back by the tips of their teeth, which left a row of small square holes. These were covered up with card rectangles.
Another piece of foamcard was used as the top, glued in flush with the top of the arch pieces. Card rectangles were used to make edge stones.
Finally buttresses were cut from foamboard, in two sections. The tops were cut off at an angle, and then capped with card to hide the rough foam exposed by the cut.
The finishing touch was to paint the card ‘stones’ with tile adhesive, using a very old brush, to give them a gritty texture. A thicker layer of tile adhesive was applied to the top.
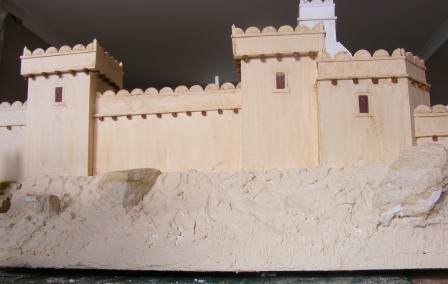
This started over 20 years ago when I put together a biblical collection. Peter Guilder’s fault really. I went to the Model Engineer exhibition in the 70s and there were some Hinchliffe Egyptian Chariots in a display case. At school. No money. Fast forward nearly 20 years and I decided I would get me some chariots, but at the time the only real options were 15mm. Even then the ranges were limited so I did some mixing and matching and a little conversion to get a good variety together.
My aim was to put on a game at a show, and I thought a bit of wow was needed for the terrain, so I built a biblical city on a 24” by 24” base. Together with the rest of the SAS club from Horsham we put the game on at SELWG 94 and Salute 95, back when it was in the Kensington Town Hall. Went well, people said nice things and we won a couple of prizes. Since then, I’ve had the idea to put on an enlarged game and so I have collected more toys and expanded the city a wee bit, but never really finished the additions.
For the last few years my health has been iffy – whether that game ever happens is open to question, but I’ve decided to pull my finger out and finish the bits I’ve started. I intend to chart my progress on here – mainly in the hope that others are interested, but partly to put pressure on myself by ensuring that failure would be public.
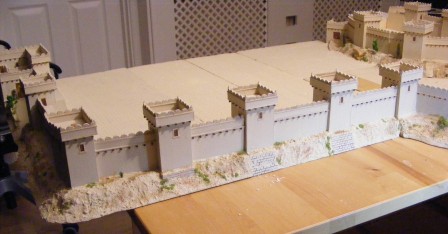
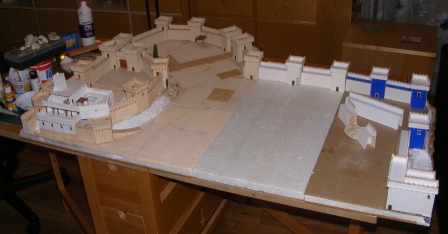
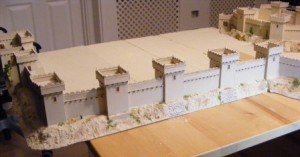
So, here is the current state of play. The walls and towers have been constructed, and although they are not shown, I have most of the internal buildings already done.

I have added 3 further sections, each of which is 2 feet by 1 foot in size. This is partly to fit in with my storage, and partly because if I add further sections I want to have the ability to switch sections around for variety.
One section (bottom left in the photo) completes the citadel, and the base structure has been painted but the groundwork needs completing. The other two are to extend the area of the lower city. One section of wall has been designed to be detachable so that it can be swapped with a breached section to depict a siege action.
Each section has a 6mm MDF base for strength, topped with 1” polystyrene to reflect that fact that these cities were either built on higher ground or a Tel, which is essentially the accumulated remains of earlier occupation. If I want a higher Tel, I’ll use more polystyrene to construct a sectional base that these will sit on.
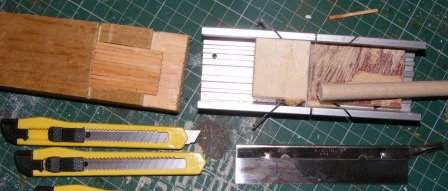
The walls and towers are constructed with Artists Mounting board, most of which I got for nothing by getting offcuts from a couple of Picture Framing shops who would have simply thrown them away otherwise. Card, craft matchsticks and 1cm balsa dowel are the other items used, along with wood glue.
Basic tools are craft knives, steel ruler and a razor saw with a mitre block to match. I get 7 of these knives for £1 from Pound Stores, and a section can be snapped off when it gets blunt, so these are perfect. Don’t use expensive alternatives like scalpel blades, it’s a waste. The razor saw and mitre are used for cutting the sticks and the dowel. Using a knife tends to split the wood if you are cutting short sections.
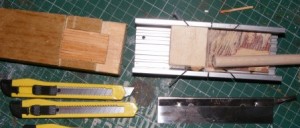
Sawing individual pieces is a very slow way of doing it, so I have knocked up a couple of things to allow me to do a number at once. One is an offcut of wood which takes a number of matchsticks wedged in fairly tightly pushed in as far as they will go. I then use the Razor Saw to cut along the slot on the left which results in a short section being taken off each of them. These are the timbers that project from just underneath the parapet on the walls. Longer lengths are required for the towers.
I then push the remainder of the matchsticks in so they butt up to the side of the slot on the left, and repeat to get more sections.
The Balsa dowel is cut into slices, then each slice is cut into a semicircle with a craft knife, and these will be used as the crenellations on the walls. The reason I opted for this is based on a picture of an Egyptian attack on Ashkelon on p49 of the Osprey Elite book on the New Kingdom Egyptians. I suspect that in reality the crenellations would have been either triangular or an arrangement of 3 square blocks, with 1 on the top level centred on 2 blocks on the lower level, and that the image is an artistic interpretation by either the original Egyptians or an error by the copyist who made the image shown in the book. Too bad – they are done now.
To speed the cutting of the balsa and try and get a consistent thickness I have a shaped piece of wood that slots into the mitre box and is held in place with a couple of pins. I push 4 dowels in as far as they will go and I can then I saw 4 disks at a time.
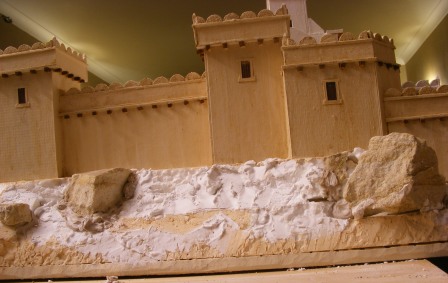
Anyway, first job is to get a base covering on the edge of the polystyrene to form the side of the Tel.
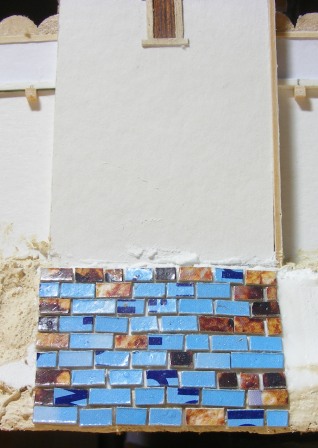
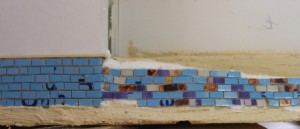
First I place a couple of bits of sandstone on the edge of the citadel section and cover the polystyrene with a base coat of filler. The polystyrene is chopped to ensure the rock sits in. Not very realistic for a Tel, but it looks nice and breaks up the surface, and I kind of justify it by claiming the original part of the city was built on a rocky outcrop. Not beyond the bounds of possibility.

I then mix up some filler with my Cream Sandtex base paint and add a bit of fine sand for texture. When I use filler on a model I usually like to use some paint in the mix, similar to what the filler will be covered with – if I don’t and the surface is scratched then white filler will show through very obviously. If it’s a similar colour to the surface then it might not show at all. I then apply this liberally to the edge of the piece, leaving only those areas where I’m going to put blockwork on there. I don’t apply flock or grit on there – this is just a base coat and I will paint the walls before I finish the groundwork.

On a couple of sections some towers and a gatehouse are very close to the edge of the Tel. To provide a stable base, the builders would have put a solid foundation wherever it was required. I’m going to represent this with blockwork. I cut 3mm strips of card from a cereal box, then slice them into sections between 3 and 8 mm long. Spread pva over the relevant area, then put in rows of blocks. One tip for these, picking them up with fingers is a pain. Tweezers are better, but I find it easiest to use a cocktail stick with a tiny bit of pva to pick them up and place them. The first pic is the base of a tower, the second is the base of the Gatehouse plus the side of the roadway leading up to the gate. Note that any troops moving up that road to attack the gate would present their unshielded side to the defenders on the wall.
Next job is to paint the walls and do the groundwork. I’ll post an update when that’s done.
Quite enjoyed a bit of D&D a few years ago. Really liked the combat under 4th edition, and wanted a few figures for that, but struggled to find some types so resolved to covert a couple. The pre-painted plastics are really good for gaming, because they can be carted about easily without getting damage, but the randomness was a pain. Still pick them up if I can get them cheap, though.
Anyway, I wanted a Dragonborn. Didn’t need wings, but wanted a meaty looking warlord to smite the foe.
Started with a plastic GW Chaos Warrior. Main changes involved a head replacement, and converting hands and boots to have 3-4 digits each with scales and claws.
The base for the head was a plastic Skaven head from the old Warhammer Regiments box. Produced in the mid-80s, it had 10 each of Goblins, Orcs, Skaven, Elves, Dark Elves and Dwarves.
The biggest modification to the head was the addition of dragon ears fashioned from thin plastic card, plus milliput/green stuff to change the jaw, add scales, and the tendril-like hair.
Green stuff was also used to modify the hands and feet and the top of the cloak. The shield was chopped about and faced with thin plastic to give the impression that it was constructed from a set of metal plates.
Finally the figure was stuck into the slottabase with the feet raised 3-4 mm above the surface, and some carved plastic card was used to represent paving slabs. A couple of small disks represent dropped coins.
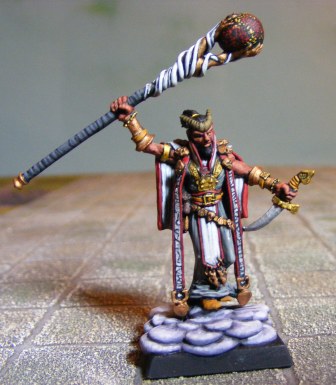
The Tiefling is a relatively simple conversion of a Reaper illusionist (I think). A couple of horns and tail have been added, and the top of the staff modified using a pair of plastic Ghoul hands and a ball of milliput, with green-stuff tendrils round it. The idea was that it was some kind of magical stone which emits power when the Warlock causes the hands to squeeze it.
The figure is based as if he’s rising up on billows of smoke.
|
|