This started over 20 years ago when I put together a biblical collection. Peter Guilder’s fault really. I went to the Model Engineer exhibition in the 70s and there were some Hinchliffe Egyptian Chariots in a display case. At school. No money. Fast forward nearly 20 years and I decided I would get me some chariots, but at the time the only real options were 15mm. Even then the ranges were limited so I did some mixing and matching and a little conversion to get a good variety together.
My aim was to put on a game at a show, and I thought a bit of wow was needed for the terrain, so I built a biblical city on a 24” by 24” base. Together with the rest of the SAS club from Horsham we put the game on at SELWG 94 and Salute 95, back when it was in the Kensington Town Hall. Went well, people said nice things and we won a couple of prizes. Since then, I’ve had the idea to put on an enlarged game and so I have collected more toys and expanded the city a wee bit, but never really finished the additions.
For the last few years my health has been iffy – whether that game ever happens is open to question, but I’ve decided to pull my finger out and finish the bits I’ve started. I intend to chart my progress on here – mainly in the hope that others are interested, but partly to put pressure on myself by ensuring that failure would be public.
So, here is the current state of play. The walls and towers have been constructed, and although they are not shown, I have most of the internal buildings already done.
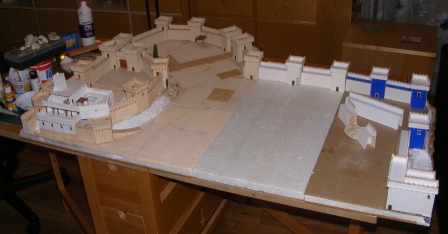
I have added 3 further sections, each of which is 2 feet by 1 foot in size. This is partly to fit in with my storage, and partly because if I add further sections I want to have the ability to switch sections around for variety.
One section (bottom left in the photo) completes the citadel, and the base structure has been painted but the groundwork needs completing. The other two are to extend the area of the lower city. One section of wall has been designed to be detachable so that it can be swapped with a breached section to depict a siege action.
Each section has a 6mm MDF base for strength, topped with 1” polystyrene to reflect that fact that these cities were either built on higher ground or a Tel, which is essentially the accumulated remains of earlier occupation. If I want a higher Tel, I’ll use more polystyrene to construct a sectional base that these will sit on.
The walls and towers are constructed with Artists Mounting board, most of which I got for nothing by getting offcuts from a couple of Picture Framing shops who would have simply thrown them away otherwise. Card, craft matchsticks and 1cm balsa dowel are the other items used, along with wood glue.
Basic tools are craft knives, steel ruler and a razor saw with a mitre block to match. I get 7 of these knives for £1 from Pound Stores, and a section can be snapped off when it gets blunt, so these are perfect. Don’t use expensive alternatives like scalpel blades, it’s a waste. The razor saw and mitre are used for cutting the sticks and the dowel. Using a knife tends to split the wood if you are cutting short sections.
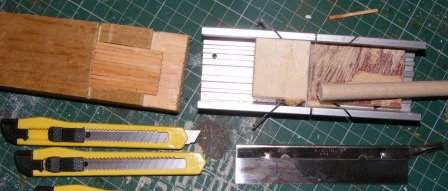
Sawing individual pieces is a very slow way of doing it, so I have knocked up a couple of things to allow me to do a number at once. One is an offcut of wood which takes a number of matchsticks wedged in fairly tightly pushed in as far as they will go. I then use the Razor Saw to cut along the slot on the left which results in a short section being taken off each of them. These are the timbers that project from just underneath the parapet on the walls. Longer lengths are required for the towers.
I then push the remainder of the matchsticks in so they butt up to the side of the slot on the left, and repeat to get more sections.
The Balsa dowel is cut into slices, then each slice is cut into a semicircle with a craft knife, and these will be used as the crenellations on the walls. The reason I opted for this is based on a picture of an Egyptian attack on Ashkelon on p49 of the Osprey Elite book on the New Kingdom Egyptians. I suspect that in reality the crenellations would have been either triangular or an arrangement of 3 square blocks, with 1 on the top level centred on 2 blocks on the lower level, and that the image is an artistic interpretation by either the original Egyptians or an error by the copyist who made the image shown in the book. Too bad – they are done now.
To speed the cutting of the balsa and try and get a consistent thickness I have a shaped piece of wood that slots into the mitre box and is held in place with a couple of pins. I push 4 dowels in as far as they will go and I can then I saw 4 disks at a time.
Anyway, first job is to get a base covering on the edge of the polystyrene to form the side of the Tel.
First I place a couple of bits of sandstone on the edge of the citadel section and cover the polystyrene with a base coat of filler. The polystyrene is chopped to ensure the rock sits in. Not very realistic for a Tel, but it looks nice and breaks up the surface, and I kind of justify it by claiming the original part of the city was built on a rocky outcrop. Not beyond the bounds of possibility.
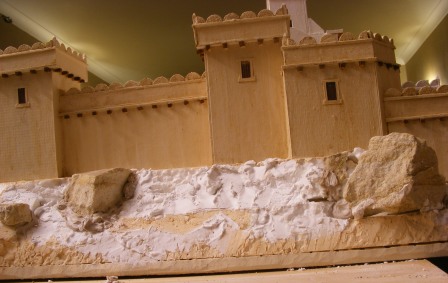
I then mix up some filler with my Cream Sandtex base paint and add a bit of fine sand for texture. When I use filler on a model I usually like to use some paint in the mix, similar to what the filler will be covered with – if I don’t and the surface is scratched then white filler will show through very obviously. If it’s a similar colour to the surface then it might not show at all. I then apply this liberally to the edge of the piece, leaving only those areas where I’m going to put blockwork on there. I don’t apply flock or grit on there – this is just a base coat and I will paint the walls before I finish the groundwork.
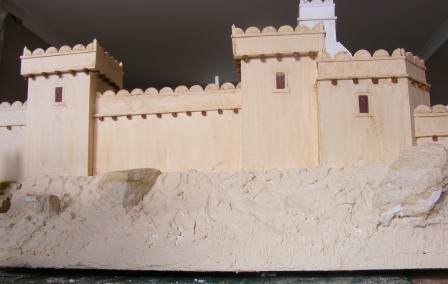
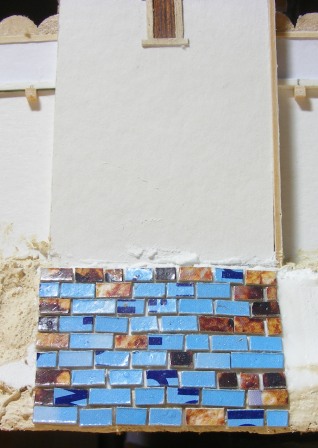
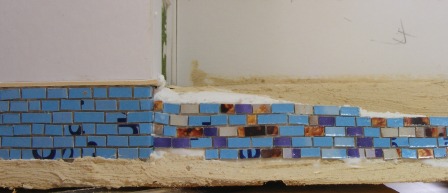
On a couple of sections some towers and a gatehouse are very close to the edge of the Tel. To provide a stable base, the builders would have put a solid foundation wherever it was required. I’m going to represent this with blockwork. I cut 3mm strips of card from a cereal box, then slice them into sections between 3 and 8 mm long. Spread pva over the relevant area, then put in rows of blocks. One tip for these, picking them up with fingers is a pain. Tweezers are better, but I find it easiest to use a cocktail stick with a tiny bit of pva to pick them up and place them. The first pic is the base of a tower, the second is the base of the Gatehouse plus the side of the roadway leading up to the gate. Note that any troops moving up that road to attack the gate would present their unshielded side to the defenders on the wall.
Next job is to paint the walls and do the groundwork. I’ll post an update when that’s done.

Just found your blog!
I love the idea about the Biblical city! I’m borrowing a few of the concepts into my ‘Trojan War’ project!
Thanks for the ideas!