|
|
I am pleased to announced that my sculpts have been spin cast for the very first time. Lancer Miniatures have made a mould from eight of my sculpts and they will be available from the Lancer Miniatures site in the next few days. Here are the first few to make it into lead and more greens are already in progress – I’ll post some previews in the next few days.
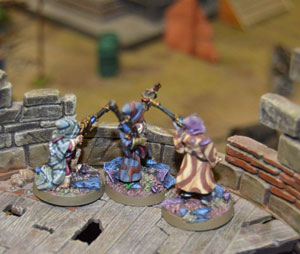
The rituals of the cultists have summoned this towering, rippling figure formed from pure magical energy.
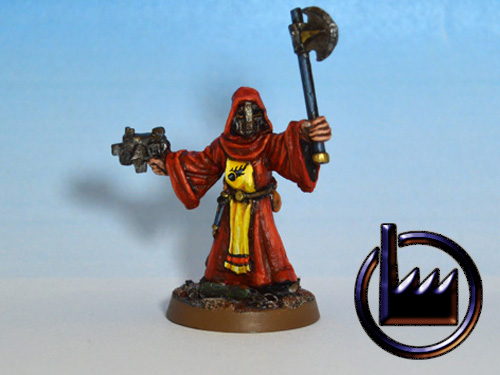
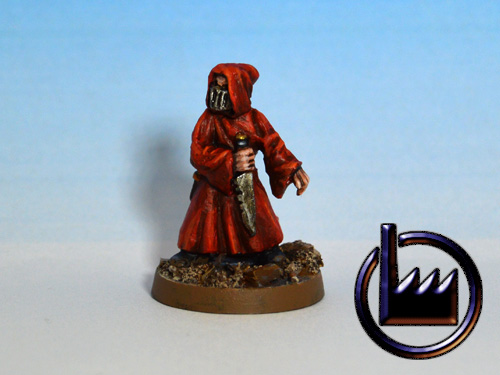
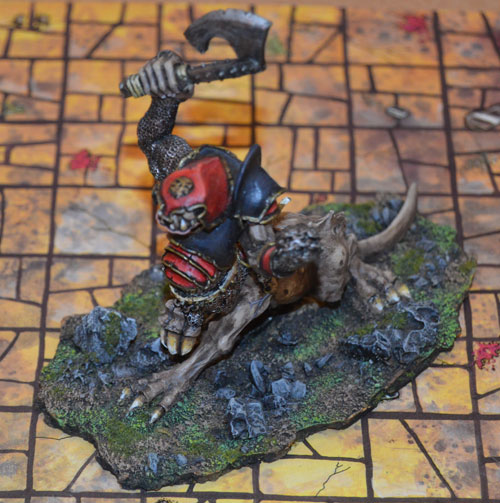
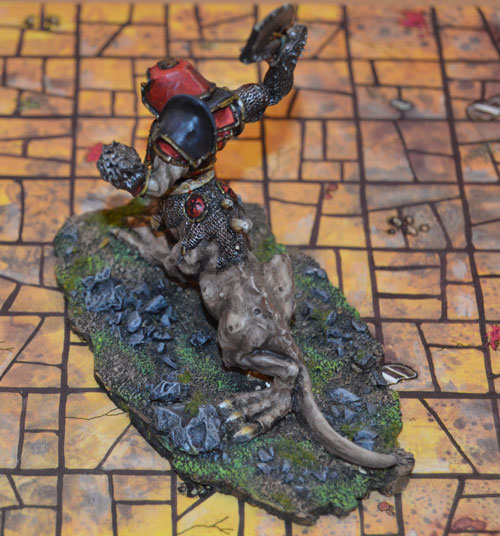
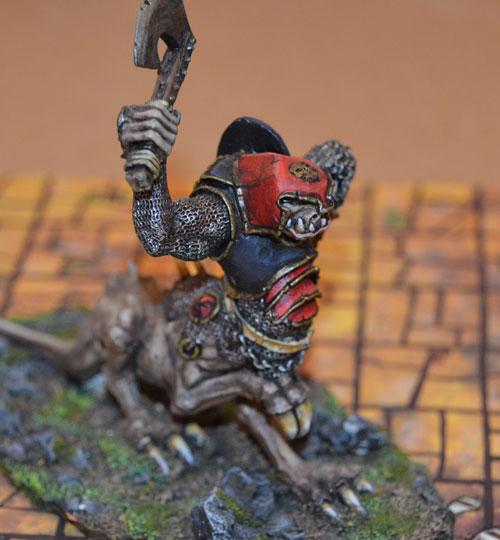
 DEM01 – Wraith Demon The cultists’ leader, Brother Benedict, wields a mighty axe as he exhorts his brethren.
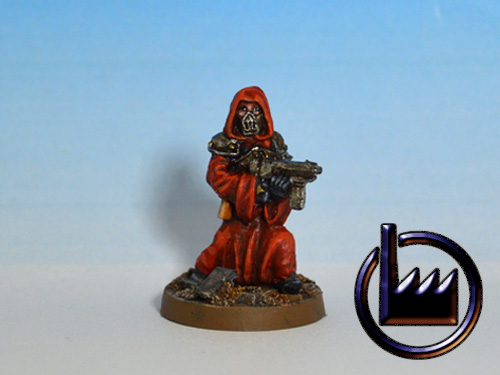
 CUL01 – Cultist Leader Nothing gets rid of heretics like a blast from Brother Rubicon’s flamethrower.
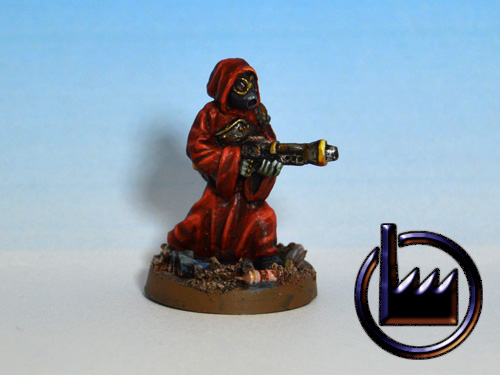 Cultist with flamethrower Brother Silas crouches down and looses off a volley of fire with his weapon.
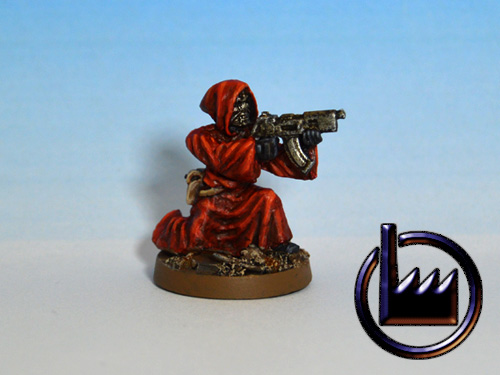 CUL03 – Cultist with sub-machine gun Brother Cambrias fells a heretic before taking another reinforcing swig of the ‘holy water’ at his belt.
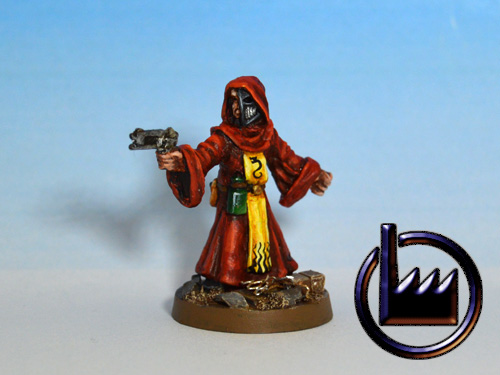 CUL04 – Cultist with pistol Brother Posada is protected by battered armour, a sacred relic.
 CUL05 – Cultist with machine pistol Enemies of the true path will be soon be removed by Brother Ucto creeping into their apartments and dispatching them.
 CUL06 – Cultist with daggers and finally Perry scans the shuttle’s condensers for that persistent coolant leak…
 CRW01 – Spaceship Ground Crew
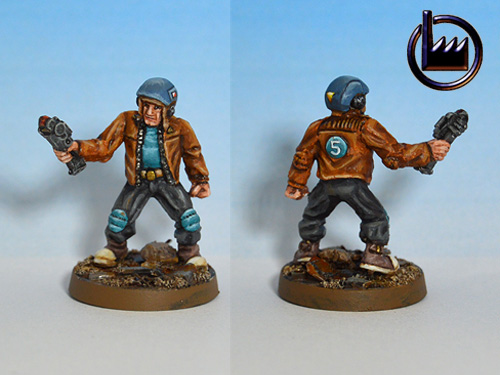
In addition to the power-armoured psychopaths, every sci-fi universe needs its ordinary Joes. A spaceport would be teeming with technicians, passengers, and people who just empty the bins, so I thought I’d sculpt a few and this is the first of them. He’s an engineer/spaceship ground crew waving a scanner or other such gizmo.
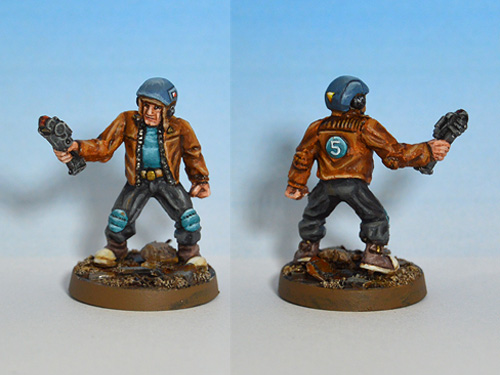 Spaceship Ground Crew
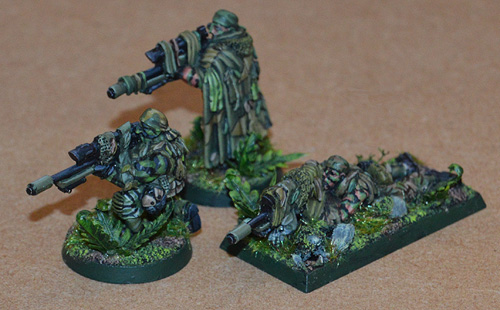 Trio of Snipers Here’s one of my most recent purchases of a Games Workshop blister pack (2004). They already had a few leaves on their cloaks, but I added extra leaves, hanging bits of cloth and scrim for more of a proper sniper “ghillie” appearance. Their skin has been almost completely covered in green or black camo paint for added realism. On the bases are a few sprigs of plastic fern (a chopped up home decoration).
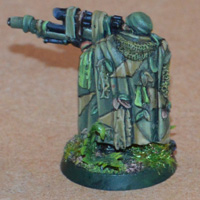 Catachan sniper standing 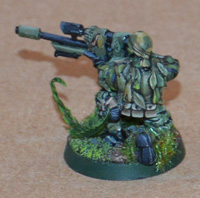 Catachan sniper kneeling Note: Previously this post was labelled as “Cadian snipers”. They are in actual fact “Catachan”.
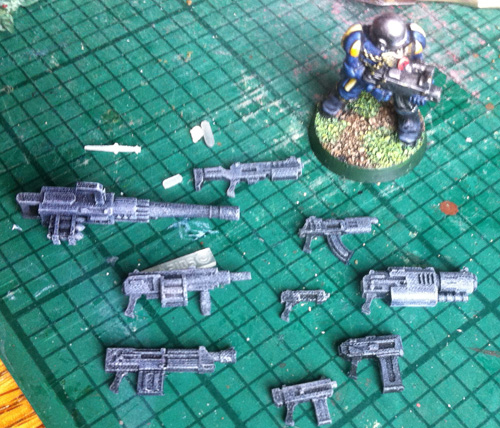
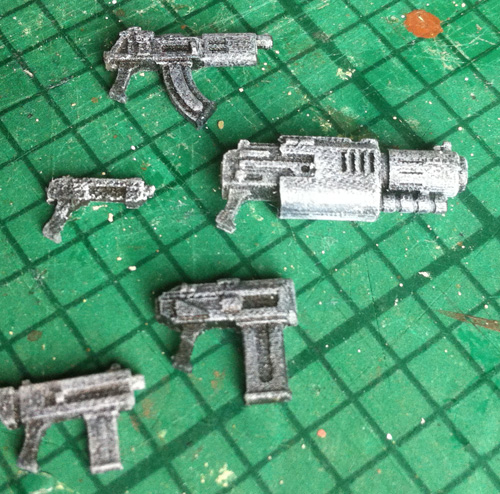
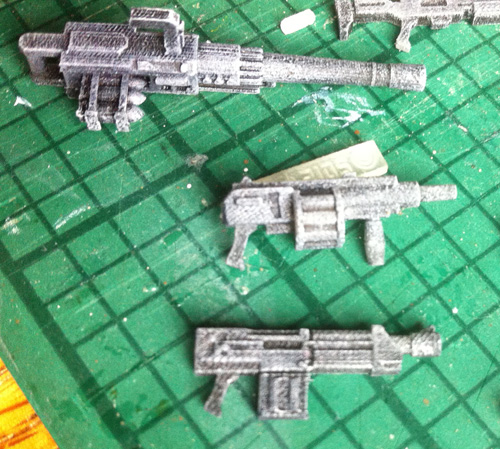
Eight days after ordering them, my 3D printed weapons have arrived. I’ve painted them black, drybrushed them and taken photos. These are Frosted Ultra Detail from Shapeways. On the whole I’m pleased, they’ve come out the right size, the surface detail is good and they are slightly rough but acceptable. It will be interesting to see how they cast. If I get some more printed, I would make some of the smallest details a little larger and deeper cut/more prominent. The plastic is very hard and a bit brittle, but it takes the paint without trouble. I was a bit worried because it was noticeably greasy (and smelt faintly of almonds). I scrubbed it with washing up liquid and a toothbrush before painting.
The only printing problem is that one of the weapons hasn’t formed correctly – it should have a ribbed end to it, but it has come separately in a little bag in two pieces. I think I hadn’t formed the 3d model correctly – it reported as being a 3 piece model when it should have been only one, and I couldn’t work out why. I’m going to try pinning and gluing it on.
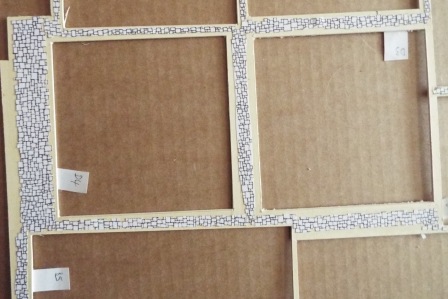
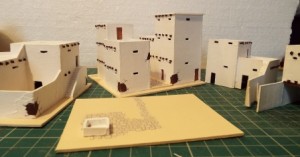
The Buildings.
Basically they are constructed from Artists Mounting Board. PVA or wood glue forms a strong bond very quickly. I make them slightly underscale, partly because I want to get more in to the space, and partly because I suspect they would have been smaller than we might think anyway.
The best sequence for a basic building, to avoid swearing and personal injury, is;
- Figure out how big the building should be.
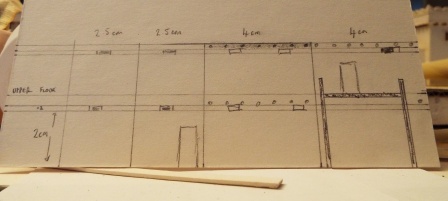
- Measure and mark out the wall sections, including doors and window slots.
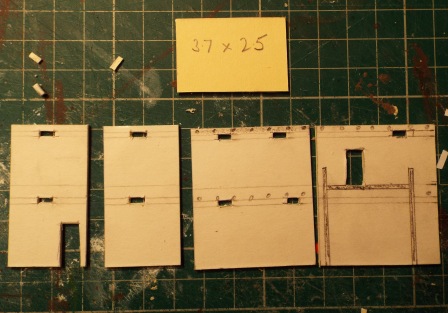
- Cut out the pieces, including window slots and doors, on a cutting mat.
- Construct the building structure without attaching it to the base.
- Do the same with other buildings that are going on to the base – as you make and measure each piece check the position on the base so that they are the size you need.
- Paint the building with smooth white masonry paint – or any other colour of choice.
- Cut some small cubes of wood, say 1.5mm square, to be the protruding roof beams and paint them brown
- Glue on the roof beams.
- Glue the doors in place.
- Paint the base.
- If you want any patches of paving on the base, glue or draw them on.
- Glue the building onto the base.
- Glue on all the accessories, such as rugs, awnings, pots, trees, booths, ladders etc
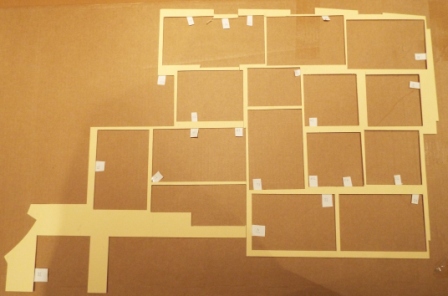
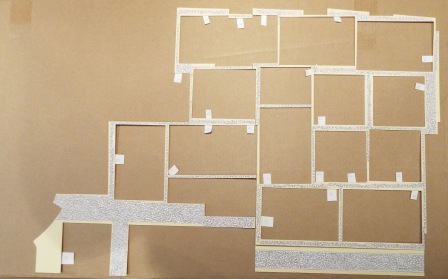
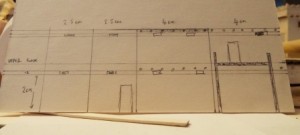
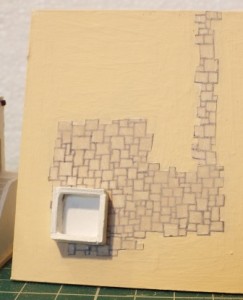
The following picture shows the walls of a building marked out. I normally draw the 2mm strip where the vents/windows and the doors will be, but on this one I have also marked where the roof beams will go, and where the walls and roof of a connected building will go. Use a pencil and do it lightly so that the paint covers it more easily.
Here are the walls and roof of the building with the cutting complete. I can’t stress enough how much easier it is to cut these out on a mat before construction. Another tip – when measuring the roof make sure you allow for the thickness of the walls so that it slots in. The mounting board is about 1.5mm think. The roof size has been marked on here.

On roofs, I use 3 varieties. The simple flat roof with no parapet as on the building above, one with a parapet – I set it 5mm below the top of the parapet, and one that overlaps the walls supported by beams.
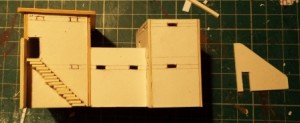
Here is a pic showing the above building on the right, with 2 other connected buildings. I like some steps. I cut a 5mm wide strip of mounting board and cut it into sections, then glue them to the wall as shown. On the far right is the wall section which will be stuck over it.
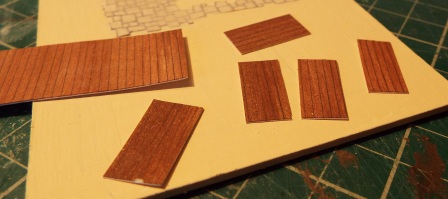
I mass produce doors by ruling planking lines on a piece of card, paint it brown, then cut it into strips which are then cut again to produce each door.

Here’s a shot of a couple of blocks with the basic painting done.
Here’s a shot of a base, ready for the buildings to be added. It’s going to be a linen workshop – the pool is used to soak the flax in water as part of the process.
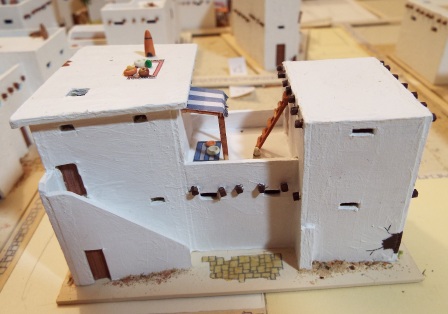
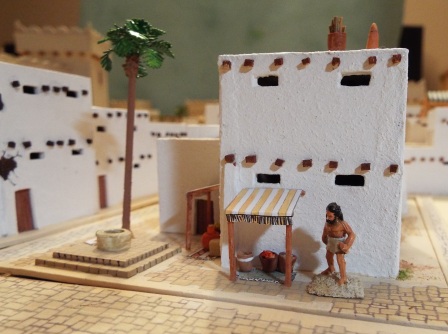
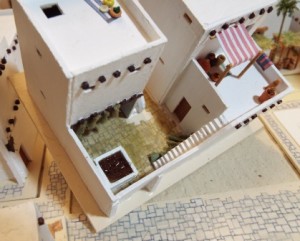
Here is a pic of the completed building from the photos above. The roofs are used as additional living space. Awnings are used for shade, and rugs for comfort. As per the paving, I created a master copy on a piece of card, painted it up, scanned it in, and now I have enough rugs and awnings to provide for plenty of buildings. As per the paving, we’ll eventually put it up for download, but if you want a copy meantime, let me know and I’ll send one over. Simply print it out on a4 paper.

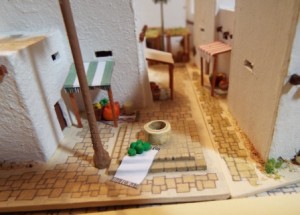
The supports are cut from a sheet of obeche from the model shop. Pots, baskets and bowls are made from fimo which is then baked in the oven, and painted as required. Sand or plant seeds are then used to fill the containers and painted to represent grain, olives or fruit. Ladder si from obeche.
The pointy things are ovens.
Damage to the plaster is done by painting a patch brown, drawing on the brick lines and the cracks, then painting round it with the white masonry paint.
Finally litter is placed at the bottom of the walls. Street cleaning wasn’t high on the list of priorities – bit like Surrey now – and rubbish would have been just pushed to the side or wash into corners by the rain.
Next shot is a street booth with a few things for sale, near a well.

A different angle, showing some watermelons for sale from a mat. Not that sure if they had them, but hey. These are yellow mustard seeds painted green.
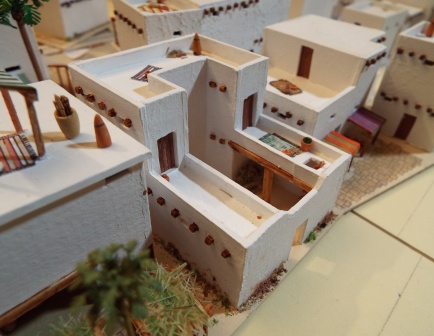
Next shot is of an Israelite 4 room house. Probably more iron age than bronze age, it shows the entrance yard with covered areas to each side.

A couple of roadside booths.

The linen works. Fresh bundles of flax are piled by the stairs, while a previous batch is hung up to dry. The pool is filled with water and another batch of flax.
As further buildings are completed I’ll post more pictures. If anyone wants any further detail, just ask.
This bit is laborious and you could go without it if you didn’t mind seeing gaps between the building bases, but I think it’s worth doing for aesthetic reasons.
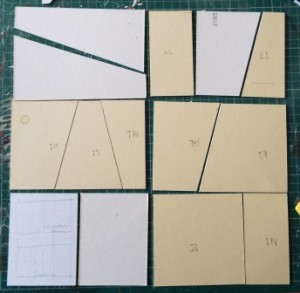
The buildings are based with Artists mounting board. I have some where the bases are cut to size to fit into a specific position, but I subsequently realised that I should have a variety of standard sizes and shapes which I could then interchange if I wanted to vary the layout, so more recent models are on these bases.
The following photo shows a variety of configurations that would sit in a slot measuring 6 by 4 inches.
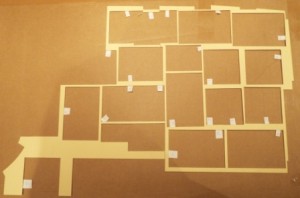
Using these placed together would create a grid-like appearance which didn’t fit right with my idea of how the city should look, and I want a few intervening spaces that break it up a bit, so the first thing is to take a larger sheet of mounting board and cut it to fit to the internal shape of the city.
I wanted a main roadway heading in from the gate, so leaving space for that I positioned the buildings on the board.

As you can see, I don’t yet have the buildings to fill it, so I have cut and positioned some blank bases, which I’ll put buildings on. I want the road to run up to a ceremonial square, with a temple sitting behind it. These are just marked with bits of paper on the picture.
Once I was happy with the layout, I marked the positions on the larger sheet, and cut them out so that each block would sit in its slot. I labelled each slot so I knew which building block went where.
I like to create the impression of irregular paving in the open spaces and along the routes. In reality, the routes would probably have been muddy or dusty unsurfaced tracks, but I just liked the effect. I draw the slabs in using a brown fine-line pen.
.
You can draw each piece directly onto the board, but it takes time, so I drew some sections on a piece of card, scanned it in and copied drawn sections to create an A4 sheet which I could then print off. When we’ve sussed out how, we’ll put a sheet on here which you’ll be able to download and use. Meanwhile, if you want it, put a comment in with your email in and I’ll send it over.
I then cut suitably sized sections and use pva or wood glue to stick them to the base board. Cutting them out can be fiddly, which is why the sheet contains a couple of narrower strips.

First mistake. They are then painted using the stone masonry paint. The lack of coverage that is frustrating on the walls in handy here, because it lets the paving joints show through. However, I didn’t think to check the colour against that used on some of the bases, which is browner and looks better to my mind, so I’ll have to re-do it. Once that’s done and dried, paint the unpaved areas with the Cream Masonry paint used for the ground cover. This is a bit fiddly, unfortunately, but worth doing to tie all the bases in. In retrospect, I would paint the paving and the board before sticking the paving in place – it would save time.
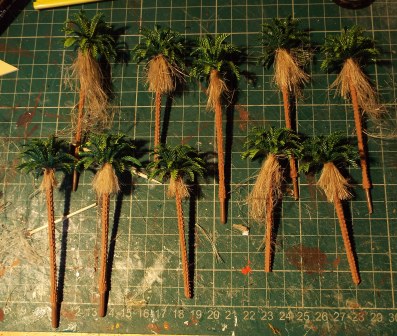
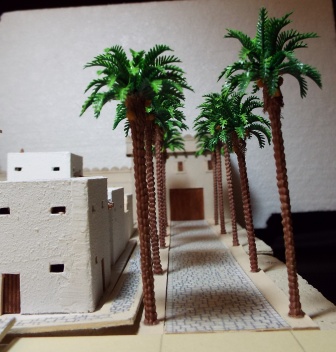
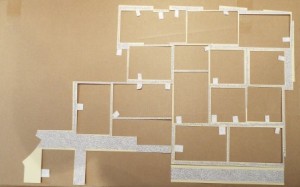
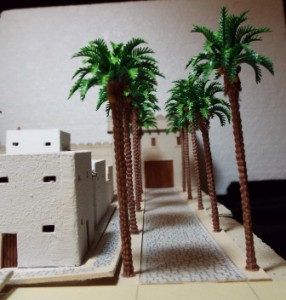
Next job is to put the roadway in place. Unlike the rest of the template, I’m going to fix this in place on the baseboard. Partly because I want to fix some trees through, to give me that Thunderbirds 2 runway effect that is a key feature of any biblical city according to all the historical sources, and partly because I’m not going to want anything other than a roadway running up from the main gate. I have resisted the temptation to hinge the palm trees, but only because I can’t find a tiny Thunderbirds 2 model.
Open spaces were not always features of ancient cities – they would use any space for buildings and the roads, such as they were, would not necessarily have the space to accommodate wheeled transport. Much of the social interaction and trade would have taken place in the area of the gate.
The palms are plastic jobbies which I have repainted. I have also added the dead foliage and fruiting bodies just below the crowns. I start by using pva to stick plumbers hemp around the trunk.

When it’s dried I crop it back with a pair of small sharp scissors and paint it brown. Photos of palms show the fruiting bodies as big clumps of orange seeds, so I used some yellow mustard seeds, applied a thin coat of pva and put them in some fine sand then allowed them to dry. Next they were painted a yellow-orange and 3-4 were glued to each palm. You can just see them in this shot down the roadway.
Buildings next.
On Wednesday we headed over to Warhammer World for a Rogue Trader game (1st Edition 40K). Here’s some snapshots of what happened. Axiom has already posted this more detailed account of the battle.
I went with my 11 year old – he fielded zoats and Eldar renegades, I fielded assorted mercenaries, pirates, scum and alien scum.
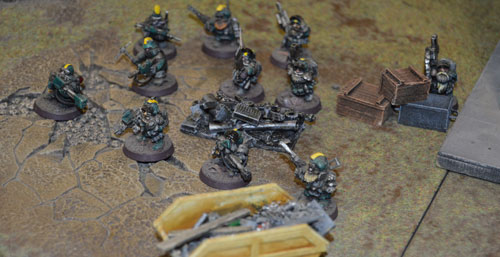
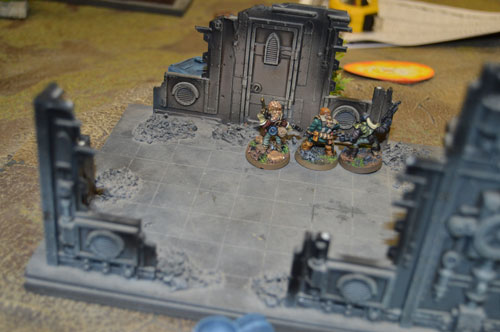
 Eldar Scouts The battlefield consisted of rolling hills with a few high vantage points like the tower above. We were facing off against 20 squats on the left, tactical marines and a squad of Terminators in the centre and Devastators on the right. On our side the Eldar and zoats were on the left, Axiom’s scum advanced in the centre and I took the right flank.
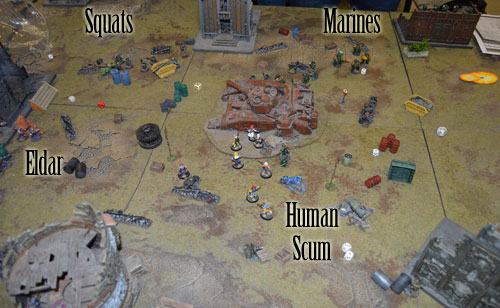 Panoramic view mid-game Here’s a view of the whole field. The forces deployed along the long edges of a 4’x6′ field. In the centre was a wrecked Baneblade. The objective was to have more models (measured by total Wounds), on the base than the other side.
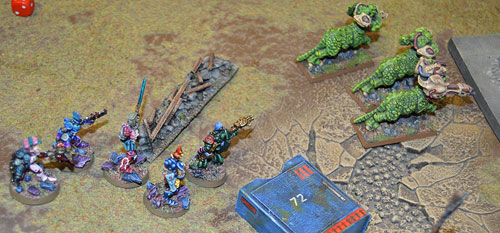 Eldar renegades and Zoats The Zoats rush in ahead, relying on Move 7 and Toughness 5 to get to close quarters. We were facing a force with quite a few long range heavy weapons, so we needed to either get in quickly, or use the most of the cover.
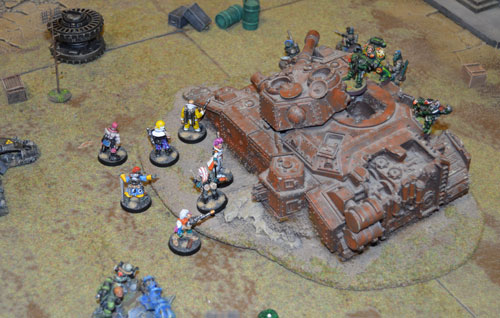
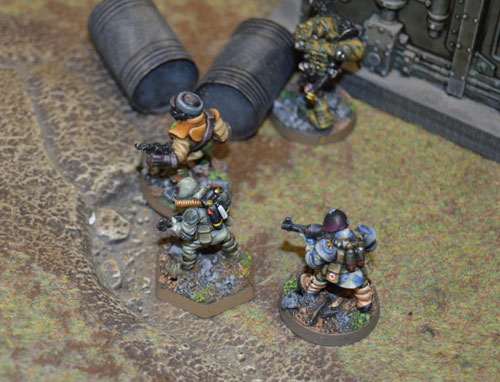 Mercenaries move up behind cover This area of the battlefield was overlooked by a marine Devastator squad so these mercenaries are cautiously moving up and staying in hard cover. This is the first incarnation of the mercenary squad (they were wiped out and came back). The first missile launcher, although packing melta and haywire missiles, failed to do anything due to a combination of deviation and failed to-hit rolls. I suspect he was expelled from the marines for his inability to shoot straight.
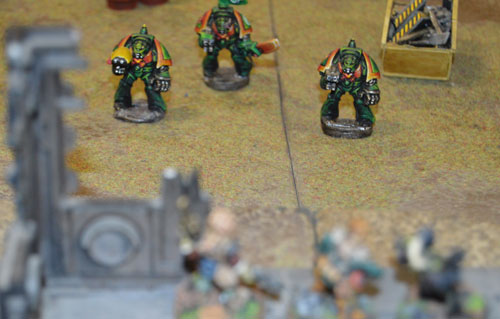
 Devastators on a vantage point Marines rushed forward to the objective in the middle, while the Devastators stayed where they were and rained fire on our advance.
 Converted Squats looking very business like and military The Imperials got off to a good start, pouring marines on to the objective and winning the first two turns.
 Scum charge the objective The squats weren’t faring so well, a zoat got into close combat in spite of being wounded, and the zoat with the multi melta managed to land its massive 2″ radius template on a group of them.
 Zoat reinforcements arrive With things starting to look a bit desperate for the looters, zoat reinforcements arrived. Feeling the need to salvage the situation, the Eldar leader (shown above in the pink with the power sword), starts to work his way forward.
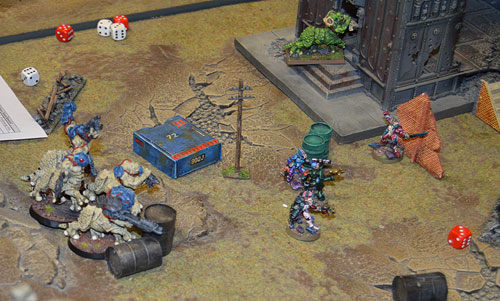
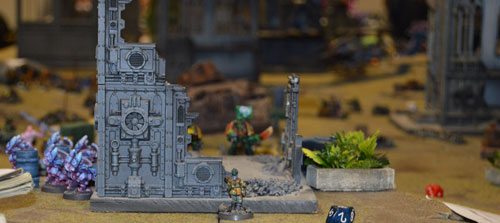
 Captain Benson and his sidekick Hodges cower tactically Things were even worse on my flank. The Heavy Stubber was cut down without firing a shot (I had foolishly forgotten to hide him when he moved to the edge of the building to get into a firing position). The rest of the pirates are hiding in the ruins on top of the help. Captain Benson (in the chequered headscarf) had a lucky escape from a heavy weapon hit when his conversion field absorbed the blast. The callous captain had neglected to warn his squad about the possibility of blinding flashes, and none of them were wearing eye protection. Fortunately none of them failed their saves. The only bit of success was Frank the Slann (none of the pirates can pronounce his real name), creeping to the edge of the building and picking off a marine with a lucky shot from his lasgun. (That’s BS2, so a 6 followed by a 4+ to hit a target in hard cover, followed by 4+ to wound and then not saving on a 5+ for a total of a 1 in 36 chance of a kill). He was swiftly cut down by the return fire but he had done his bit.
 Pirates prepare to repel boarders The terminators began to advance up the hill towards the pirates, using their bio-scanner to spot them and pick them off. The captain pulled out his shuriken pistol, and with very good odds (hit on 2+, wound on 3+, following fire) loosed a hail of shuriken into them. The first one went down but a 1 put an unfortunate stop to it. In the following turn the pirates went down in a hail of fire, except for a blue faced alien called Vlad, who lurked at the back.
 Vlad waits in ambush The terminators pressed on up the hill, facing the new threat of chaos squats with jump packs who had just arrived on table. At this point Vlad, who I had just realised had a melta-gun, popped out and roasted a Terminator at point blank range. He survived the next turn (I can’t remember how), and then took out the last remaining Terminator with another blast.
Fortunes had really turned on this flank. The mercenary with power armour and missile launcher (in his second incarnation) finally managed to land haywire on the two missile launcher devastators. It didn’t hurt them, but it did put every item of their equipment out of action, taking them out of the fight. The following turn he hit again and did the same to the las cannon marine (everything of Tech Level 1 and above stopped working).
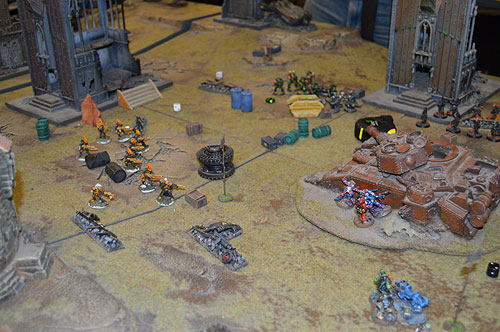 Latecomers arrive Two substantial new forces made their way on to the field at this point. Some Eldar led by Matt and a large force of Imperial Guard (original metal range) belonging to Curis. You can just see the remains of the Eldar and a red-robed cultist claiming the objective in the second-to-last turn. In the final turn the Imperial Guard swarmed forward to help claim a narrow Imperial victory.
I have been using Sketchup to make some weapons for 3D printing. I have just sent two copies of this sprue for printing by Shapeways and I should have them back before the end of the month. I am using the highest resolution material, which is called Frosted Ultra Detail. The cheaper “White Strong and Flexible” definitely has too much banding judging from the samples I’ve seen. The more you order, the cheaper it gets, because the base cost plus postage is 18 Euros, and then you pay proportionally to the volume on top of that – in this case approximately 5 Euros per sprue – so this isn’t a cheap way to get models, even if you have the CAD files ready to print. However, I think they will be neater than I could ever achieve in putty, and it will be exciting to see something I’ve computer modelled turning up in the physical world.
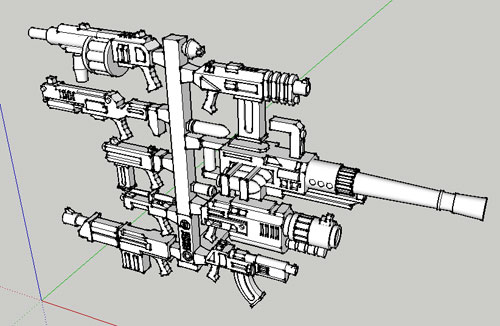 3D printed 28mm weapons
A few photos of a really classic model here. I love the way he is stalking forward, his massive axe raised. At any moment he is about to start sweeping it from side-to-side, cutting down lesser creatures like corn. It’s no wonder this would cause fear in creatures under 10′ tall.
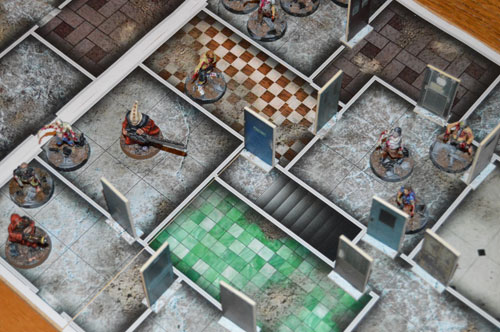
I have made the first prototype board for my Chainsaw Warrior “2D” – Chainsaw Warrior with Space Hulk rules. The board will be made up of 30cm squares. I bought a big sheet of hardboard from B&Q – they offer a free timber cutting service and can have it sliced up for you very precisely with their massive saw. The floor plans that I made in Photoshop have been printed, and I have also done some doors. These were glued to mounting board and then cut up with a scalpel before gluing to their bases with PVA.
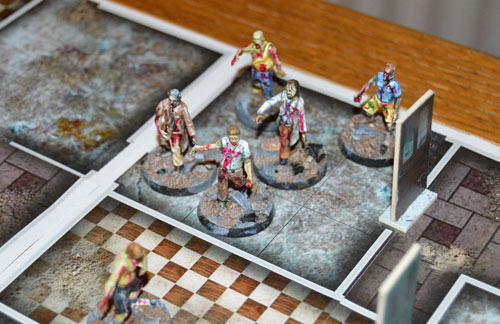
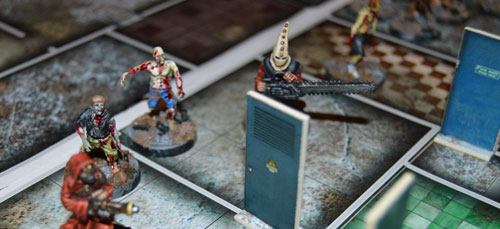
Here you can see a sample, populated by zombies (Wargames Factory) and a couple of Chaos Agents (one is a home made cultist and the other a converted Foundry monk).
|
|