 Been interested in the East Africa campaign in WW1 for a long time. Have a few of my Darkest Africa28mm that would do the job, but I know I’ll never get a big enough collection in 28mm to refight any of the battles, and artillery in 28mm takes a bigger table than I can manage. 15mm might have been an option, but there is a dearth of figures for the campaign. Amazes me that we can have dozens of different ranges for a French napoleonic fusilier or ECW pikeman, but none for German askaris. Opted for 10mm based on the Pendraken ranges. Don’t have specifics for everything, but the smaller scale makes it easier to use figures that are close, such as Boers for Schutztruppen. Smaller scale means that I should be able to paint them a bit quicker – at least that ‘s the theory.
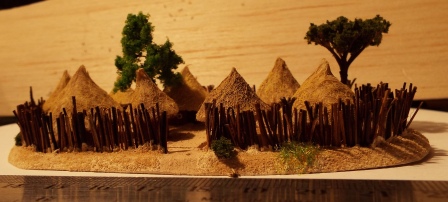
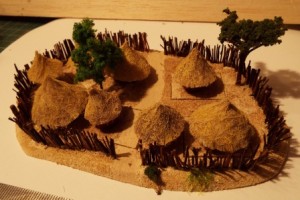
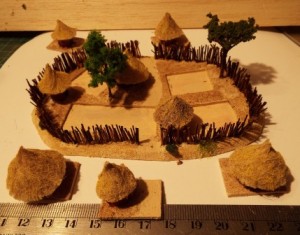
Still waiting for my figures to be delivered, so have started turning out some terrain. First bit is an African village – some huts surrounded by a palisade. I decided that I wanted to be able to put troops in there if necessary, so I made 5 lift-out bases which could be replaced by troop bases if the village is occupied. The base size in the ITSLU rules from Two Fat Lardies is 2.5cm by 2 cm. I decided on 5 bases being enough for 1 company and an accompanying Machine gun.
The base for the village is made of 2 layers of artists mounting board. I cut the base spaces out of the top layer, and glued them together. I then cut a slot in the top layer around the perimeter to take the palisade, leaving 2 gaps as entrances.
The palisade consists of sections of bristle from a scrubbing brush. They are stiff natural bristles, as opposed to the softer coir bristles on some brushes. Mine was £2 from Robert Dyas – I’m sure other sales outlets are available. They always say that on the BBC. A bit haphazard and irregular is the look I was aiming for. Next the huts. Went for round huts. Used sections of bamboo and balsa dowel to get a variety. Cut sections around 12mm high or therabouts. To make the roofs, I cut a disk of card, cut out a wedge and turned it into a cone so that when glued to the cylindrical hut base, gave me an overlap of a couple of millimetres all round. When that is dry, use scissors to cut a small bunch of the fibres from cream-coloured teddy-bear fur.Th bunch is then glued to the cone roof, with the fibres running down the roof and overlapping the card by a another couple of millimetres. Using thinned wood glue I then use a brush and lay it over the fur to glue the fibres down.
Allow these to dry, then using scarp scissors, neaten the bottom edge. Paint the walls a red-brown, with a black panel for the entrance. I applied simple patterns to a couple of them but to be honest, I don’t think it was worth the effort. Dry-brush the roof with a sand colour, and highlight with a little yellow. I then applied sand-coloured smooth masonry paint to the slots in the village base and allow it to dry. I will texture the bases with sand and don’t want it in the slots because the bases won’t then sit in them properly. I then apply the base paint to the rest of the village bases and the hut bases, and scatter some fine sand over them to give it some texture. When that is dry, I apply a very thin wash of dark brown to pick out the texture, to try and provide more contrast with the hut roofs.
Finally I glue the huts which are to be permanently attached to the village base in place, add a couple of trees and a few small bushes and tufts of grass. Job done. The ruler is included in the picture to show the scale. First pic shows the huts in place, second shows the bases taken out to allow troop bases to be put in place. Sadly, no toys yet to show this.

Leave a Reply